
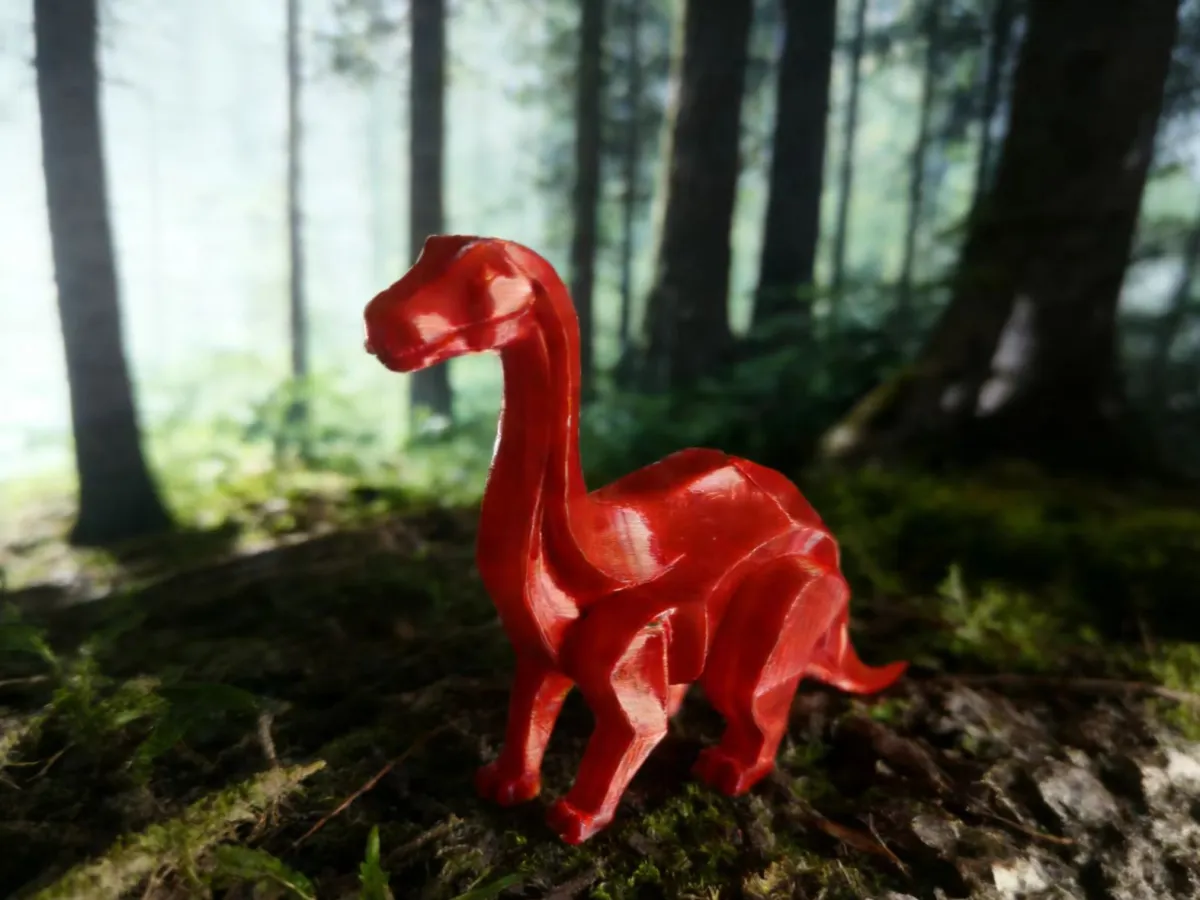


Geometric Brachiosaurus OnePiece Design
3D Printed Art Decor Handle with Care
Fragile Limbs Do Not Bend
Fragile Tail Remove Supports Gently
No Glue Required Fully Integrated
Supports Needed Brim Recommended
Geometric Facade Modern Art Style
Prehistoric Creature Geometric Reimagined
Desktop Art Brachiosaurus Figurine
Delicate Structure Avoid Dropping
Optimal Layer Height 01502mm
Recommended PLA Filament
Remove Supports Slowly Gently
Sharp Head Avoid Impact
Fully Integrated No Assembly
Jurassic Inspiration Geometric Aesthetics
Do Not Lift by Neck or Tail
Supports Required for Overhangs
Home Office Art Decoration
Fragile Model Keep Away from Children

- 0.2 mm layer height, 3‑layer walls, 15% infill density

1-disc
PLA
Designer

2

0
Comprehensive Design and Fabrication of a Geometric Faceted Brachiosaurus 3D Print Model
Foreword
In the context of today’s deep integration between cultural and creative design and 3D printing technology, the artistic reimagining of biological forms has emerged as a key development direction in the field of model design. The geometric faceted Brachiosaurus 3D print model presented here takes the Jurassic-era sauropod Brachiosaurus as its biological prototype. Departing from the intricate textures of traditional realistic sculptures, this model employs a minimalist geometric faceting aesthetic to deconstruct and reshape the form—blending the majestic grandeur of ancient creatures with the sharp, clean lines of modern industrial design to create a one-piece decorative piece that balances artistic appeal, structural stability, and 3D printing compatibility. Unlike conventional segmented dinosaur models available on the market, this model features an integrated, non‑disassemblable design that not only preserves the model’s overall integrity and tactile quality but also significantly reduces the difficulty of post‑printing assembly. It is ideally suited for a wide range of applications, including desktop decoration, cultural and creative collectibles, art exhibitions, and 3D printing education. This article offers a comprehensive and in‑depth exploration of the model—from tracing its design inspiration and defining core printing requirements to outlining fabrication equipment standards, post‑processing techniques, and structural protection guidelines—providing a complete guide for 3D printing enthusiasts, cultural and creative designers, and model collectors alike.
I. Origins of Design Inspiration
(1) Biological Prototype: The Aesthetic Form of Ancient Brachiosauruses
As one of the most iconic sauropod dinosaurs of the Jurassic period, the Brachiosaurus captivated observers with its elongated neck, massive body, and sprawling limbs—features that made it instantly recognizable among ancient creatures. Its biological form embodied the ultimate beauty of natural evolution: the rhythmic elegance conveyed by its long neck, the powerful strength of its sturdy limbs supporting its immense frame, and the graceful balance achieved through its long tail—all combining to create a biomorphic silhouette rich in artistic tension. Through meticulous study of the Brachiosaurus’ anatomical proportions, the designer retained the species’ defining characteristics—its ultra‑long neck, robust torso, quadrupedal stance, and long tail trailing along the ground—ensuring that even after artistic reinterpretation, viewers could still clearly identify the Brachiosaurus’ biological identity while capturing the awe‑inspiring presence of these ancient giants.
At the same time, as one of Earth’s “giant beasts” of the prehistoric era, the Brachiosaurus symbolized resilience, strength, and vitality. By choosing this creature as the design prototype, the model transcends mere decoration, imbuing itself with deeper spiritual meaning. While satisfying the public’s innate curiosity about ancient life, the artistically refined treatment of this hard‑hitting prehistoric figure allows it to seamlessly integrate into contemporary home and office decor, achieving a harmonious fusion of ancient civilization and modern aesthetics.
(2) Artistic Style: Deconstructing and Reimagining with Geometric Faceting
The core inspiration for this design stems from modern geometric minimalism and Cubist art. Cubism sought to break free from the smooth, curvilinear surfaces of nature, dissecting objects into combinations of geometric facets. By juxtaposing angles, lines, and planar surfaces, Cubist artists crafted visually striking works that challenged conventional perceptions of form. In contrast to the smooth, organic textures of traditional dinosaur models, the designer disassembled the Brachiosaurus’ head, neck, torso, limbs, and tail into regular geometric facets—triangles, quadrilaterals, and polygons—and used the interplay of these facets’ transitions, joins, and overlaps to reshape the creature’s contours, resulting in a visual aesthetic that is crisp, angular, and undeniably sophisticated from every angle.
Geometric faceting is not only an aesthetic innovation—it also optimizes 3D printing compatibility. Curved surfaces are prone to visible layer lines and printing distortions, whereas the angular structure of geometric facets effectively minimizes layer artifacts and enhances the finished model’s refinement. Moreover, the regular planar geometry facilitates efficient slicing during 3D printing, ensuring structural stability throughout the one‑piece manufacturing process and striking a perfect balance between artistic expression and printing technology.
(3) Application Scenarios: Cultural and Creative Decor for Modern Spaces
As young consumers increasingly demand personalized cultural and creative products, traditional realistic models can no longer fully meet the decorative needs of modern spaces. The geometric faceted Brachiosaurus model targets contemporary interiors characterized by minimalist, industrial, and streamlined aesthetics. With clean lines, sharp silhouettes, and a high‑end finish, it sheds the “childish” label often associated with dinosaur models, offering a light‑luxury decorative piece suitable for all age groups. Whether displayed on a desk, arranged on a bookshelf, or used as a cultural gift or 3D printing teaching aid, the model adapts perfectly to diverse settings—this is precisely the key source of inspiration behind the design: to extend 3D printing beyond industrial manufacturing and transform it into a practical tool that serves everyday aesthetics.
II. Core Printing Requirements for the Model
This model features a one‑piece, non‑disassemblable design that requires no assembly or joining at any stage. As such, strict adherence to 3D printing parameters, structural support, and printing processes is essential to ensure both successful printing and high model quality. Below are the core printing specifications that must be meticulously followed to maximize printing success and maintain model integrity.
(1) Support Structure Requirements: Must Be Added—and Precisely Applied
1. Necessity of Support: Due to the model’s numerous overhanging structures—including the ultra‑long neck, outer sides of the limbs, middle section of the tail, and sharp corners of the head—without support, printing would result in issues such as sagging, misaligned layers, and structural deformation. Therefore, adding support structures is critical to ensuring the model’s complete and accurate formation.
2. Support Coverage Areas: All overhanging angles greater than 45° must be precisely covered—specifically the area beneath the neck, the junctions between the limbs and torso, the upper half of the tail, and the prominent facets of the head. Partial omissions of support are unacceptable; at the same time, support density should be moderate—too dense increases removal difficulty, while too sparse fails to provide adequate support. A recommended support density of 10–15% strikes the right balance.
3. Support Type Selection: Tree‑like or linear supports are highly recommended. Compared to block supports, these types offer moderate adhesion, easy removal, and minimal risk of leaving large-scale damage on the model’s surface, preserving the delicate geometric facets to the greatest extent possible.
(2) Skirt Feature Requirements: Recommended to Enable—for Enhanced Adhesion
1. Necessity of the Skirt: This model is designed as a standing structure with a relatively small contact area at the base. During printing, the bottom edge may lift or shift, leading to printing failures. Enabling the skirt feature—using a circular auxiliary border around the model’s base—to increase the contact area between the model and the print bed helps securely anchor the base, preventing lifting and shifting that could cause printing errors.
2. Skirt Parameter Settings: A skirt width of 3–5 mm is recommended, with a thickness matching the model’s base layer. This ensures strong adhesion without excessively occupying print bed space, while also making post‑printing removal more convenient.
(3) Glue Usage Requirements: No Glue Needed—One‑Piece Manufacturing
This model employs a fully enclosed, one‑piece design with no separate head, limbs, or tail components. Once printing is complete, the model is a fully formed, finished product—no glue is required for assembly or bonding. The glue‑free design not only eliminates potential gaps that might detract from the model’s aesthetic appeal but also simplifies post‑processing, making it ideal for novice users with little to no prior model‑making experience.
(4) Support Removal Requirements: Handle with Care—Prioritize Protection
Removing support structures is the most likely stage to cause damage. Because the limbs, tail, neck, and sharp corners of the head are slender structures with brittle geometric facets, the following precautions must be strictly observed when removing supports:
1. Tool Selection: Use precision tools such as needle‑nose pliers, craft knives, or specialized support‑removal pliers. Never attempt to tear or forcibly break off supports by hand;
2. Operational Guidelines: Slowly peel away supports starting from the base, first removing larger areas of support before carefully addressing residual supports along the edges and corners of the model. When working on the limbs, tail, or neck, use one hand to gently support the main body of the model while using the other hand to perform delicate operations—avoid applying excessive force that could lead to structural fractures;
3. Residual Glue Handling: If a small amount of adhesive residue remains, lightly sand it down with fine‑grit sandpaper—but never scrape aggressively across the sharp edges of geometric facets.
(5) Printing Dimensions and Precision Requirements
1. Recommended Printing Dimensions: A height of 15–25 cm and a length of 20–30 cm strike the ideal balance between detailed rendering and structural strength, minimizing the risk of breakage;
2. Printing Precision: Set the layer thickness to 0.15–0.2 mm—this precision allows for crisp, well‑defined geometric facets while avoiding overly heavy layer lines that could compromise the model’s aesthetic appeal;
3. Infill Settings: Maintain an infill density of 15–20%, balancing the model’s weight with structural integrity—neither too lightweight and cheap‑looking nor so heavy that the base becomes prone to compression and deformation.
III. Printing Equipment Overview
(1) Compatible 3D Printer Models
This model is compatible with FDM (Fused Deposition Modeling) 3D printers—the most widely used household and commercial printer models currently available, boasting exceptional compatibility. Specific requirements are as follows:
1. Print Bed Size: The print bed must exceed the model’s maximum dimensions; standard desktop‑class FDM printers (with a print bed size of 200×200 mm or larger) are fully capable of printing this model;
2. Printing Precision: Supports precision of 0.1 mm or higher, ensuring that the geometric facets’ sharp edges are accurately rendered;
3. Printer Type: Both entry‑level home printers and professional commercial FDM printers are suitable—there are no special model restrictions.
(2) Recommended Printing Materials
1. Preferred Materials: PLA (the top choice) and PETG
- PLA: Low melting point, odorless during printing, excellent forming properties, and moderate hardness—perfect for rendering the sharp edges of geometric facets while resisting warping. It’s ideal for beginners and represents the optimal material choice for this model;
- PETG: More resilient and durable, with superior impact resistance and wear‑resistance. Printed pieces are less likely to fracture, making PETG an excellent option for models intended for long‑term display or frequent handling. While PETG offers better toughness than PLA, it does present slightly higher printing challenges.
2. Prohibited Materials: ABS—prone to warping and significant shrinkage, which can cause the model’s base to deform, making it unsuitable for printing standing structures.
3. Material Colors: Solid colors—black, white, gray, red, blue, etc.—best highlight the linear qualities of geometric facets. Avoid using mixed colors or fluorescent materials, which can dull the model’s premium aesthetic.
(3) Auxiliary Printing Equipment
1. Print Bed: Glass or PEI print beds are recommended—they offer moderate adhesion, making it easy to remove the model after printing without damaging the base;
2. Slicing Software: Compatible slicing software includes Cura, PrusaSlicer, Chitubox, and other common FDM slicers. When slicing, be sure to enable support detection and skirt functionality, and set parameters with precision;
3. Post‑Processing Tools: Needle‑nose pliers, support‑removal pliers, craft knives, 400–1000 grit sandpaper, and polishing blocks are essential for support removal and edge finishing;
4. Protective Gear: Disposable gloves and safety goggles (optional) help prevent dust from contacting skin or entering the eyes during sanding.
IV. Structural Protection and Daily Maintenance Guidelines
(1) Prioritize Protection for Vulnerable Areas
Although this model is a one‑piece construction, the forelimbs, hindlimbs, tail, neck, and sharp corners of the head are all areas of weak stress and are particularly susceptible to damage. These areas require special attention:
1. Placement: Choose a flat, stable surface—avoid placing the model on edges or elevated surfaces to prevent drops that could break the limbs or tail;
2. Handling: When moving the model, support the base of the torso with one hand and hold the neck with the other. Never lift the neck, tail, or limbs directly—doing so could place undue stress on these fragile areas and lead to fractures;
3. Cleaning: Gently wipe away surface dust with a soft brush or dry cloth—never submerge the model in water or scrub vigorously, as this could wear down the sharp edges of the geometric facets.
(2) Environmental Requirements for Daily Maintenance
1. Temperature: Avoid prolonged exposure to high‑temperature environments—such as direct sunlight or near heating vents. PLA and PETG materials tend to soften and deform under high heat, potentially causing the neck or tail to bend;
2. Humidity: Keep the environment dry and well‑ventilated—moisture can accelerate material aging and discoloration;
3. Impact Protection: Never store the model alongside sharp or hard objects—prevent accidental impacts that could chip or dent the sharp edges of geometric facets.
V. Summary of Value in Model Design and Printing
The geometric faceted Brachiosaurus 3D print model stands as a quintessential example of the intersection between 3D printing technology and modern artistic design. It breaks free from the limitations of traditional biological modeling, reimagining ancient dinosaurs through a geometric aesthetic while simultaneously lowering the barrier to entry for 3D printing through optimized, one‑piece designs—making it accessible even for casual hobbyists. From a design perspective, the model achieves a seamless fusion of ancient biological aesthetics and modern industrial design, blending artistry with visual appeal; from a technical standpoint, precise support and skirt settings, combined with compatibility with mainstream FDM printers, ensure both printing success and practical usability; and from a user perspective, the model’s glue‑free construction and easy maintenance make it a culturally creative decorative piece suitable for people of all ages.
Moreover, this model provides valuable insights for 3D printing–based cultural and creative design: by grounding designs in biological prototypes, centering them on artistic aesthetics, and leveraging printing technology as a foundation, we can strike the perfect balance between design beauty and technical feasibility—creating 3D print models that not only hold market value but also carry profound artistic significance. For hobbyists, building this model offers more than just the joy of 3D printing—it invites them to experience the captivating interplay between ancient life and modern art; for designers, the model’s design philosophy opens up new avenues for developing biological‑themed cultural and creative products.
Conclusion
The geometric faceted Brachiosaurus 3D print model reinterprets ancient biological forms with meticulous craftsmanship and brings artistic creation to life through advanced technology. From the very origins of its inspiration to the final stages of printing, every step of the process carefully considers aesthetics, technology, and practicality. By strictly adhering to the printing requirements, equipment standards, and maintenance guidelines outlined in this article, you can produce a complete, refined, and durable model. May this geometric Brachiosaurus—imbued with the vitality of ancient times and the sensibilities of modern art—bring creative joy to 3D printing enthusiasts, add a unique artistic touch to living spaces, and unlock even more possibilities for 3D printing in the realm of cultural and creative design.
Originality of the Model
The author declares that this work is their personally original model
This model is licensed under the following terms:
Credit must be given to the creator
Models(1)
- 几何长颈龙.3mfDesigner

1.53 MB

2026-02-13