




large
wall
artwork
huge
segments
drops
water
waves

- 0.2mm layer, 2 walls, 15% infill

1-disc
PLA
Designer - 0.2mm layer, 2 walls, 15% infill
25-disc
PLA
Designer

2

0
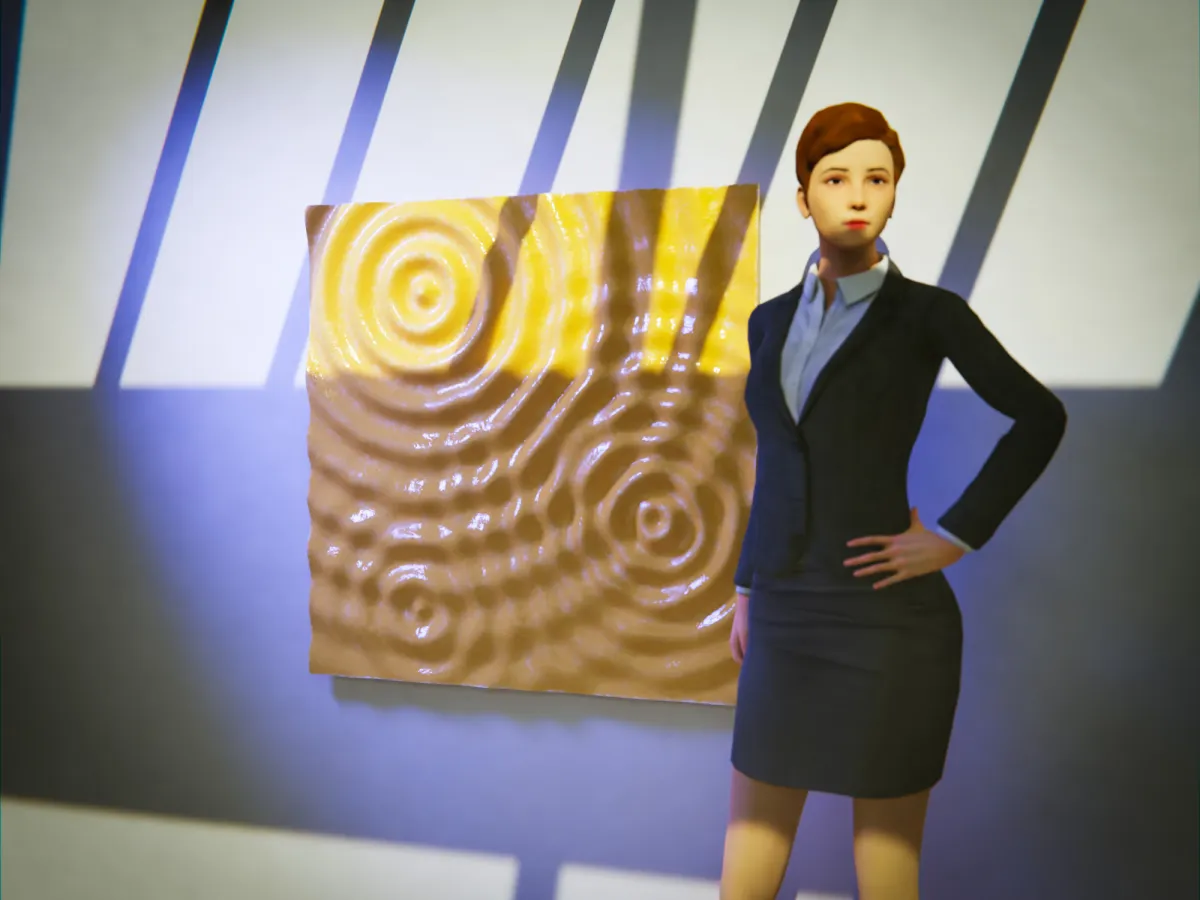
This is a large and beautiful sculpture/artwork you can print and paint. The full dimension of the final artwork is 1x1 meters, or 100x100cm (~40x40 inches). The height of the relief is 3cm (~1 inch) at the highest point.
The woman in the rendered image gives you an impression of how large the final sculpture will get.
The Design
The design features three drop-like wave patterns that form beautiful inference patterns between them. Even this is not easily visible, I created the pattern in a way to reduce the required material as much as possible. Flatter parts of the waves will also be thinner and therefore require less material.
I divided the artwork into 5x5 quadratic tiles with a length of 20cm. It is the perfect size to print on a Prusa MK3S printer. For an owner of the Prusa MINI, there is a slightly smaller version of the sculpture, with a tile length of 16cm.
Also, you can easily print just a 3x3, 3x5, 2x5 segment of the artwork, which will still look interesting and impressive on your wall.
Preview Print
There is a small 18cm preview print if you like to visualize the pattern on a smaller scale.
Required Material
- 4kg of cheap PLA filament.
- A plywood panel, in the same dimensions, to glue the tiles on it.
- Glue to fasten the tiles to the plywood panel. (e.g. epoxy-based glue).
- The idea is to paint this sculpture after printing:
- A can of primer that works on PLA.
- Acrylic paint for the colour and look you like.
- Wood filler, to fill the small gaps between the tiles after glueing.
- Sandpaper to smooth the roughest edges and remove small defects.
How to Print the Sculpture
The arrangement of the tiles is shown below. The shown number is the plate number.
| 21 | 22 | 23 | 24 | 25 |
| 16 | 17 | 18 | 19 | 20 |
| 11 | 12 | 13 | 14 | 15 |
| 6 | 7 | 8 | 9 | 10 |
| 1 | 2 | 3 | 4 | 5 |
The print will take a about 7-14 days with one printer. Make sure to label each printed tile with its number.
Assembly
- Cut a plywood panel to the final dimensions of the artwork (e.g. 100x100cm). Make sure it has a perfect right angle.
- Lightly sand the sides of the tiles to remove excess filament and seams.
- Arrange all tiles on the plywood and check if everything fits and looks good.
- Mark the position and number of all tiles with a grid.
- Start by glueing the first tile to the bottom left corner. Make sure it is perfectly flush with this side of the plywood and at the correct angle. Also, make sure it is correctly rotated!
- Glue the bottom row to the plywood.
- Continue with the rows above, until the sculpture is completed.
Finalize the Artwork
- Use sandpaper to smooth the waves as good as possible until the printed layers aren't strongly visible anymore.
- Apply multiple layers of primer, until you have a stable and smooth surface. Alternatively, use acrylic filler to smooth out the waves.
- Use acrylic paint with a brush or airbrush as you like to give the sculpture your personal touch.
Additional Ideas
- Use transparent or translucent filament and add a LED backlight to the piece.
- With transparent filament and backlight, only paint parts of the artwork for a special effect.
- Use shiny filament and a large nozzle to make all layers visible.
Happy printing! 😄
Bill of materials
- NameQuantityNotes
- 1Plywood Panel 100 x 100 cm1
Originality of the Model
The author declares that this work is their personally original model
This model is licensed under the following terms:
Credit must be given to the creator
Models(2)
- Elegoo_LR2201.3mfDesigner

9.11 MB

2025-11-14
- Elegoo_LR2201_18cm_preview.3mfDesigner
1.45 MB
2025-11-14


