




auto
automatic shutoff
auto power off
automatic power
automatic shutdown
cheap
easy
off
shutoff
anet
automatic power off
Anet A8
power
power off
shutdown
Automatic


8

1
The easiest way to equip your printer with the auto power off capability.
You don't need to print anything for this solution, at least one 3D fiile needed to publish this, thats why the mutyur.stl is in the project.
Ingredients:
- a two pole switch (if you don't have until now)
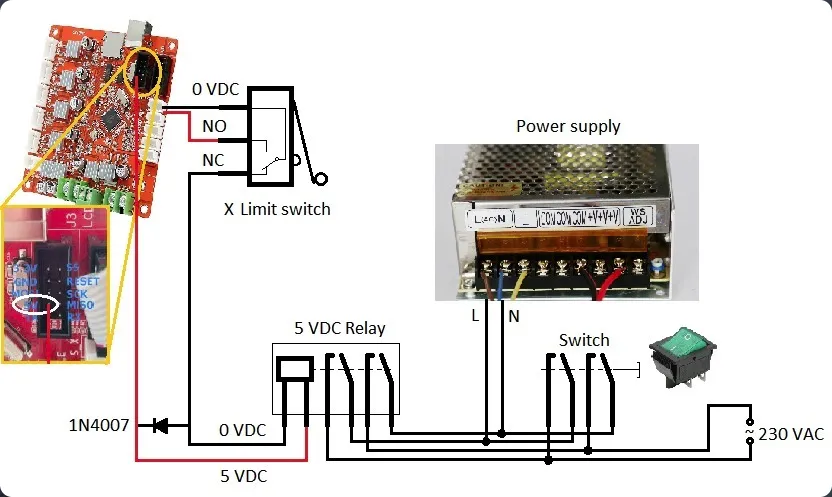
- a Relay with 5 VDC coil and with 2 pole 5A 250 VAC Normaly Open contacts,
I used the Omron G6B-2214P type, - a diode (flywheel diode to protect your board from the relay)
- ~50 cm twin cable
- cable lug (same which is on the X limit switch by default if you don't want to solder it)
Preparation:
- First of all you have to measure which is the 0V wire on the limit switch with a multimeter.
You can measure it between the power connector 0V (-) point of your main board and the limit swich cables. The printer must be powered on ad the X limit switch in open state.
The 0V wire must be on the common point of the limit switch, the other is on the NO point like on the picture. - Solder the cables and the diode (polarity correctly) to the relay,
- isolate the relay legs to avoid a short circuit (Insulating tape or shrinkable tube),
- plug the cables from the power supply to the limit switch.
The 0V wire to the limit switch's NC point and the 5VDC wire to the J3 connector 5V (Vcc) pin like on the picture, - connect the cables and the switch as shown. The preparation is done.
The necessary End G-code:
M104 S0 ;extruder heater off
M140 S0 ;heated bed heater off (if you have it)
G91 ;relative positioning
G1 E-1 F300 ;retract the filament a bit before lifting the nozzle, to release some of the pressure
G1 Z+10 E-5 X-20 Y-20 F9000 ;move Z up a bit and retract filament even more
G90 ;absolute positioning
G1 X-30 F5000 ;X close to endstop, YOU HAVE TO CHECK IT ON YOUR PRINTER!!!
G1 Y200 F2000 ; prepare for part removal
G1 X-33 F1000 ;X to endstop -> Shutdown, YOU HAVE TO CHECK IT ON YOUR PRINTER!!!
M107 ; turn off fan
M84 ;steppers off
The "G1 X-30" and the "G1 X-33" starting lines are especially for my printer, you have to check your printer by stepping the X axis in 1mm steps. Check where the limit switch is switching, replace the -33 with that value, and +3 to 5mm to the -30 where the printhead just not touching the limit switch.
Usage:
Power on your printer by the switch. Make bed leveling (if need). Start your print and wait until it heating and homeing, after the Start G-code is done and when the print is during normaly you can switch off the switch, the relay will provide the 230 VAC to the powersupply. When the print is done the End G-code is coming and the X limit switch is breaks the relay and the printer is shutting down.
Originality of the Model
The author declares that this work is their personally shared model

This model is licensed under the following terms:
Credit must be given to the creator
Models(2)
 Auto_Power_off_descriptions.txt
2.68 KB

2025-07-19
- mutyur.stl
0.67 KB
2025-07-19


