

Medieval Knights
Armor Warrior
Plate‑armored Knight
Knight Model
FDM Printing
Desktop Decorations
Figure model
Armor Model
European-style Knight
Gothic Armor
Toy figurines
Decorative ornaments
Boys’ Gifts
Game Models
Fantasy Warrior
Assembly Model
Support‑required printing
Need to print with a skirt.
Save Model
Warrior Figurine
Historical Model
European-style Armor

- 0.2 mm layer height, 3‑layer walls, 15% infill density

2-disc
PLA
Designer

2

0
1. Model Inspiration Sources
1. Core Historical Prototypes
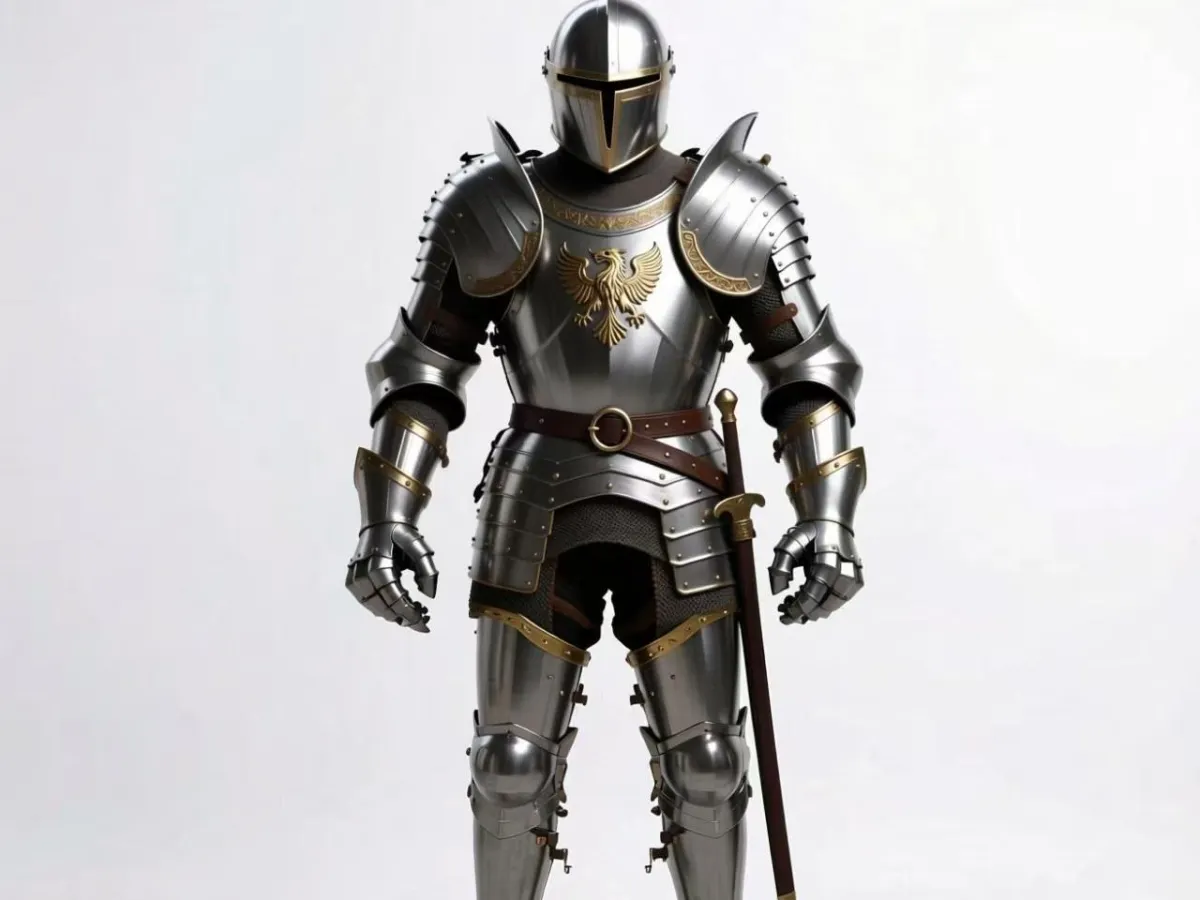
This model takes early 15th-century German Gothic plate armor as its core reference, blending it with the distinctive convex ridge design of the “Maximilian style” from the 16th century to faithfully recreate the iconic image of late medieval knights. During this period, plate armor reached its zenith in both protective performance and aesthetic appeal—striking a perfect balance between the loose, articulated structure of earlier mail armor and the excessive bulk seen in later tournament armor. It is widely regarded as the visual archetype of the “standard knight.”
The design draws heavily on实物 from European armory collections—such as the German field armor housed in the Wallace Collection—focusing on capturing the vertical, elongated silhouette of Gothic plate armor, its hinged joint mechanisms, and the characteristic convex ridge patterns of the Maximilian style. This approach not only ensures historical accuracy but also maximizes the feasibility of 3D printing.
2. Design Philosophy & Application Scenarios
- Functional Purpose: A tabletop display-grade figure that balances collectibility with DIY fun, specifically tailored for FDM print enthusiasts and optimized for home printer precision.
- Design Intent: To shatter the common misconception that “historical models = complex and difficult to print.” While faithfully reproducing the intricate details of the armor, we’ve streamlined the print geometry to reduce support requirements and simplify assembly. The inclusion of a detachable sword accessory enhances interactive assembly and satisfies modelers’ desire for creative accomplishment.
- Hidden Details & Easter Eggs: The armor’s surface features minimalist heraldic motifs—inspired by medieval knightly family crests—both honoring historical context and avoiding excessive carving that could lead to print artifacts like stringing or layer lines. The hand designs have been refined to ensure a secure grip on the sword accessory, eliminating the need for additional modifications.
3. Adaptation & Optimization Guidelines
To align with the unique characteristics of 3D printing, we made three key optimizations to the historical prototype:
1. The overhang angles of the shoulder and knee plates were adjusted to 40° (compared to approximately 30° in the original historical design), reducing support material while preserving the signature “expansive, protective” visual profile;
2. Armor seams—such as the junction between the breastplate and backplate—were widened to 0.8 mm, preventing detail loss during FDM printing;
3. The sword accessory adopts an “integrated hilt with detachable blade” design, offering robust structural integrity while simplifying post‑printing coloring and assembly.
2. Core Printing Requirements (FDM‑Specific, Precisely Tailored for Home Printers)
1. Equipment & Material Basics
Category | Core Requirement | Alternative Options | Prohibitions
Printer: Must feature auto‑leveling and closed‑loop temperature control; nozzle diameter of 0.4 mm (high‑precision models like the Technology T‑Zhi A1C are highly recommended). | 0.2 mm nozzle (for extreme detail, though speed must be reduced). | Avoid printers with nozzle wear exceeding 0.05 mm, as this can lead to noticeable stringing and poor surface finish.
Material: PLA+ is the preferred choice (high fluidity, excellent detail reproduction, minimal warping). PETG offers superior toughness and durability, ideal for frequent handling. | ABS is strongly discouraged due to its tendency to warp and its requirement for a sealed, temperature‑controlled environment—making it ill‑suited for home use.
Material Color: Silver or gunmetal gray (basic tones that facilitate easy post‑printing coloring). Black is ideal for creating aged or weathered effects. | Avoid transparent colors, which tend to reveal layer lines and increase post‑processing complexity.
2. Slicing Parameters (Critical! Prioritized by importance)
(1) Basic Precision Parameters (Determine Detail Reproduction)
- Layer Height: 0.1 mm (fine mode); for detailed areas such as shoulder plates and helmets, layer height can be reduced to 0.08 mm.
- Wall Width: 0.36 mm for outer walls (90% of nozzle diameter), 0.4 mm for inner walls.
- Wall Thickness: 1.2 mm (at least 3 times the nozzle diameter to ensure armor strength and prevent breakage).
- Infill Density: 15% (ideal for display models, balancing strength with material cost).
- Infill Pattern: Cubes (provide good stability and minimize internal collapse after support removal).
(2) Temperature & Speed Settings (Prevent Warping & Stringing)
- Nozzle Temperature: PLA+ – 205–215°C (first layer at 215°C, then reduce to 205°C for subsequent layers).
- Bed Temperature: 50–55°C (first layer at 55°C, then reduce to 50°C to avoid edge warping).
- Printing Speed: 20 mm/s for the first layer to ensure strong adhesion; 30 mm/s for outer walls, 50 mm/s for inner walls, and 40 mm/s for supports.
- Cooling Settings: Start the fan at 100% from the second layer onward, and automatically slow down to 25 mm/s for overhanging areas such as shoulder plates and sword blades.
(3) Supports & Rafts (Customized for This Model)
Support Requirements (must be enabled, with local support prioritized):
- Support Type: Tree‑like supports (reduce contact area and minimize residual marks).
- Support Density: 12% (balances ease of removal with sufficient support strength).
- Z‑Distance to Contact: 0.2 mm (specifically for fragile areas like the base of shoulder plates and helmets to prevent breakage during removal).
- Manual Support Addition: For the sword blade tip and the base of the knight’s chin, manually add 2 mm diameter support pillars.
- Prohibitions: Avoid using full‑model supports, as they can obscure armor textures and complicate removal.
Raft Requirements (strongly recommended):
- Raft Width: 6 mm (matches the contact area of both feet to prevent shifting during printing).
- Layers: 2 layers (easy to peel off without compromising the model’s bottom aesthetics).
- Adjustment: If bed adhesion is poor, use PVA spray to ensure the first layer adheres securely without warping.
3. Pre‑Printing Model Preparation (A Critical Step to Prevent Printing Failures)
1. Model Inspection: Use MeshMixer to check for non‑manifold edges and voids, repairing small gaps in shoulder plates and sword blades to ensure the model has no broken faces.
2. Orientation: Position the knight upright with both feet firmly pressed against the build plate and the helmet facing upward (the optimal orientation, reducing support needs while preserving the integrity of armor textures).
3. Scaling: We recommend printing at a height of 15–20 cm (below 15 cm risks losing fine details; above 20 cm increases the likelihood of edge warping).
4. Part Separation: This model is a two‑part design—“main body + detachable sword”—so no additional part separation is required; simply import the file directly into your slicing software.
4. Printing Environment & Equipment Calibration
- Environment: Maintain a temperature of 20–25°C and humidity below 60%, avoiding direct drafts near the printer (to prevent uneven cooling and deformation of PLA).
- Calibration: Before printing, ensure nozzle perpendicularity and bed levelness are calibrated, keeping tolerances within ±0.05 mm.
- Material Drying: PLA+ does not require drying—but if stored for more than 3 months, dry it at 60°C for 2 hours to eliminate air bubbles that could affect print quality.
3. Detailed Assembly Instructions (Including Post‑Processing, Beginner‑Friendly)
Pre‑Assembly Preparation
1. Tool & Material Checklist
Category | Essential Items | Recommended Brands | Purpose
Adhesive Tools: Low‑whitening CA fast‑curing glue, toothpicks, tweezers | Loctite 401 | Used for bonding sword accessories and repairing minor cracks.
Auxiliary Materials: Epoxy filler, sandpaper (600/1200/2000 grit) | Tamiya | Fills gaps and smooths layer lines.
Protective Gear: Gloves, safety goggles | — | Protect hands from adhesive and eyes from debris.
Cleaning Tools: Small brush, alcohol wipes | — | Remove print dust and residual adhesive.
2. Part Inspection & Pre‑Processing
1. Inventory Check: Confirm that you have 1 main knight body and 1 sword accessory—no parts missing.
2. Initial Inspection: Check shoulder plates and knee plates for cracks, and verify that the sword blade is intact. If there are minor cracks, use a toothpick dipped in a small amount of CA glue to repair them, then let them sit for 5 minutes to cure.
3. Cleaning: Use a brush to remove print dust from the part surfaces, and wipe bonding areas with alcohol wipes to remove oil and enhance adhesive strength.
Core Assembly Steps (Approximately 20 minutes total, including curing time)
Step 1: Remove Supports (The Most Critical Step—Prevent Damage to the Model)
1. Remove Main Body Supports: First, use diagonal pliers to trim away large supports far from critical details, then carefully chip away small supports at the base of shoulder plates and the helmet using a small craft knife.
- Key Note: Never force the shoulder plates apart—instead, gently scrape along the support contact lines with a craft knife to avoid cracking armor pieces.
2. Remove Sword Accessory Supports: Carefully pinch and remove supports at the sword blade tip with tweezers to avoid damaging delicate tip details.
3. Residual Cleanup: After removing all supports, lightly sand any remaining small residues with 600‑grit sandpaper to maintain a smooth surface.
Step 2: Sand Bonding Areas (Enhance Adhesion & Fit)
1. Knight’s Hand Grip Area: Lightly sand with 1200‑grit sandpaper to remove layer lines and ensure a tighter fit between the sword scabbard and the knight’s hand.
2. Sword Accessory Bonding Areas: For the crossguard (hand guard) and the blade connection point (if the sword was printed in separate parts), sand until there is no gap—ensuring the bond remains straight and true after assembly.
3. Cleaning: After sanding, use a brush to remove dust and prevent sandpaper particles from interfering with adhesive performance.
Step 3: Attach Accessories (Two‑Step Process for Precision)
1. Positioning: Use tweezers to hold the sword accessory, place it in the knight’s hand grip area, adjust the angle (with the sword blade pointing downward at a 15° angle relative to the body), and mark the bonding points.
2. Bonding:
- Dip a toothpick in a tiny amount of low‑whitening CA fast‑curing glue and apply it to the marked bonding points (only coat the bonding areas to avoid excess glue contaminating the armor).
- Quickly insert the sword accessory into the grip, hold it in place with tweezers for 10–15 seconds to ensure proper alignment.
- Let it sit for 5 minutes to allow the glue to fully cure—avoid touching it during this time.
Step 4: Fill Gaps (Optional—For a Seamless Finish)
1. If there are small gaps between the sword and the knight’s hand, use a toothpick to apply a small amount of epoxy filler, filling the gaps and smoothing the surface.
2. Once the filler has cured (approximately 1 hour), lightly sand the filled areas with 2000‑grit sandpaper to seamlessly blend the fill with the model’s surface.
Advanced Post‑Processing (Optional—Enhance Display Quality)
1. Sand Layer Lines (The Core Step)
- Rough‑sand with 600‑grit sandpaper to remove visible layer lines.
- Switch to 1200‑grit sandpaper for finer sanding, smoothing out any rough traces left by the coarse sanding.
- Finally, polish with 2000‑grit sandpaper to achieve a细腻 texture on the armor’s surface—no polishing compounds needed, as this could damage delicate details.
2. Coloring & Aging Effects (Maximize Historical Authenticity)
1. Primer: Apply a thin coat of silver metallic primer to cover the model’s surface and enhance its metallic质感.
2. Color Separation: Paint the helmet and sword blade in gunmetal gray, and apply bright silver to the armor’s convex ridges to create depth and dimension.
3. Aging Effects: Lightly dab black paint onto the armor’s seams using a sponge to simulate the wear and tear of medieval armor—perfectly aligned with historical context.
3. Protective Coating
After coloring, apply a clear, matte finish coat to protect against fading and scratching, extending the model’s lifespan.
Common Assembly Issues & Solutions
Issue | Cause | Solution
Sword Accessory Misalignment | Not properly secured before glue cured | Realign with tweezers, apply a small amount of glue, and extend the curing time.
Shoulder Plate Breakage | Excessive force applied when removing supports | Repair with CA glue and epoxy filler, wrapping the fractured area with a few strands of fiber to reinforce strength.
Glue Overflow & Surface Contamination | Applied too much glue | Wipe away excess glue promptly with alcohol wipes, then sand the affected areas with 2000‑grit sandpaper after curing.
4. Model Maintenance & Display Recommendations
1. Daily Maintenance
- Avoid direct sunlight (to prevent PLA material from yellowing and aging).
- Do not handle the model roughly—shoulder plates and sword accessories are delicate and prone to breakage.
- When cleaning, use a soft, dry cloth to wipe the surface gently; avoid washing with water (to prevent glue from peeling off).
2. Display Suggestions
- Placement: Pair the model with a medieval‑style base—such as a 3D‑printed castle or shield-shaped stand—to enhance the overall ambiance.
- Lighting: Illuminate the model with warm light shining from a slight angle above to highlight the armor’s convex ridges and metallic sheen.
- Storage: When not on display, store the model in a dust‑proof box to prevent dust accumulation and accidental impacts.
5. Summary
This medieval knight armor figure represents the perfect fusion of historical accuracy and practical 3D printing. Through precise slicing parameters and optimized structural design, even a home FDM printer can produce a finished model that boasts rich detail and robust construction. The detachable sword accessory not only adds to the creative enjoyment of assembly but also elevates the model’s collectible value.
By following these printing requirements and assembly steps, even beginners can easily navigate the entire process—from printing to display—and create their own collection of medieval knight figures.
Originality of the Model
The author declares that this work is their personally original model
This model is licensed under the following terms:
Credit must be given to the creator
Models(1)
- 中世纪铠甲人.3mfDesigner

24.61 MB

2026-02-21