


 GIF
GIF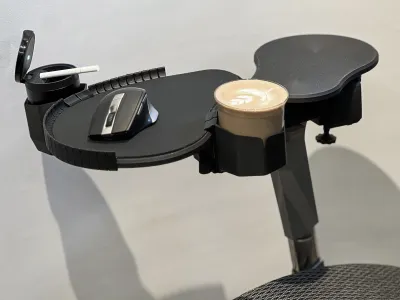


Better Workdays – Office Essentials
Mousepad
Computer Peripherals
Ergonomics
Mouse Pad

- Widened base and supports, ideal for armrests with widths ranging from 60 to 100 mm.

3-disc
PLA
Designer - 0.1 mm layer height, 2‑wall structure, 15% infill density
6-disc
PLA
Designer  Choose from two cup holder sizes, pen holders, and mouse pad cutting templates—simply select the accessories you need and print them yourself.
2-disc
PLA
Designer

847

55
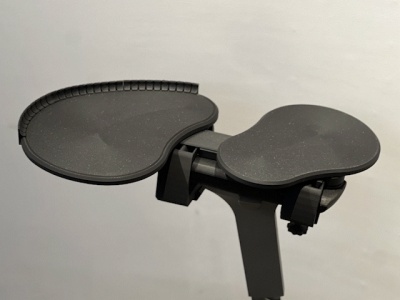
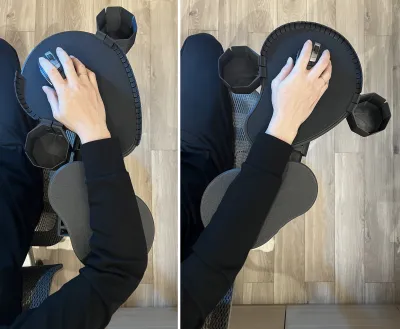
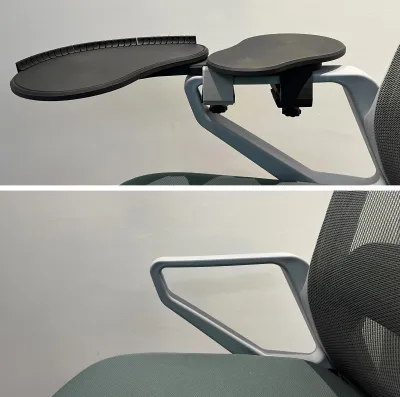
Save the shoulder, save the occupational disease, the liberation of the mouse
hand can be multi-angle adjustment, all-round support arm, free movement of the mouse tray
Design purpose:
Multi-directional adjustment, at any time to adapt to the arm and wrist posture, to provide more support; to avoid shoulder, arm for a long time in the computer desk hanging problem, so that the arm in the operation of the mouse more natural and easy placement, reduce shoulder pain problem.
The use of adjustable and telescopic structure, as well as flexible replacement of a variety of specifications of connectors, as far as possible to adapt to more specifications and styles of different chair armrests.
No additional purchase of hardware accessories installation, full 3D printing, free support printing loss.
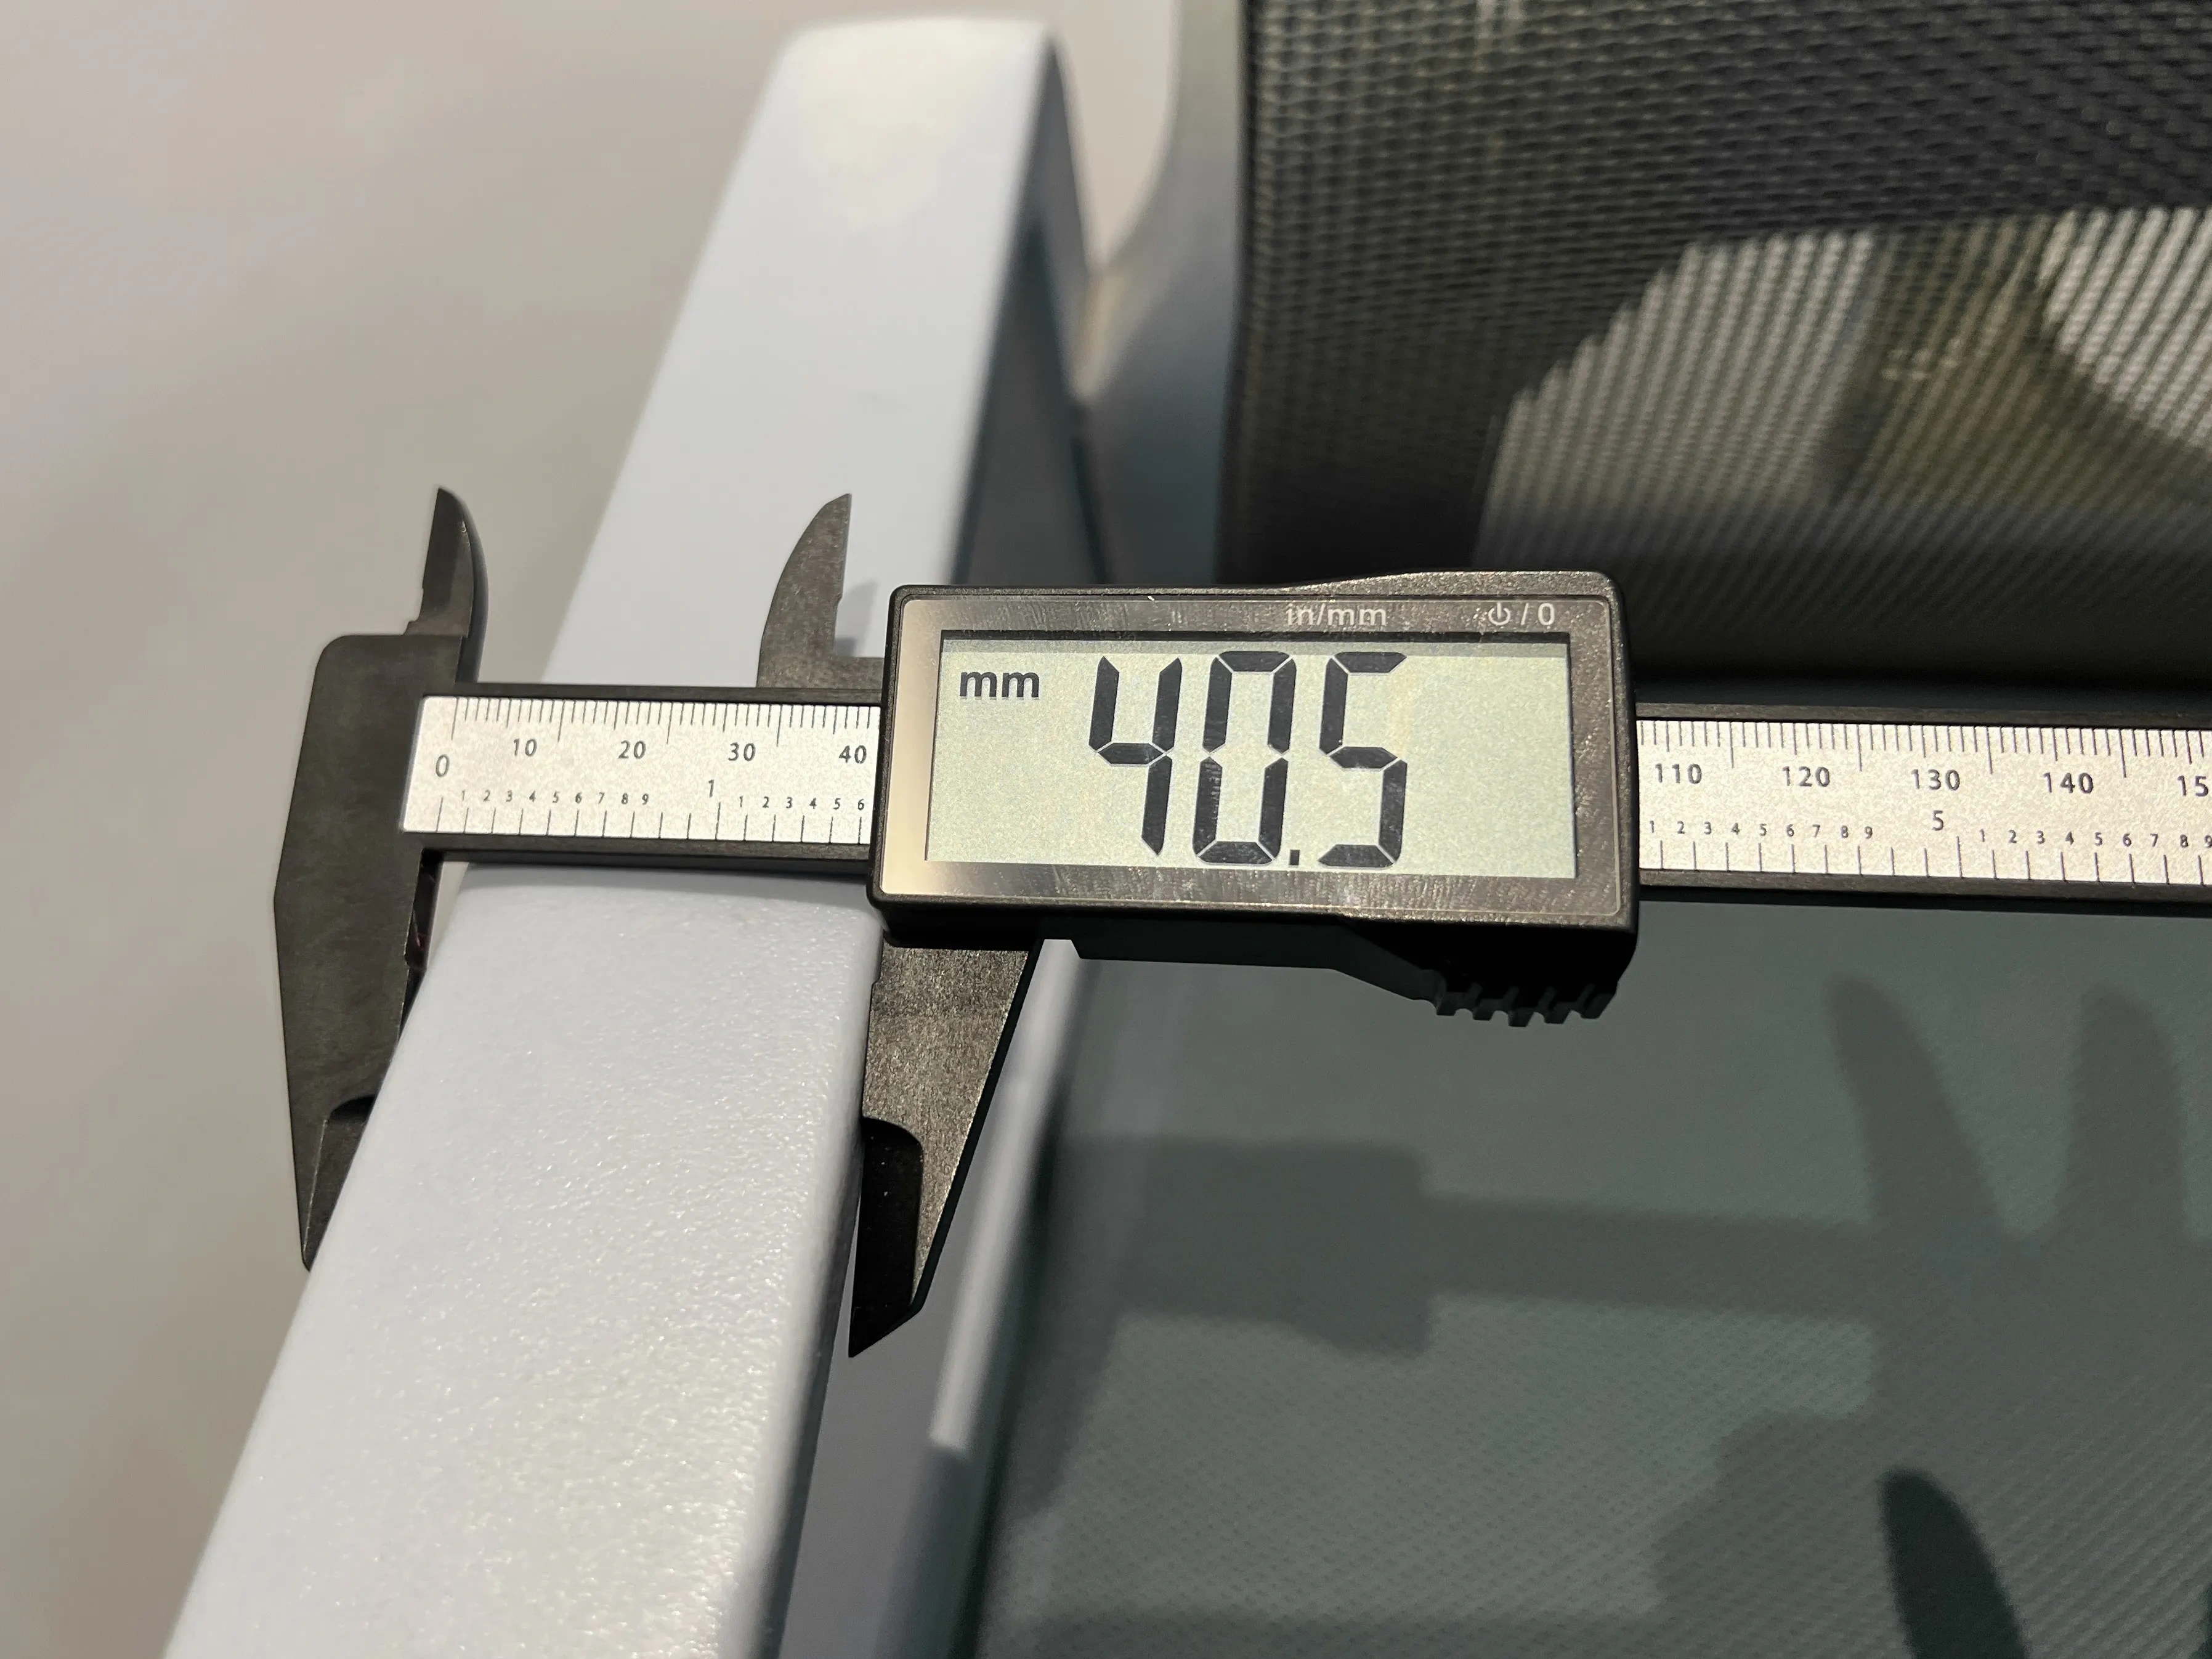
The chair armrest width 35 to 100mm, thickness 15 to 60mm can be installed.
Source:
As a heavy computer user, I am accompanied by the mouse for more than ten hours a day, fighting shoulder to shoulder periarthritis and cervical spondylosis every day. In addition, I have the habit of operating the computer with the back of my chair half lying or leaning back when I work for a long time. Comfortable use of the mouse has always been a big problem, but there are always many unsatisfactory products on the market.
has always wanted to make a convenient mouse tray since he started the 3D printer. He has drawn many drafts and printed paper plates. This time he took advantage of the thrust of the activity to realize his own idea. This is also one of the most complicated products made in the past half year since into the pit 3D printing.
, because the versatility of installation is considered at the beginning of the design, the trouble of buying various hardware accessories after printing is avoided. Then the obsessive-compulsive disorder occurred during the design and the design was designed with zero support. Therefore, the components were disassembled more finely and some assembly steps were added during the design. (Dig your own hole and jump yourself. . .) As a new player,
wasted a lot of time studying and learning software while printing the debugging structure of sample parts. As we didn't have time to shoot the installation video, we took more picture decomposition steps to explain the installation sequence and the selection criteria of accessory specifications as clearly as possible. Perhaps the assembly steps will be wordy and complicated, hoping to help you quickly and easily assemble and use, if you have time later, make another installation video.
The following are installation instructions
List of products:
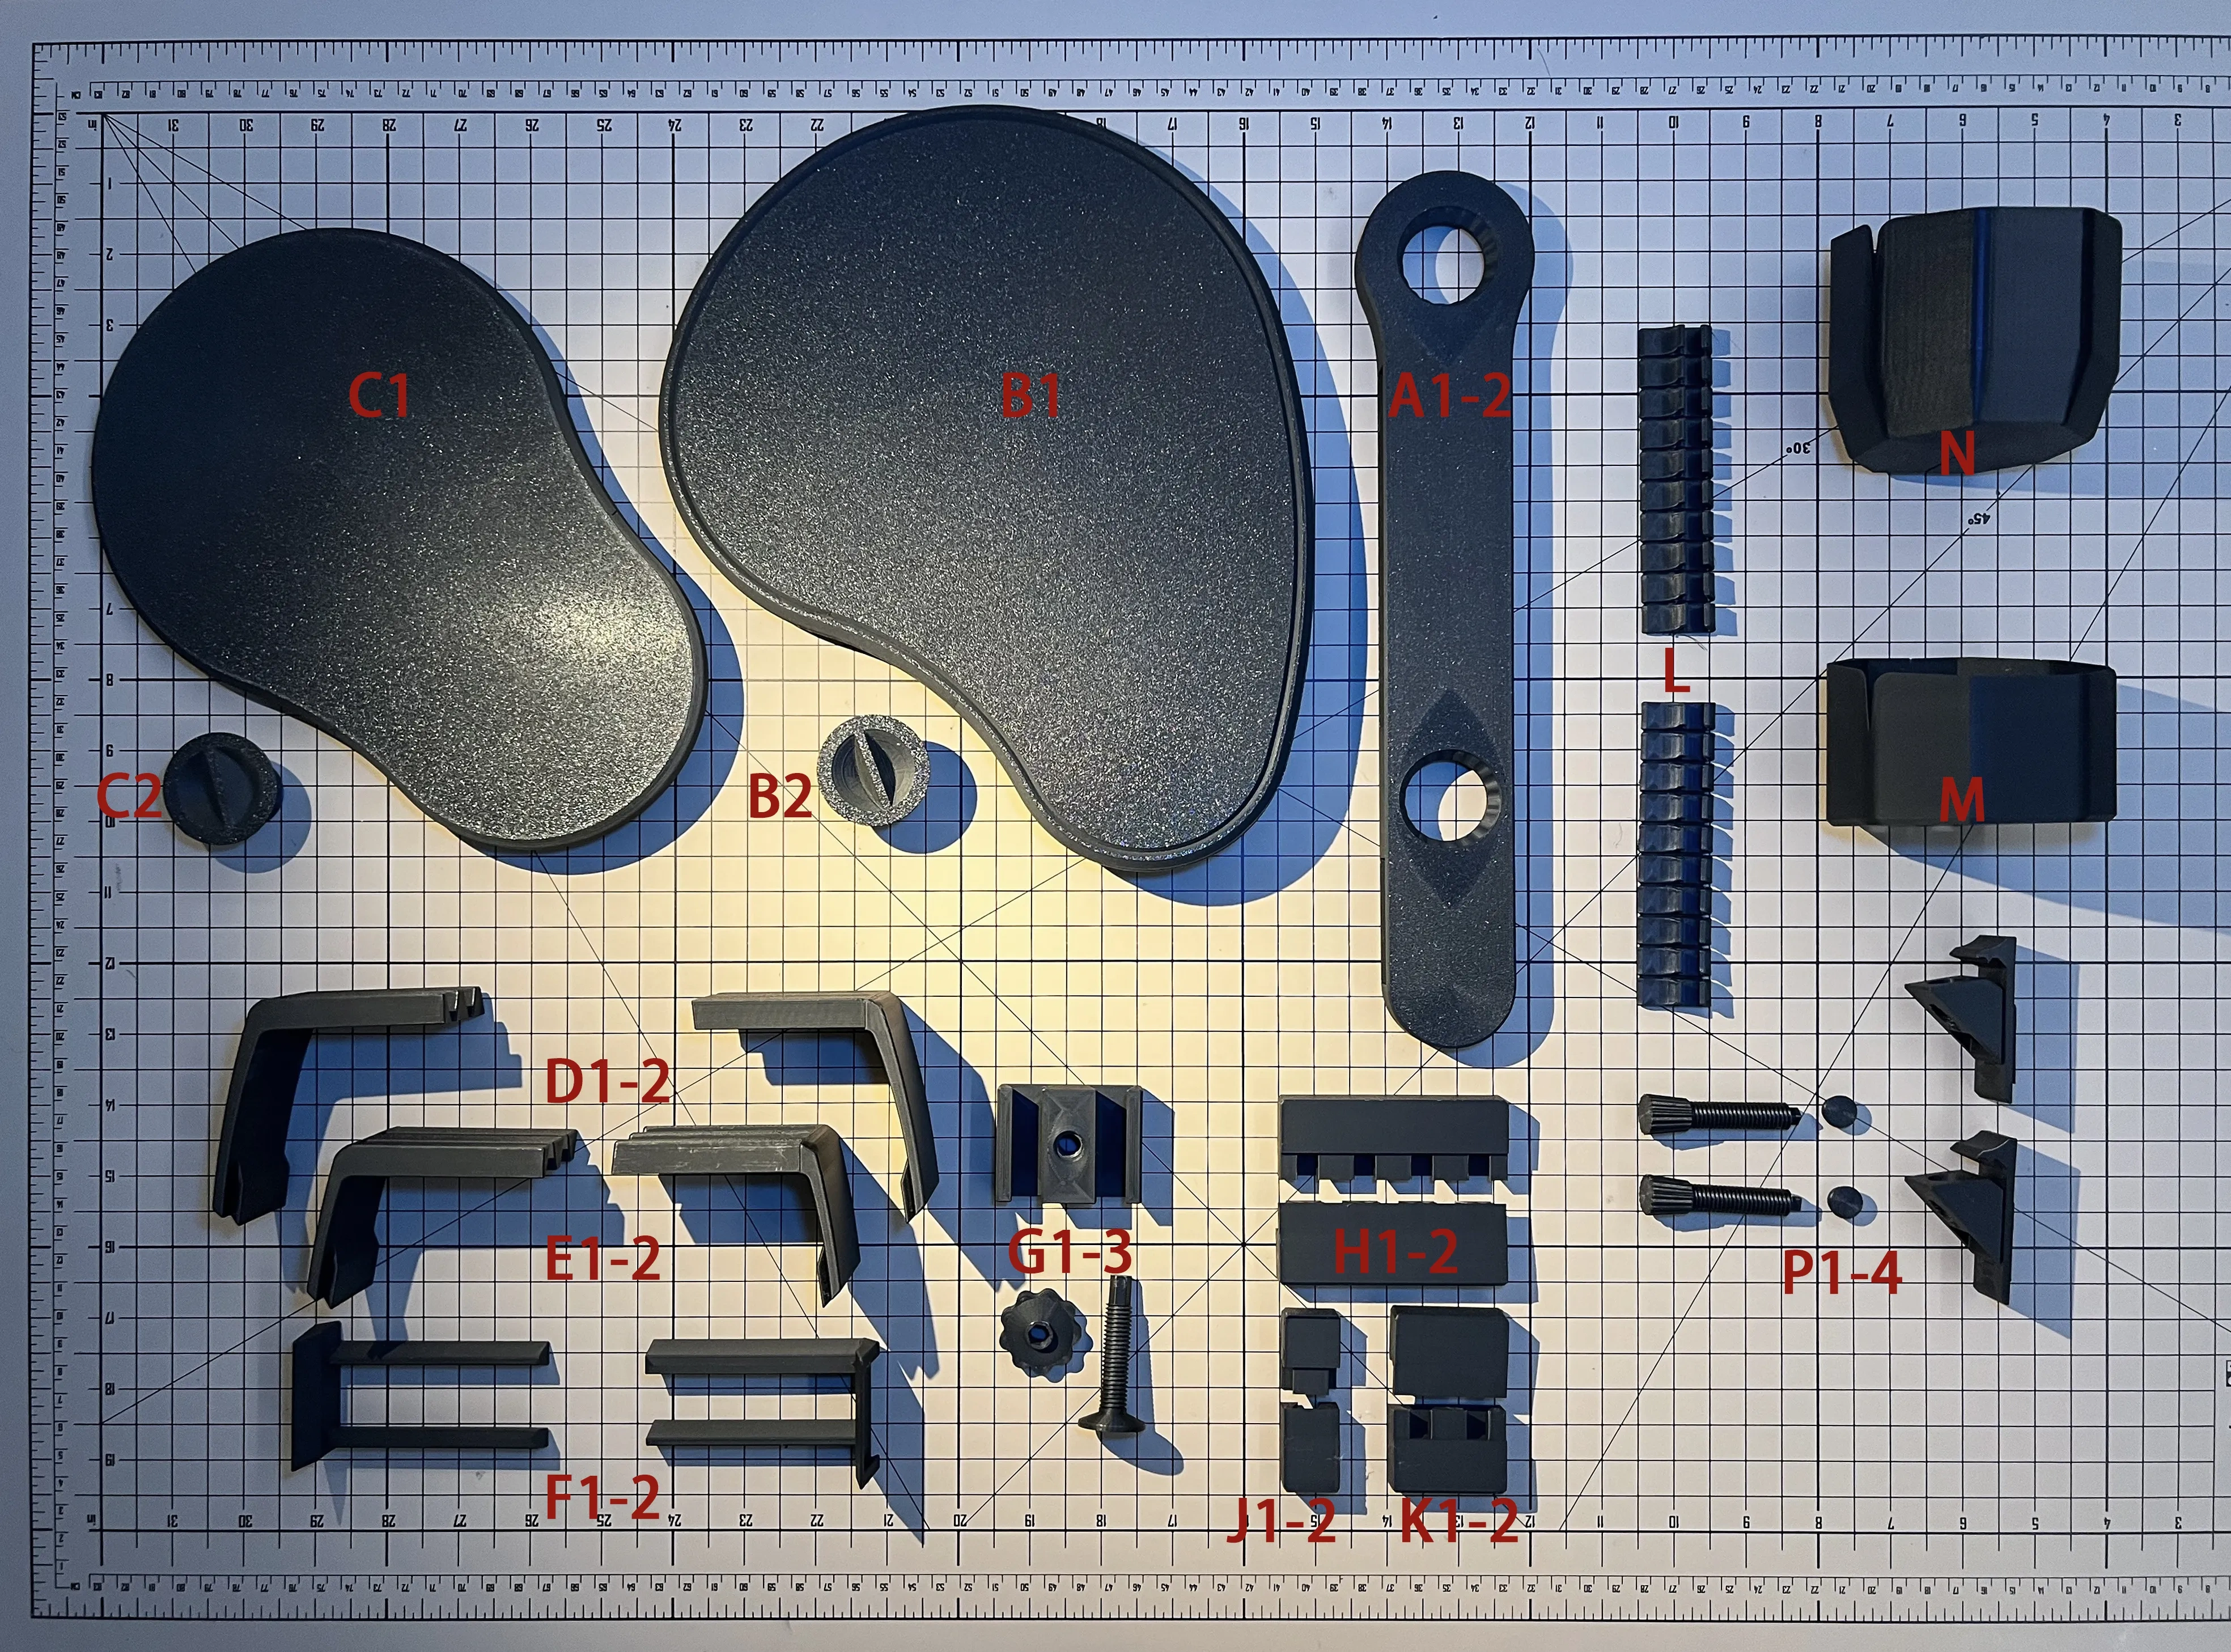
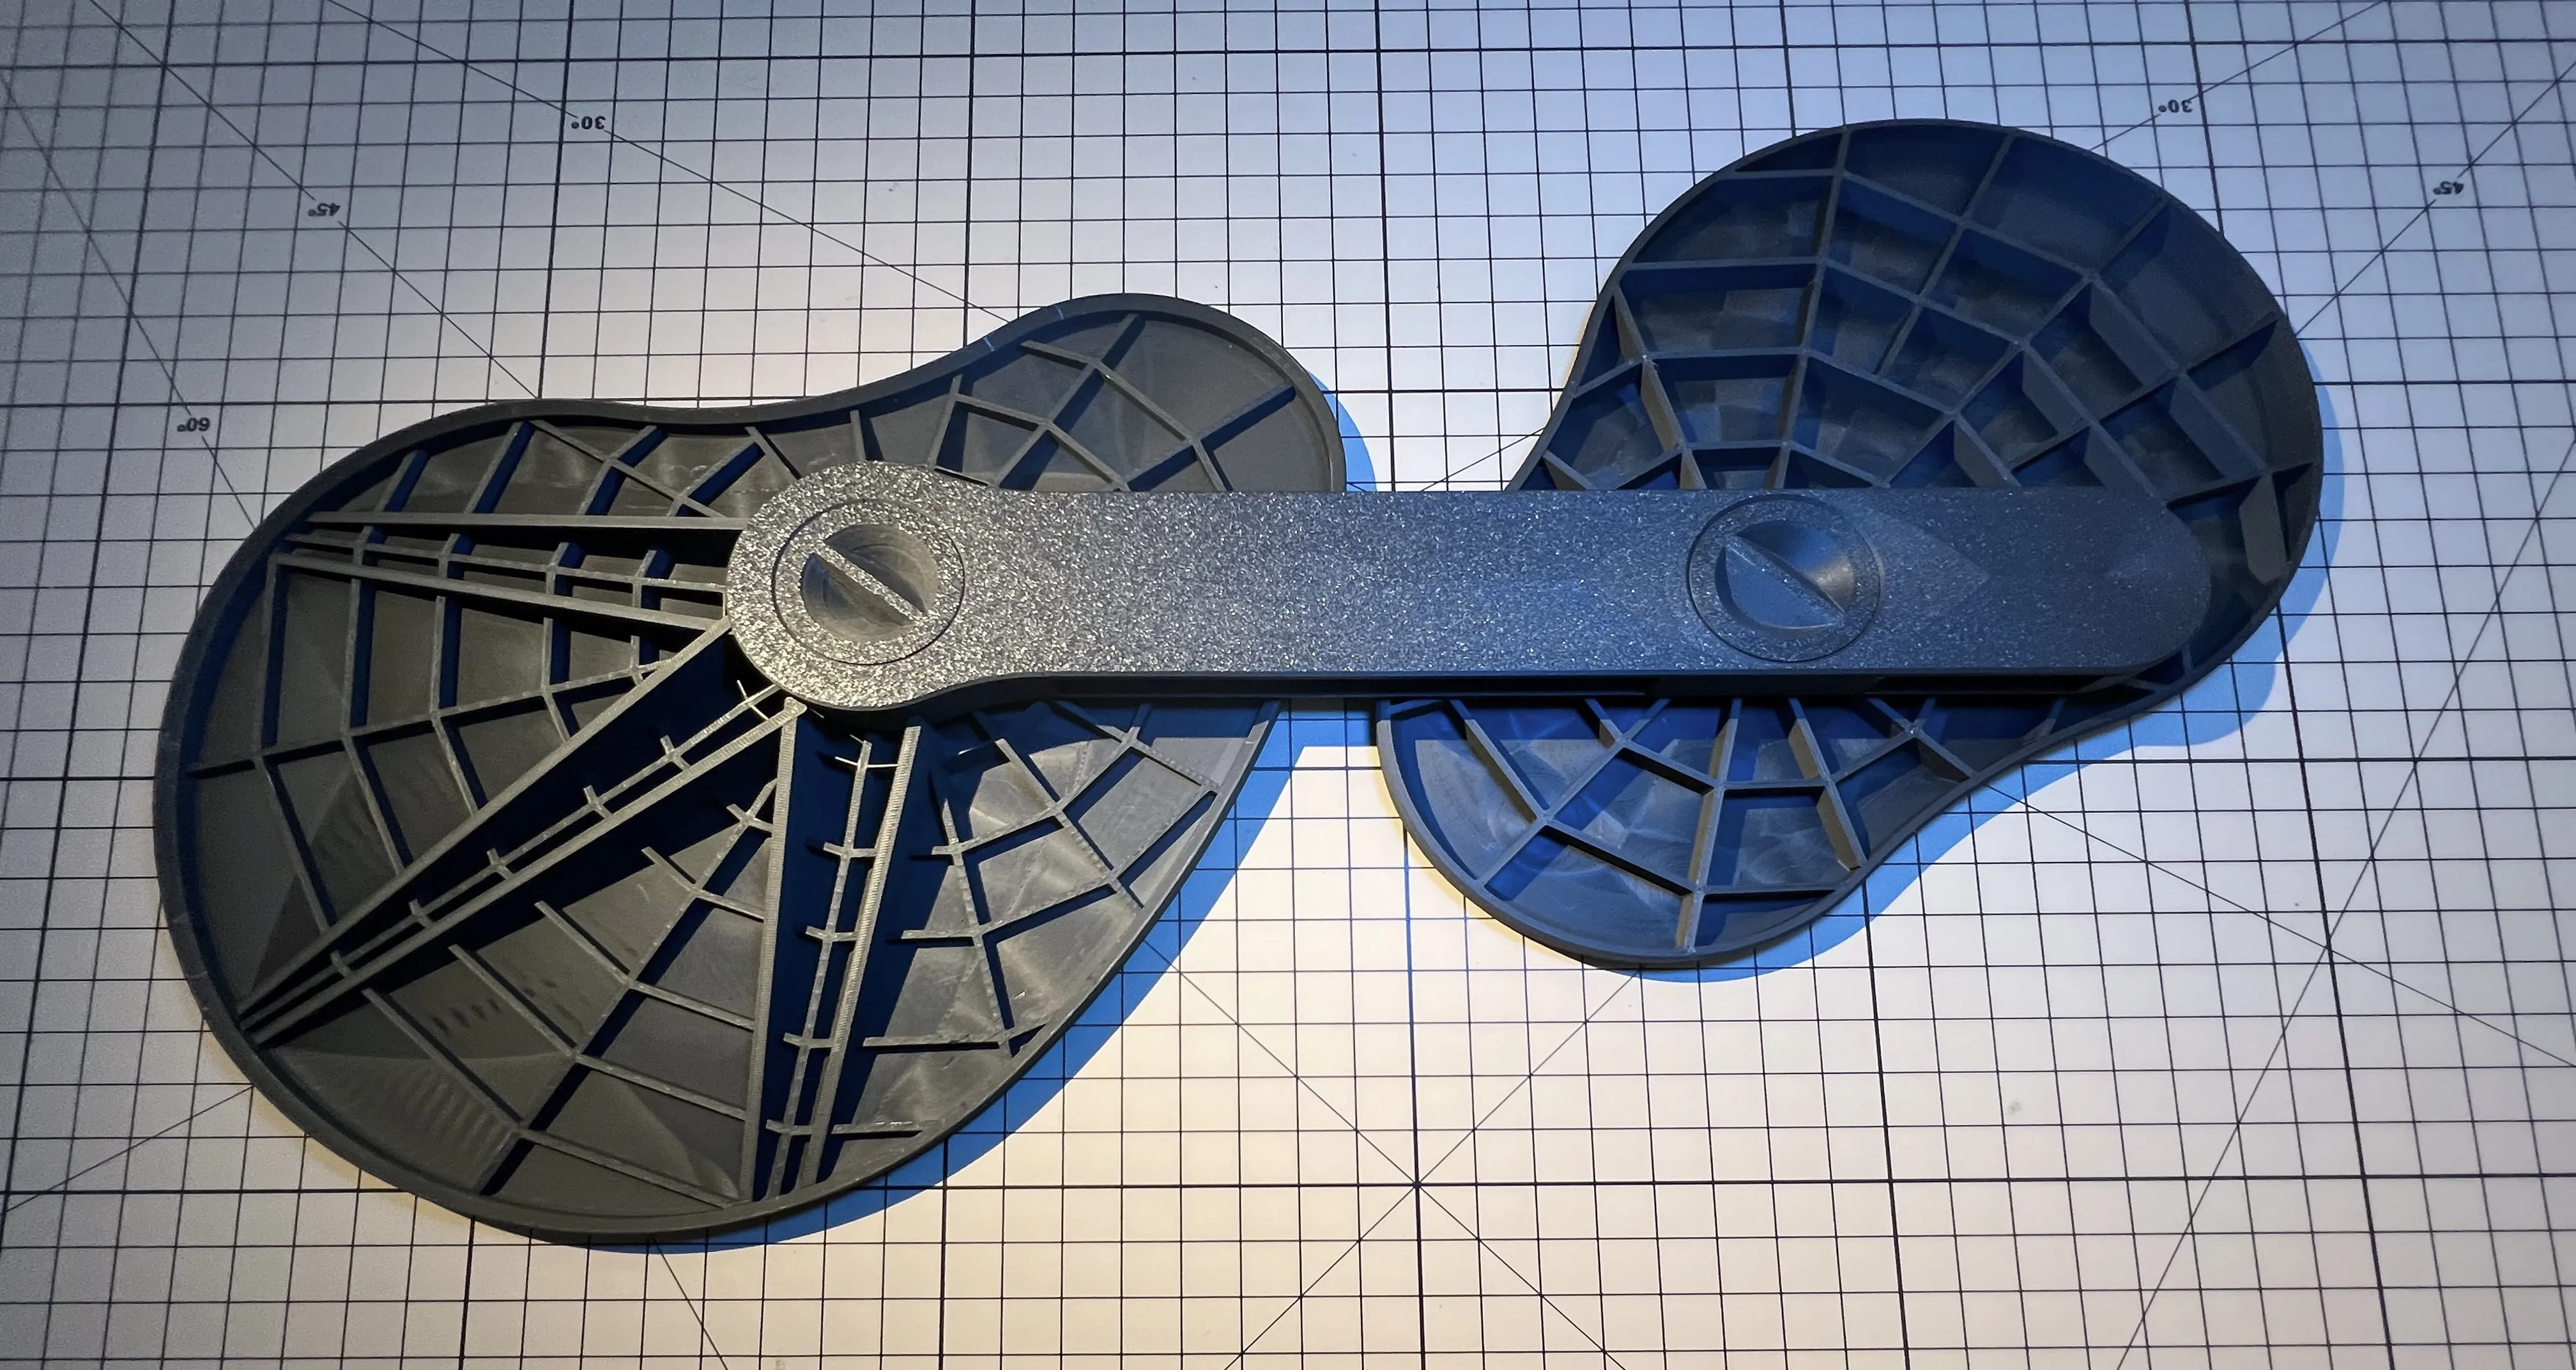
Main part:
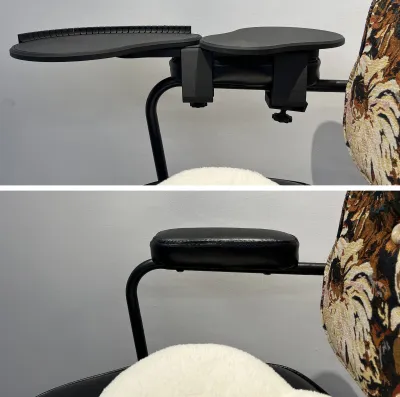
- A1-2: The main body is installed on the base, which is divided into upper and lower parts for buckling, and the limit tooth is facing upward. (This is 45mm wide, most of the width of the armrest are available; Another 75mm wide, if the armrest is relatively wide, you can choose to play this if you consider the aesthetics.)
- B1: The mouse operation area pallet is installed in the front round hole of A and then screwed and fixed on the back with B2. If the tray is fully tightened, it cannot be rotated. If it is properly loosened for two turns, the angle of the tray can be adjusted at any time, or it can be locked with use.
C1: elbow support plate, the same way into the circular hole under the base fixed with C2.
the main body is assembled at this point, you can first try to place the armrest to adjust the position.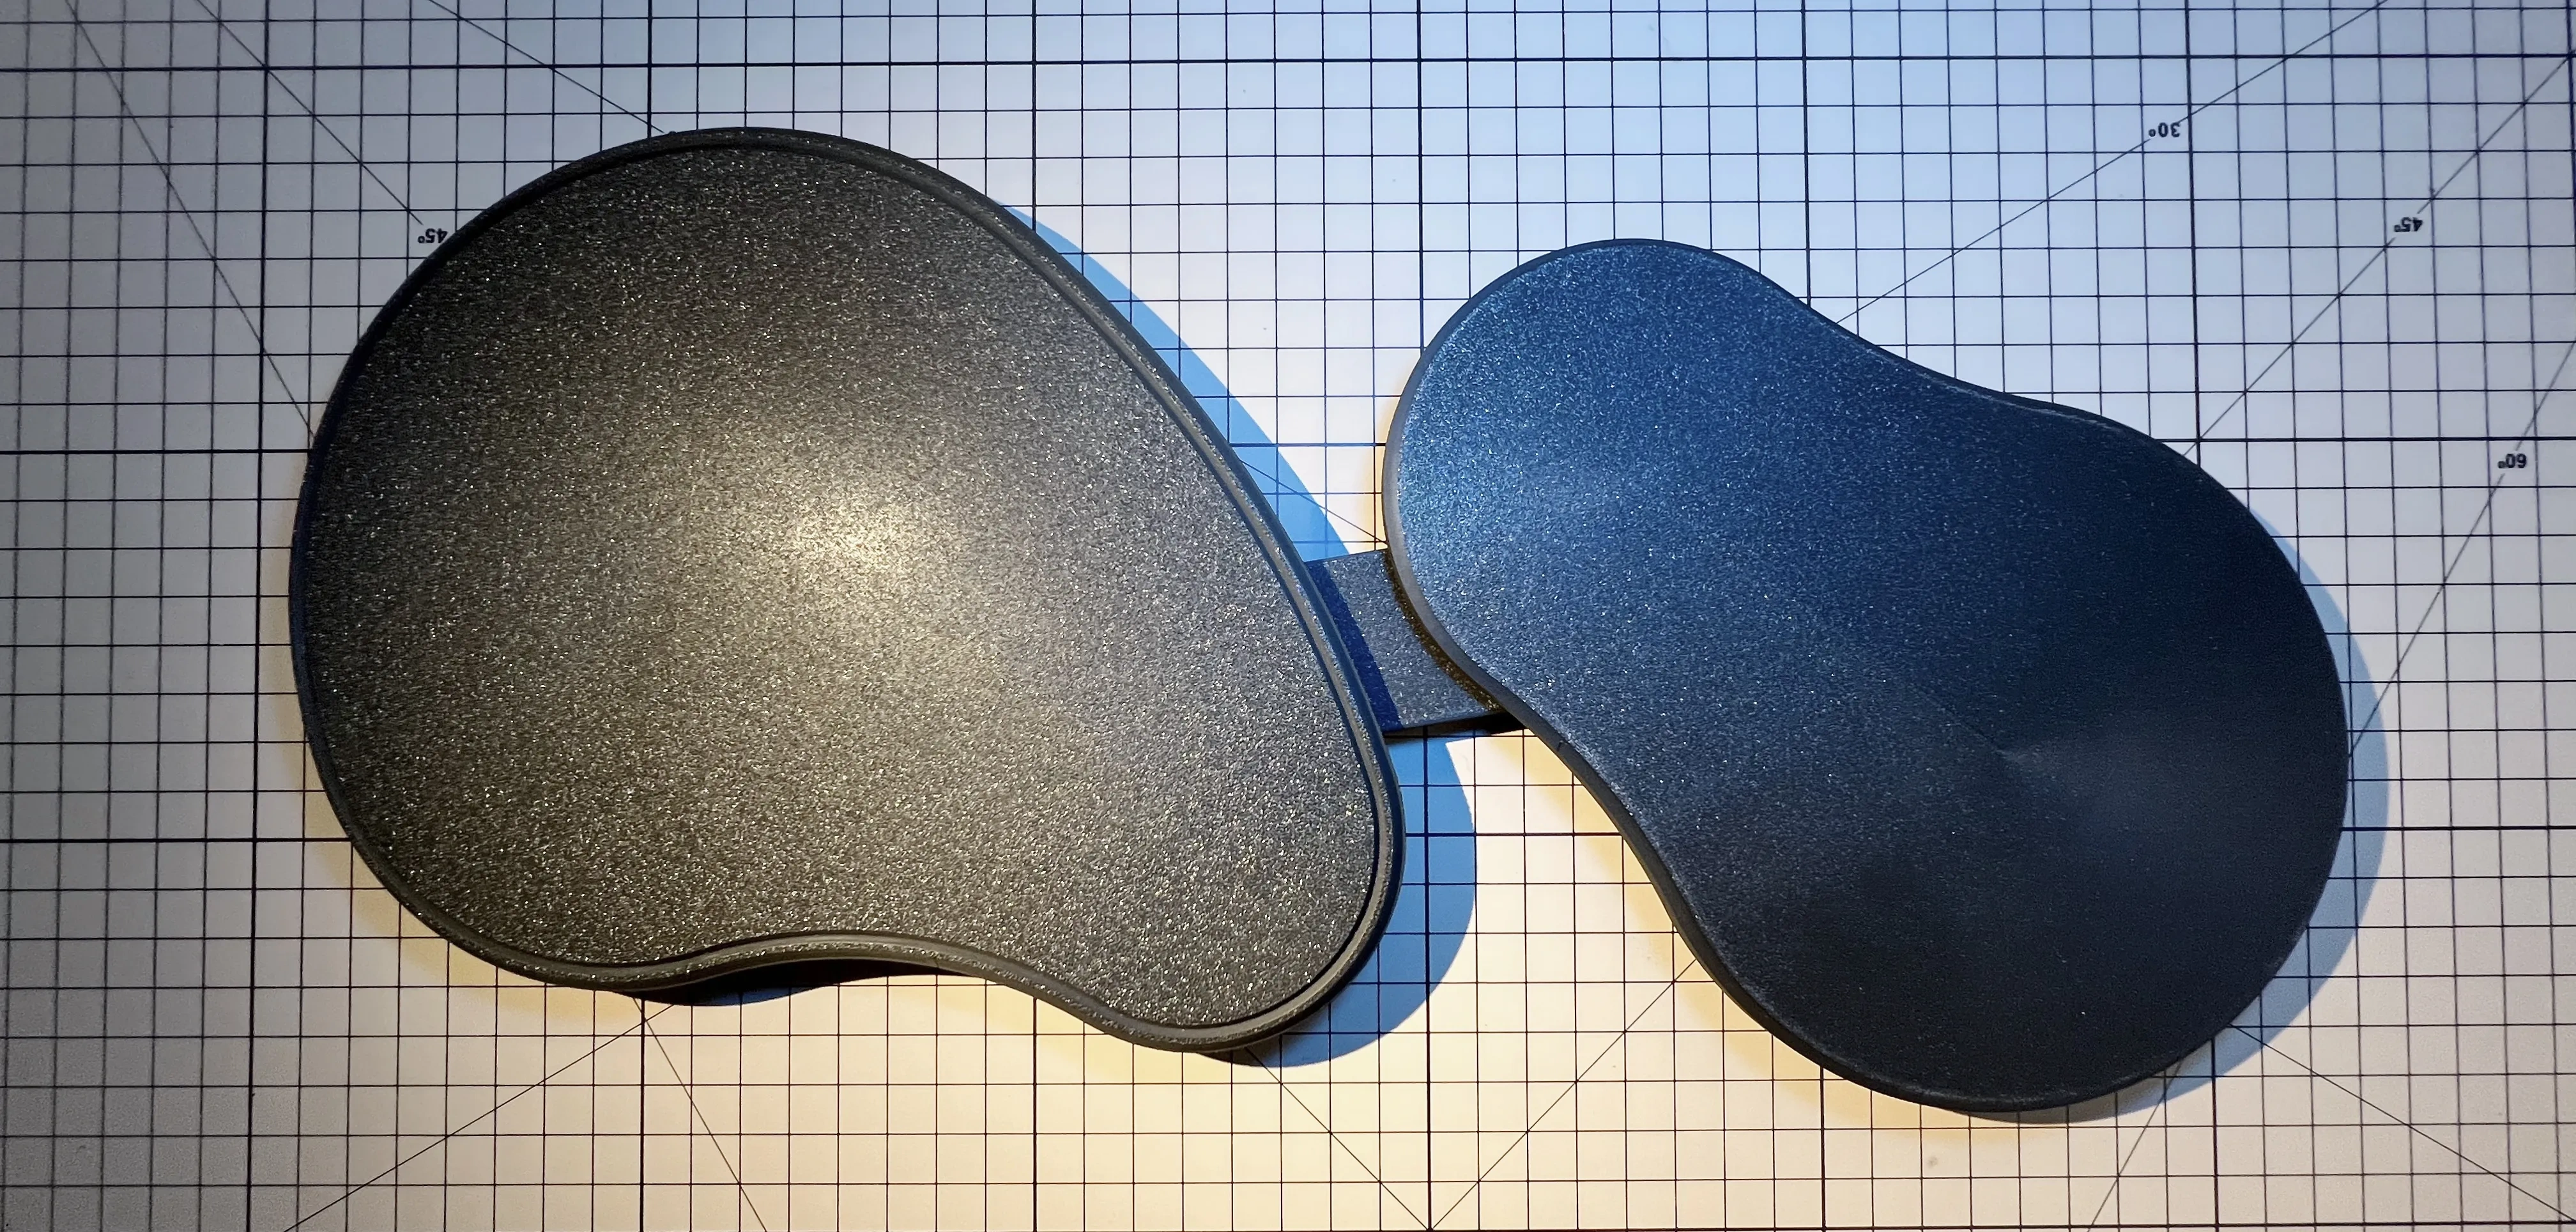
FIXED FITTINGS:
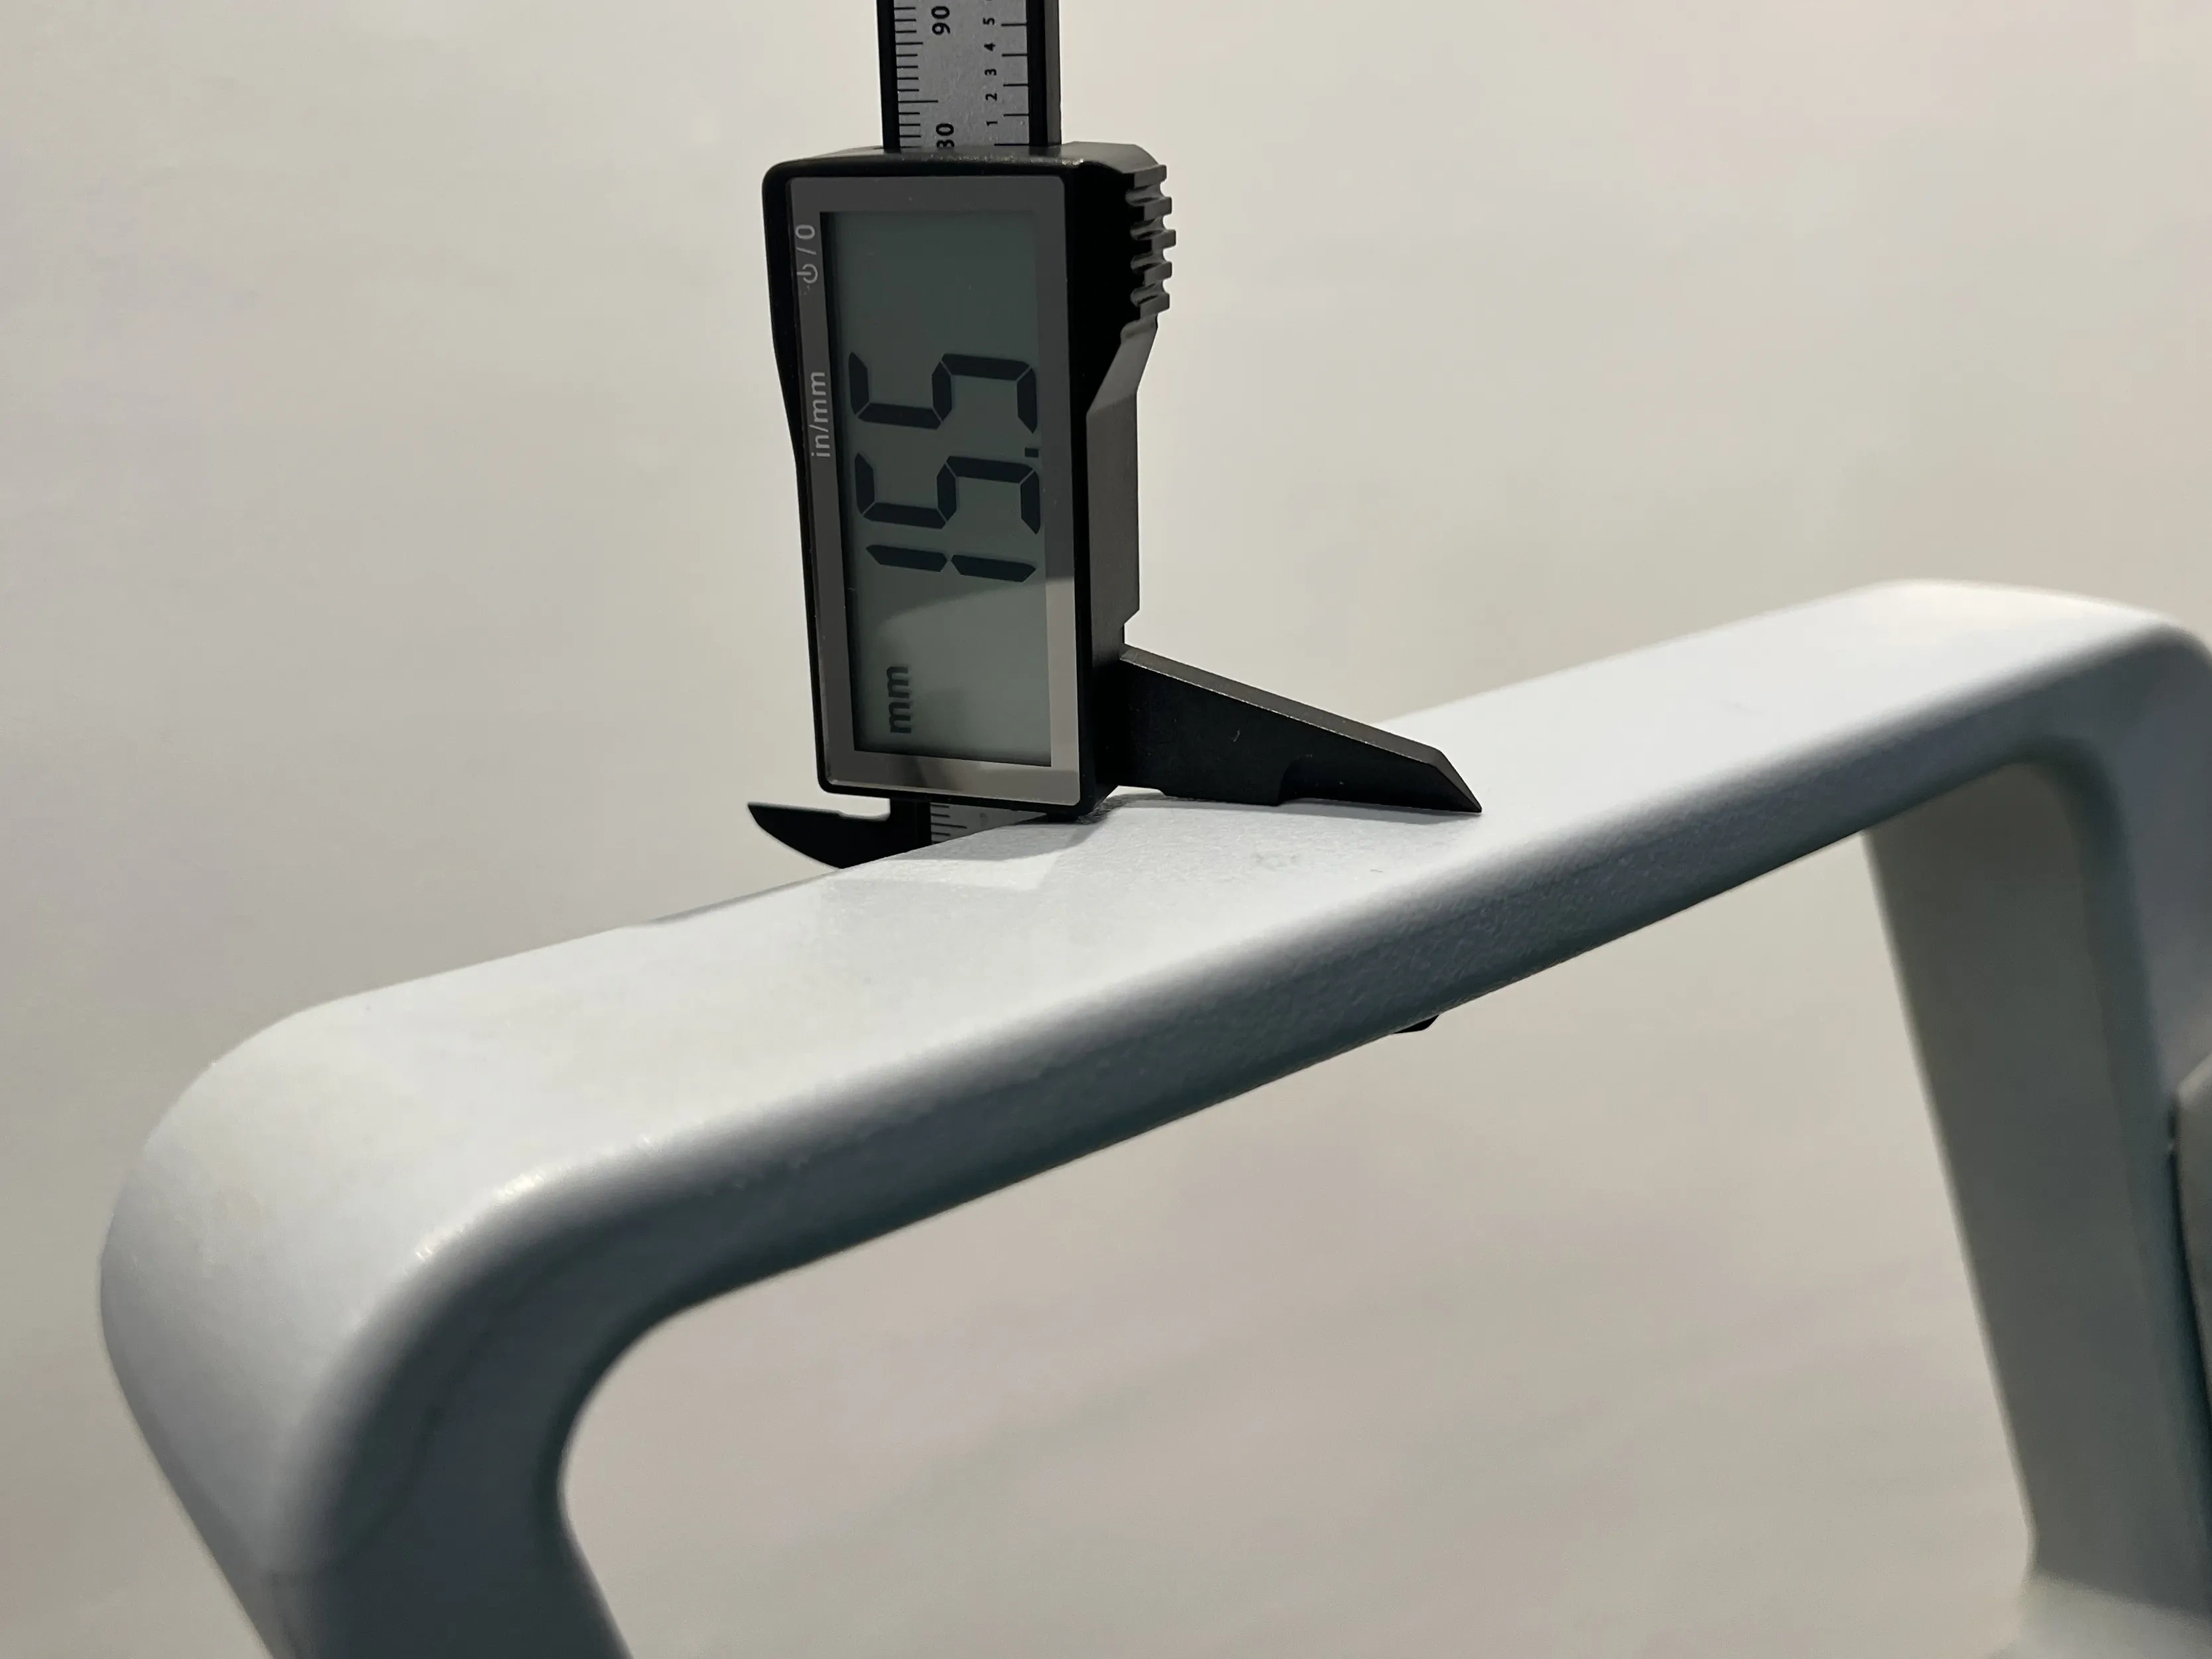
Please measure the thickness and width of the armrest before selecting the appropriate printing (two sets are required for front and rear installation).
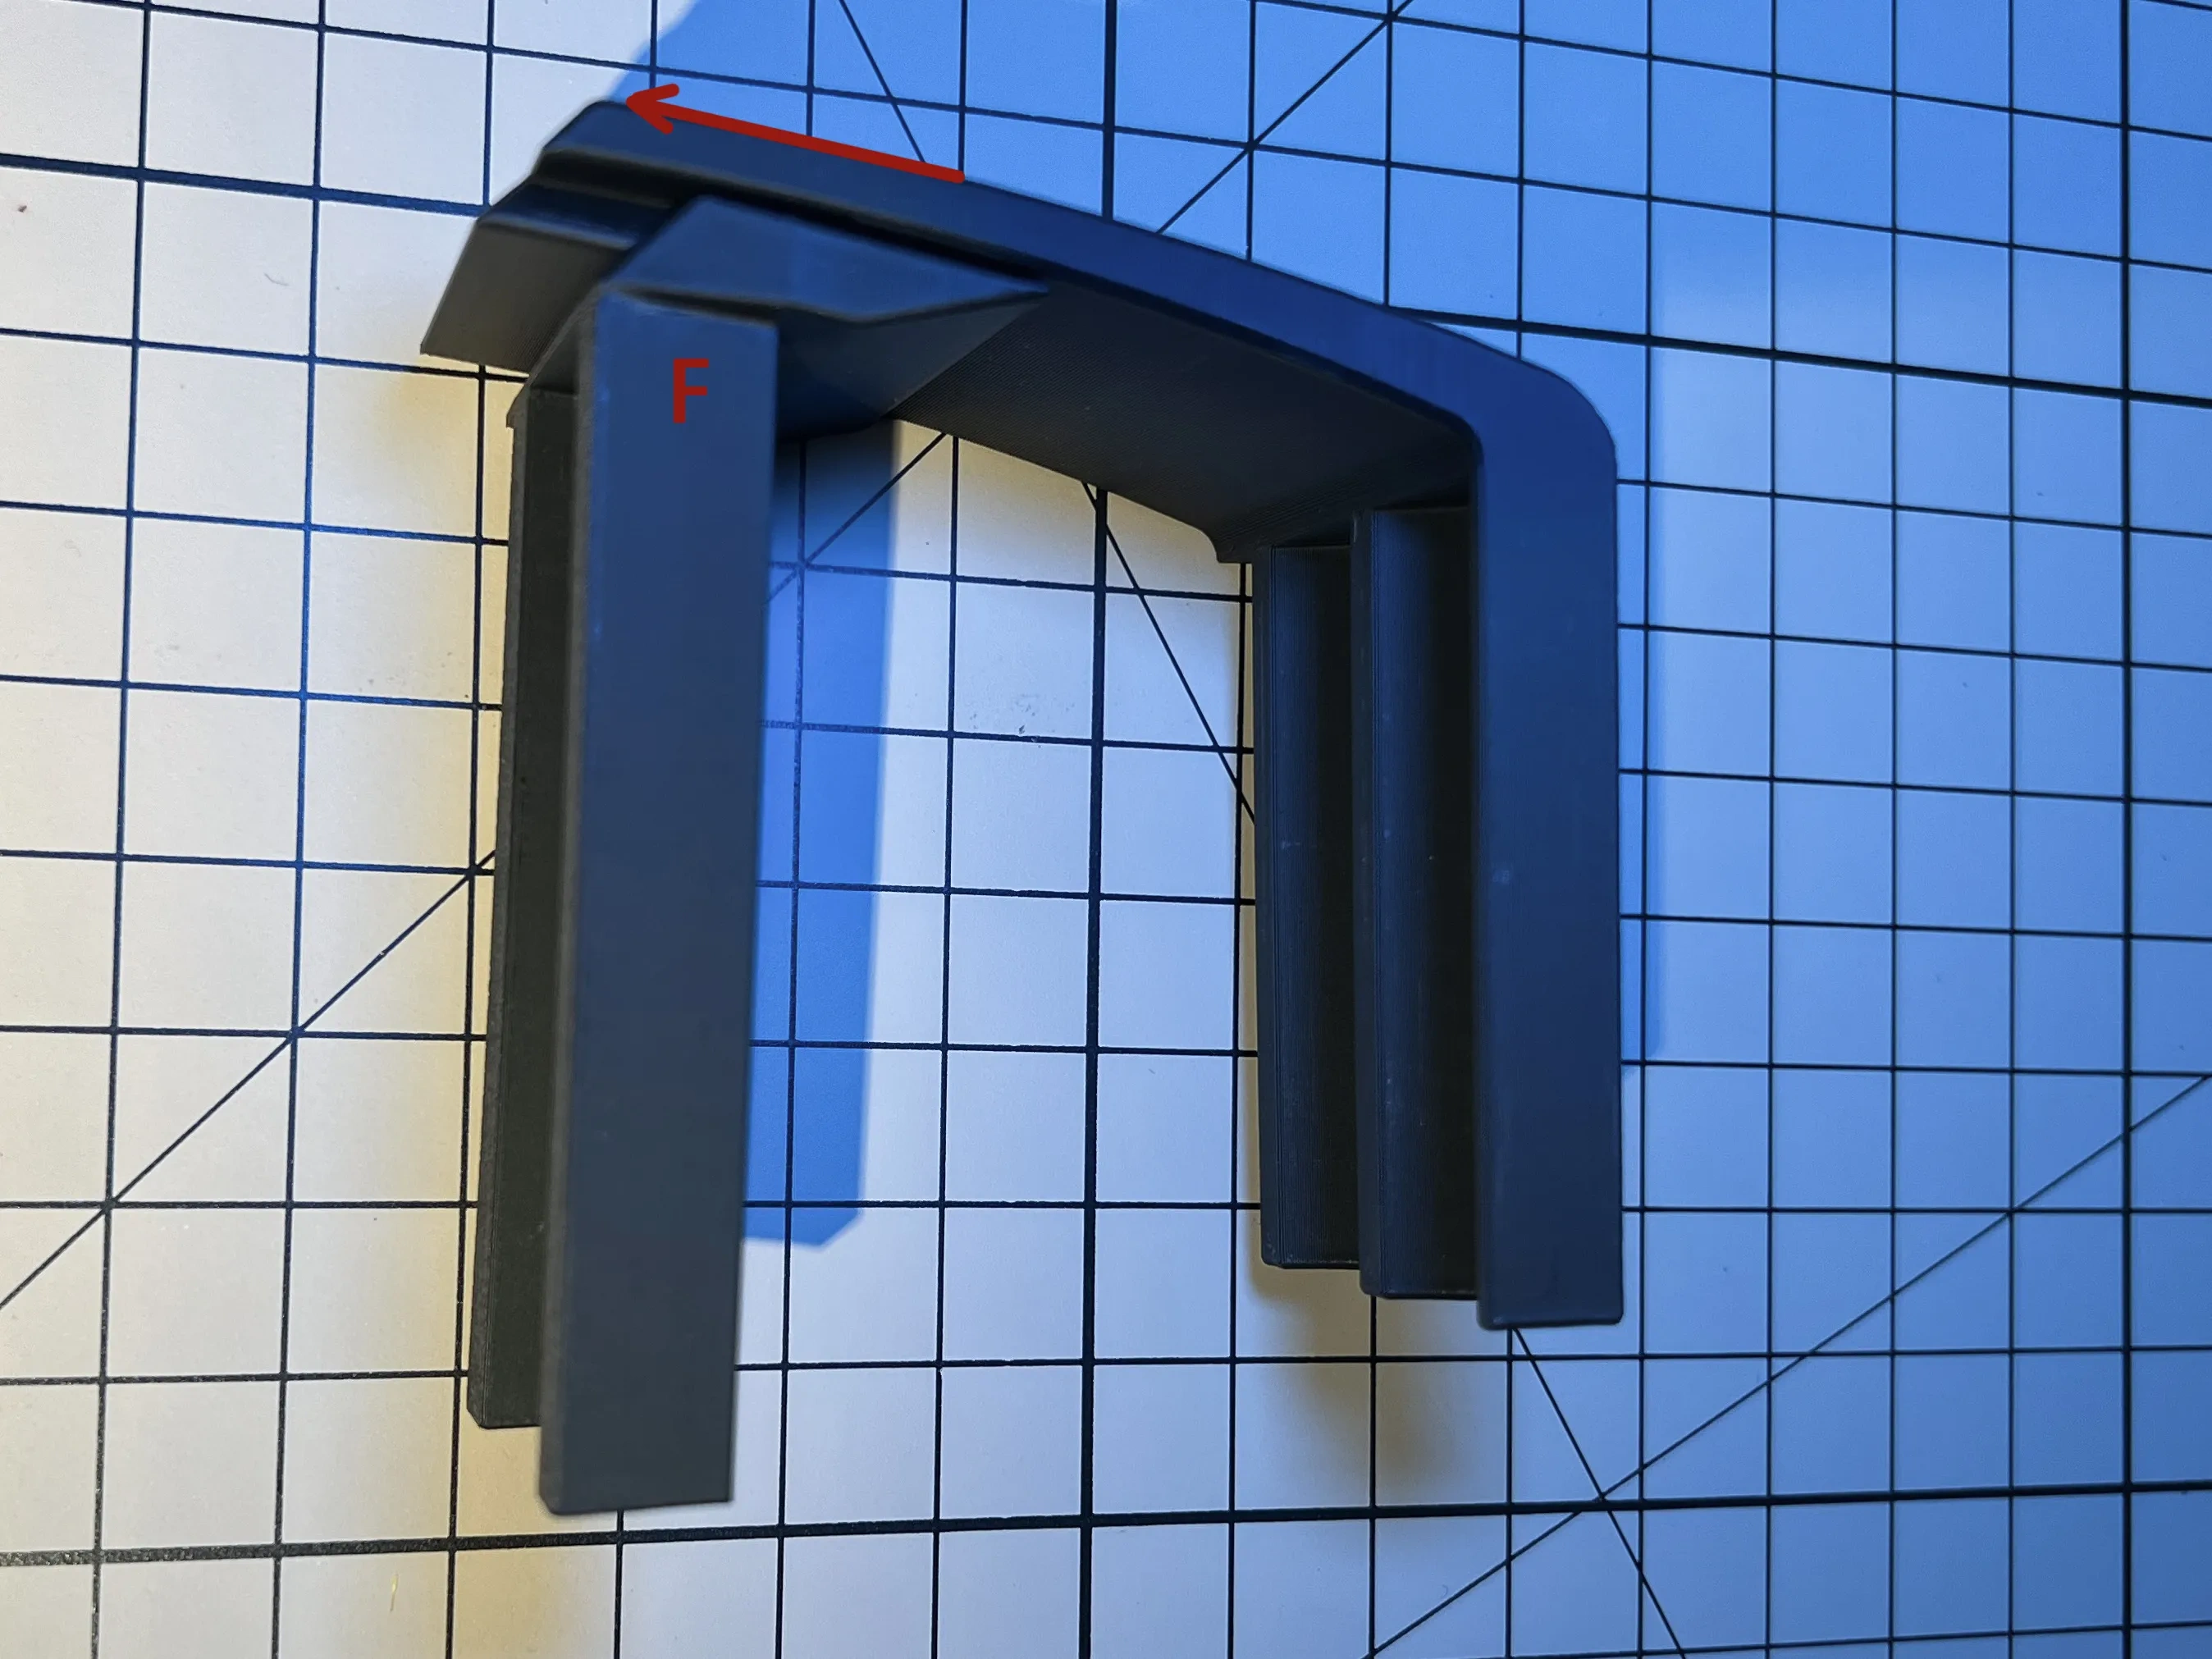
D/E + F + G is the latch that connects the base to the armrest.
The G model has been optimized, and the new model is slightly different from the picture.
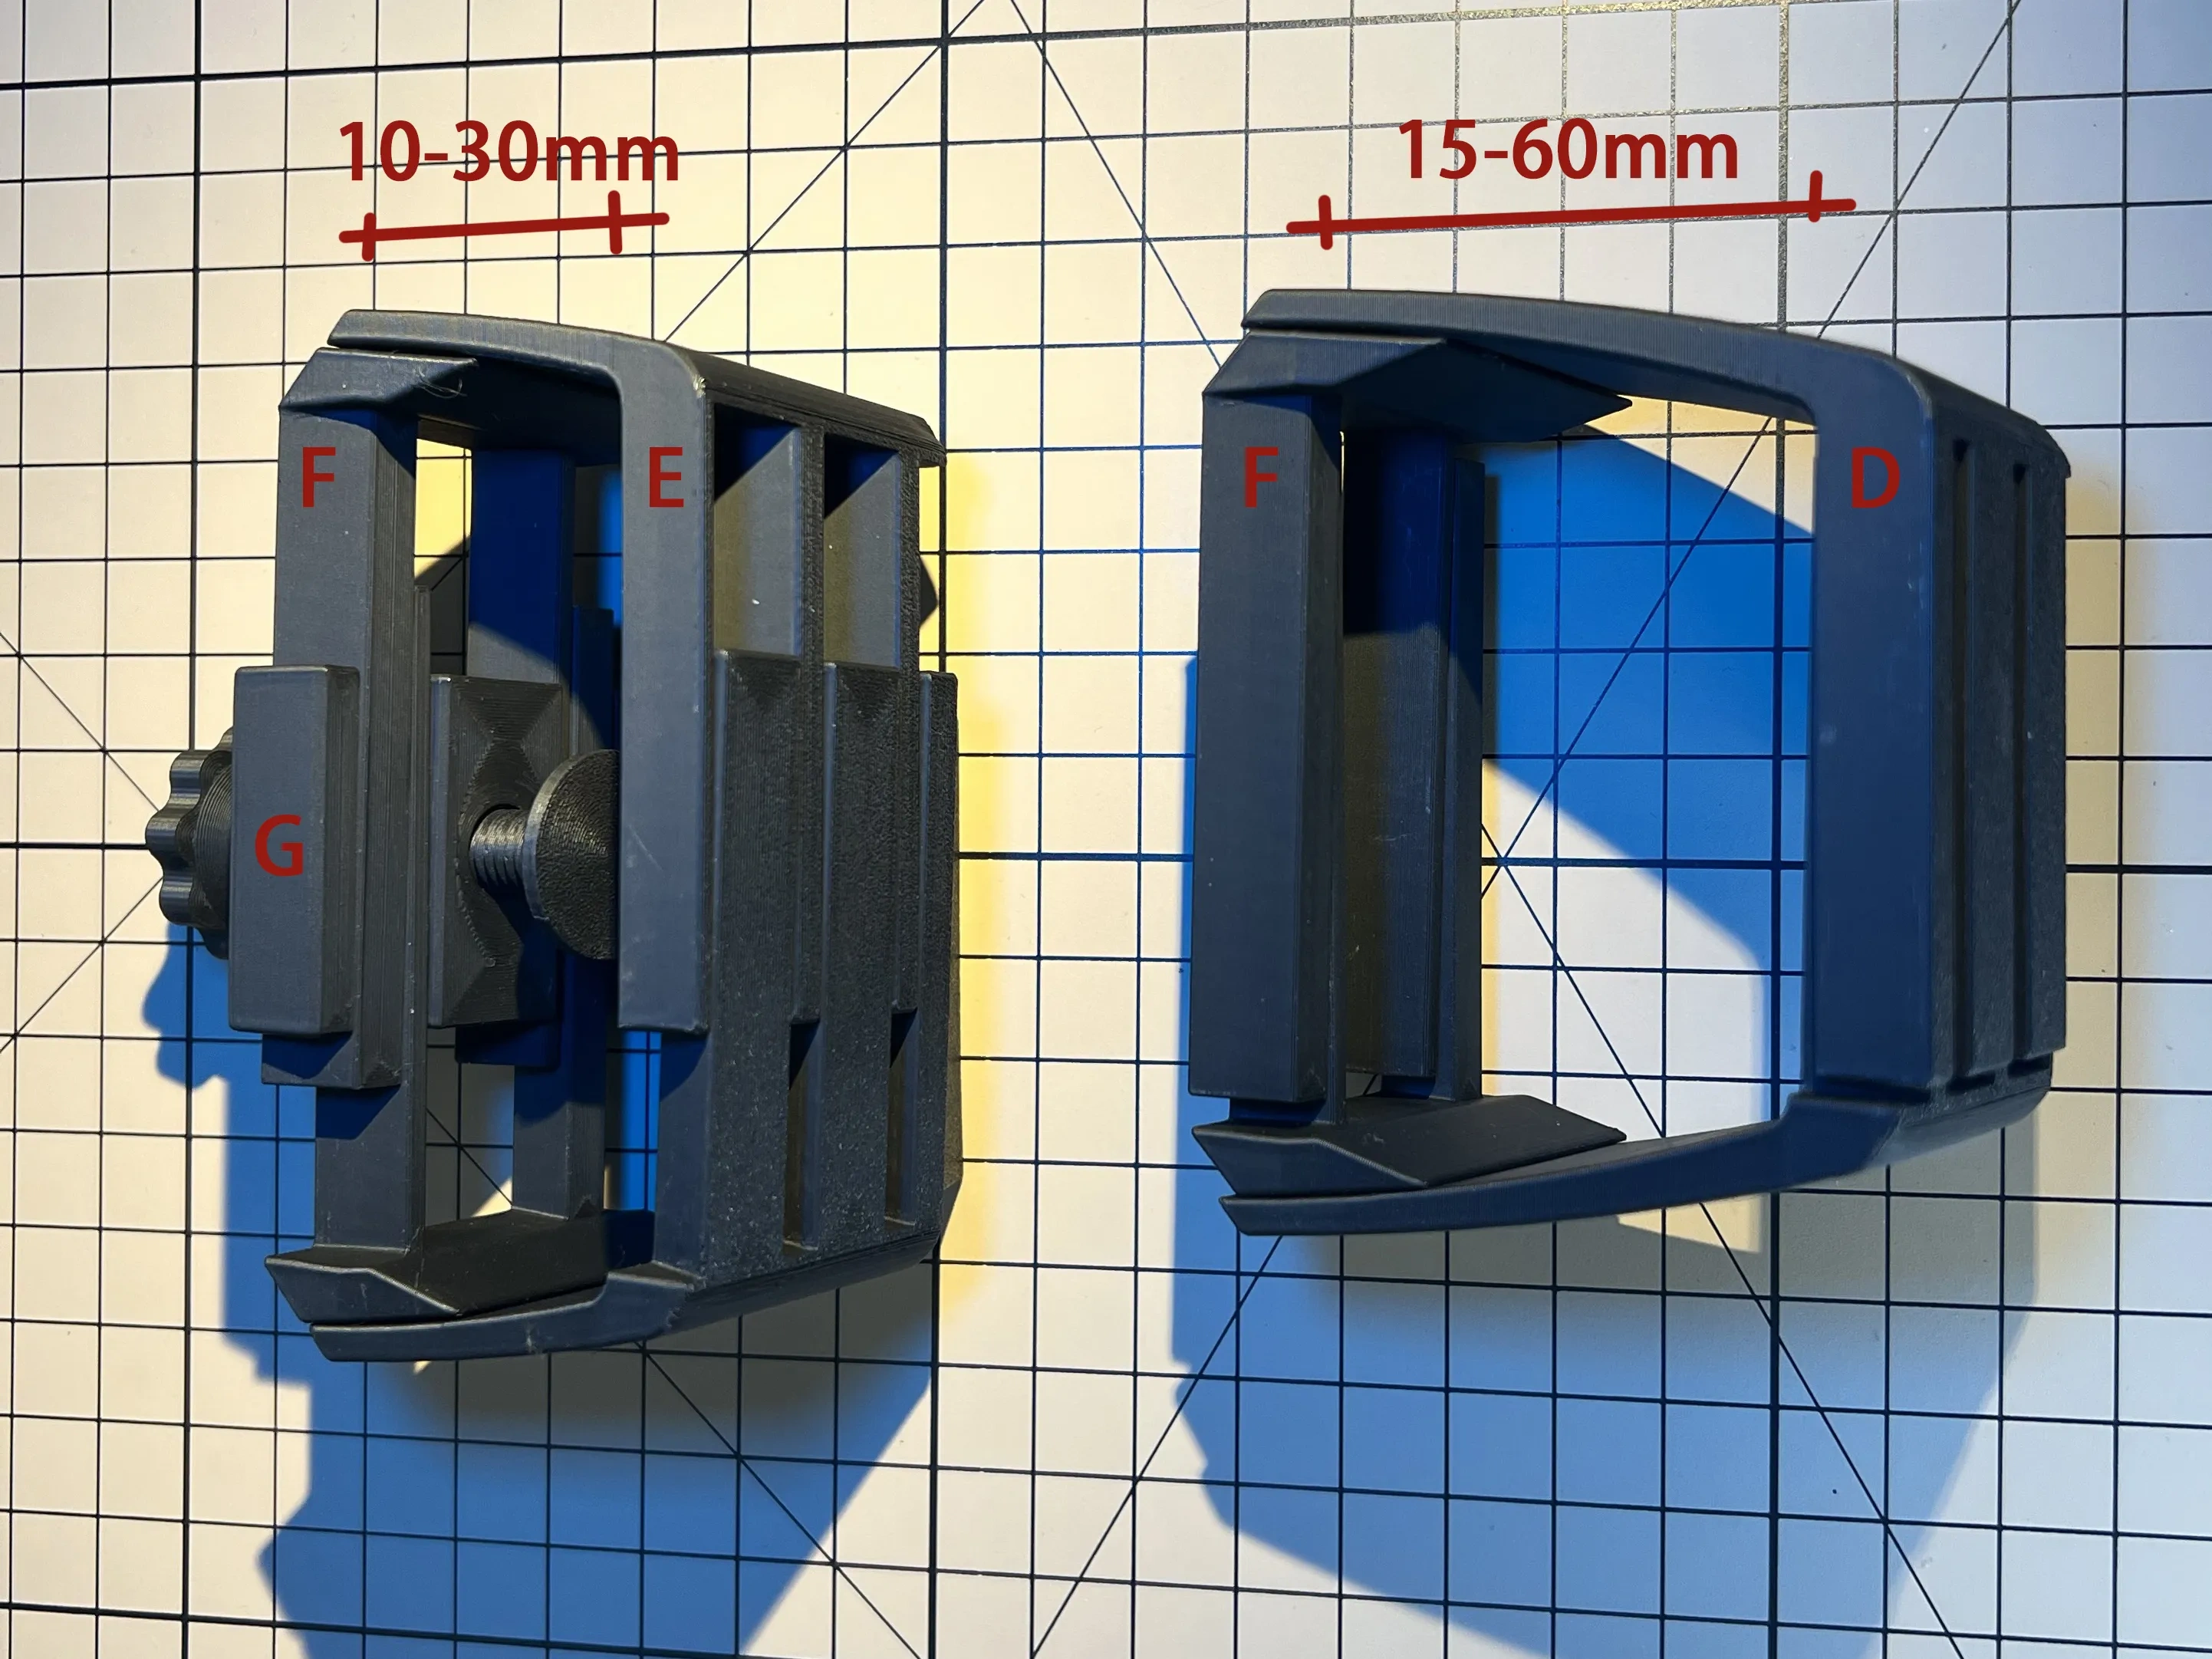
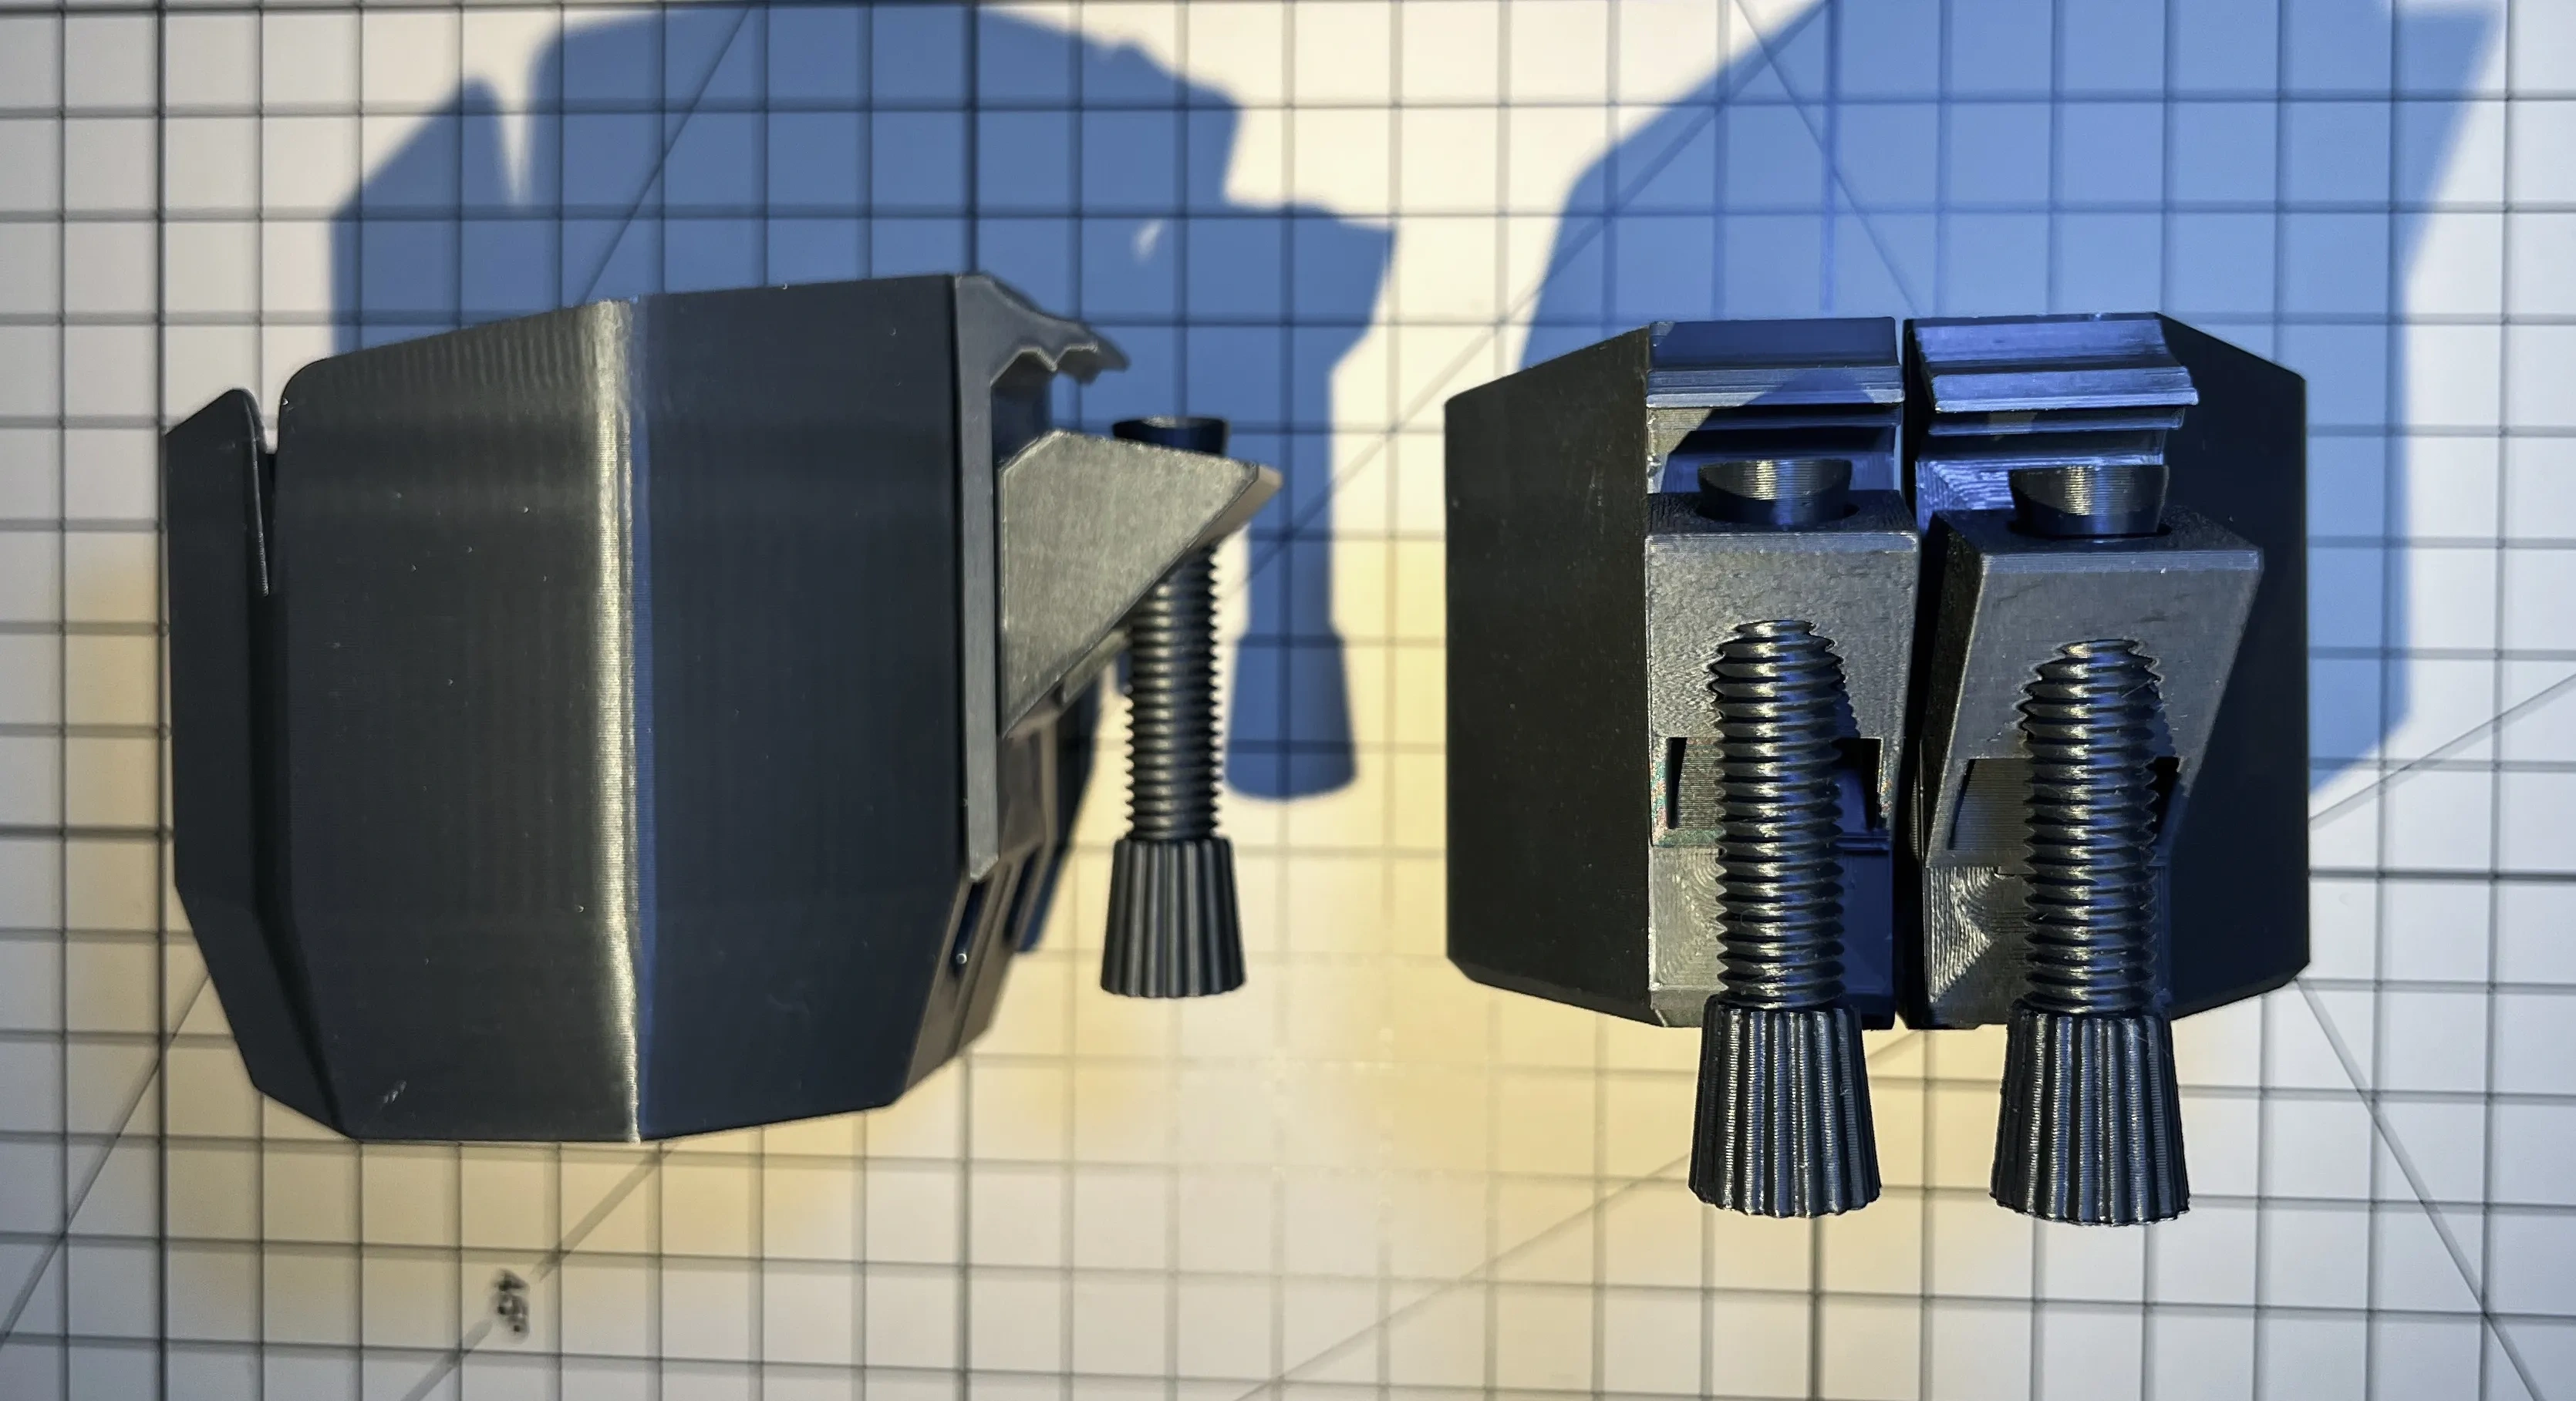
- D/E about two telescopic accessories, there are two lengths and two heights, a total of four specifications to choose to print.
When printing D/E series, it is recommended to open the variable floor height. The floor height of the rising position of the bottom arc should be set at the printing height of 0.08 to 0.1 as far as possible to make the radian more natural.

- F also has two telescopic accessories on the left and right, and another short specification can be selected in the document.
In most cases, D + F is suitable for armrests of various specifications (I .e. "the armrest of the chair has a width of 35 to 100mm and a thickness of 15 to 60mm", which is the range of armrest specifications measured around me)
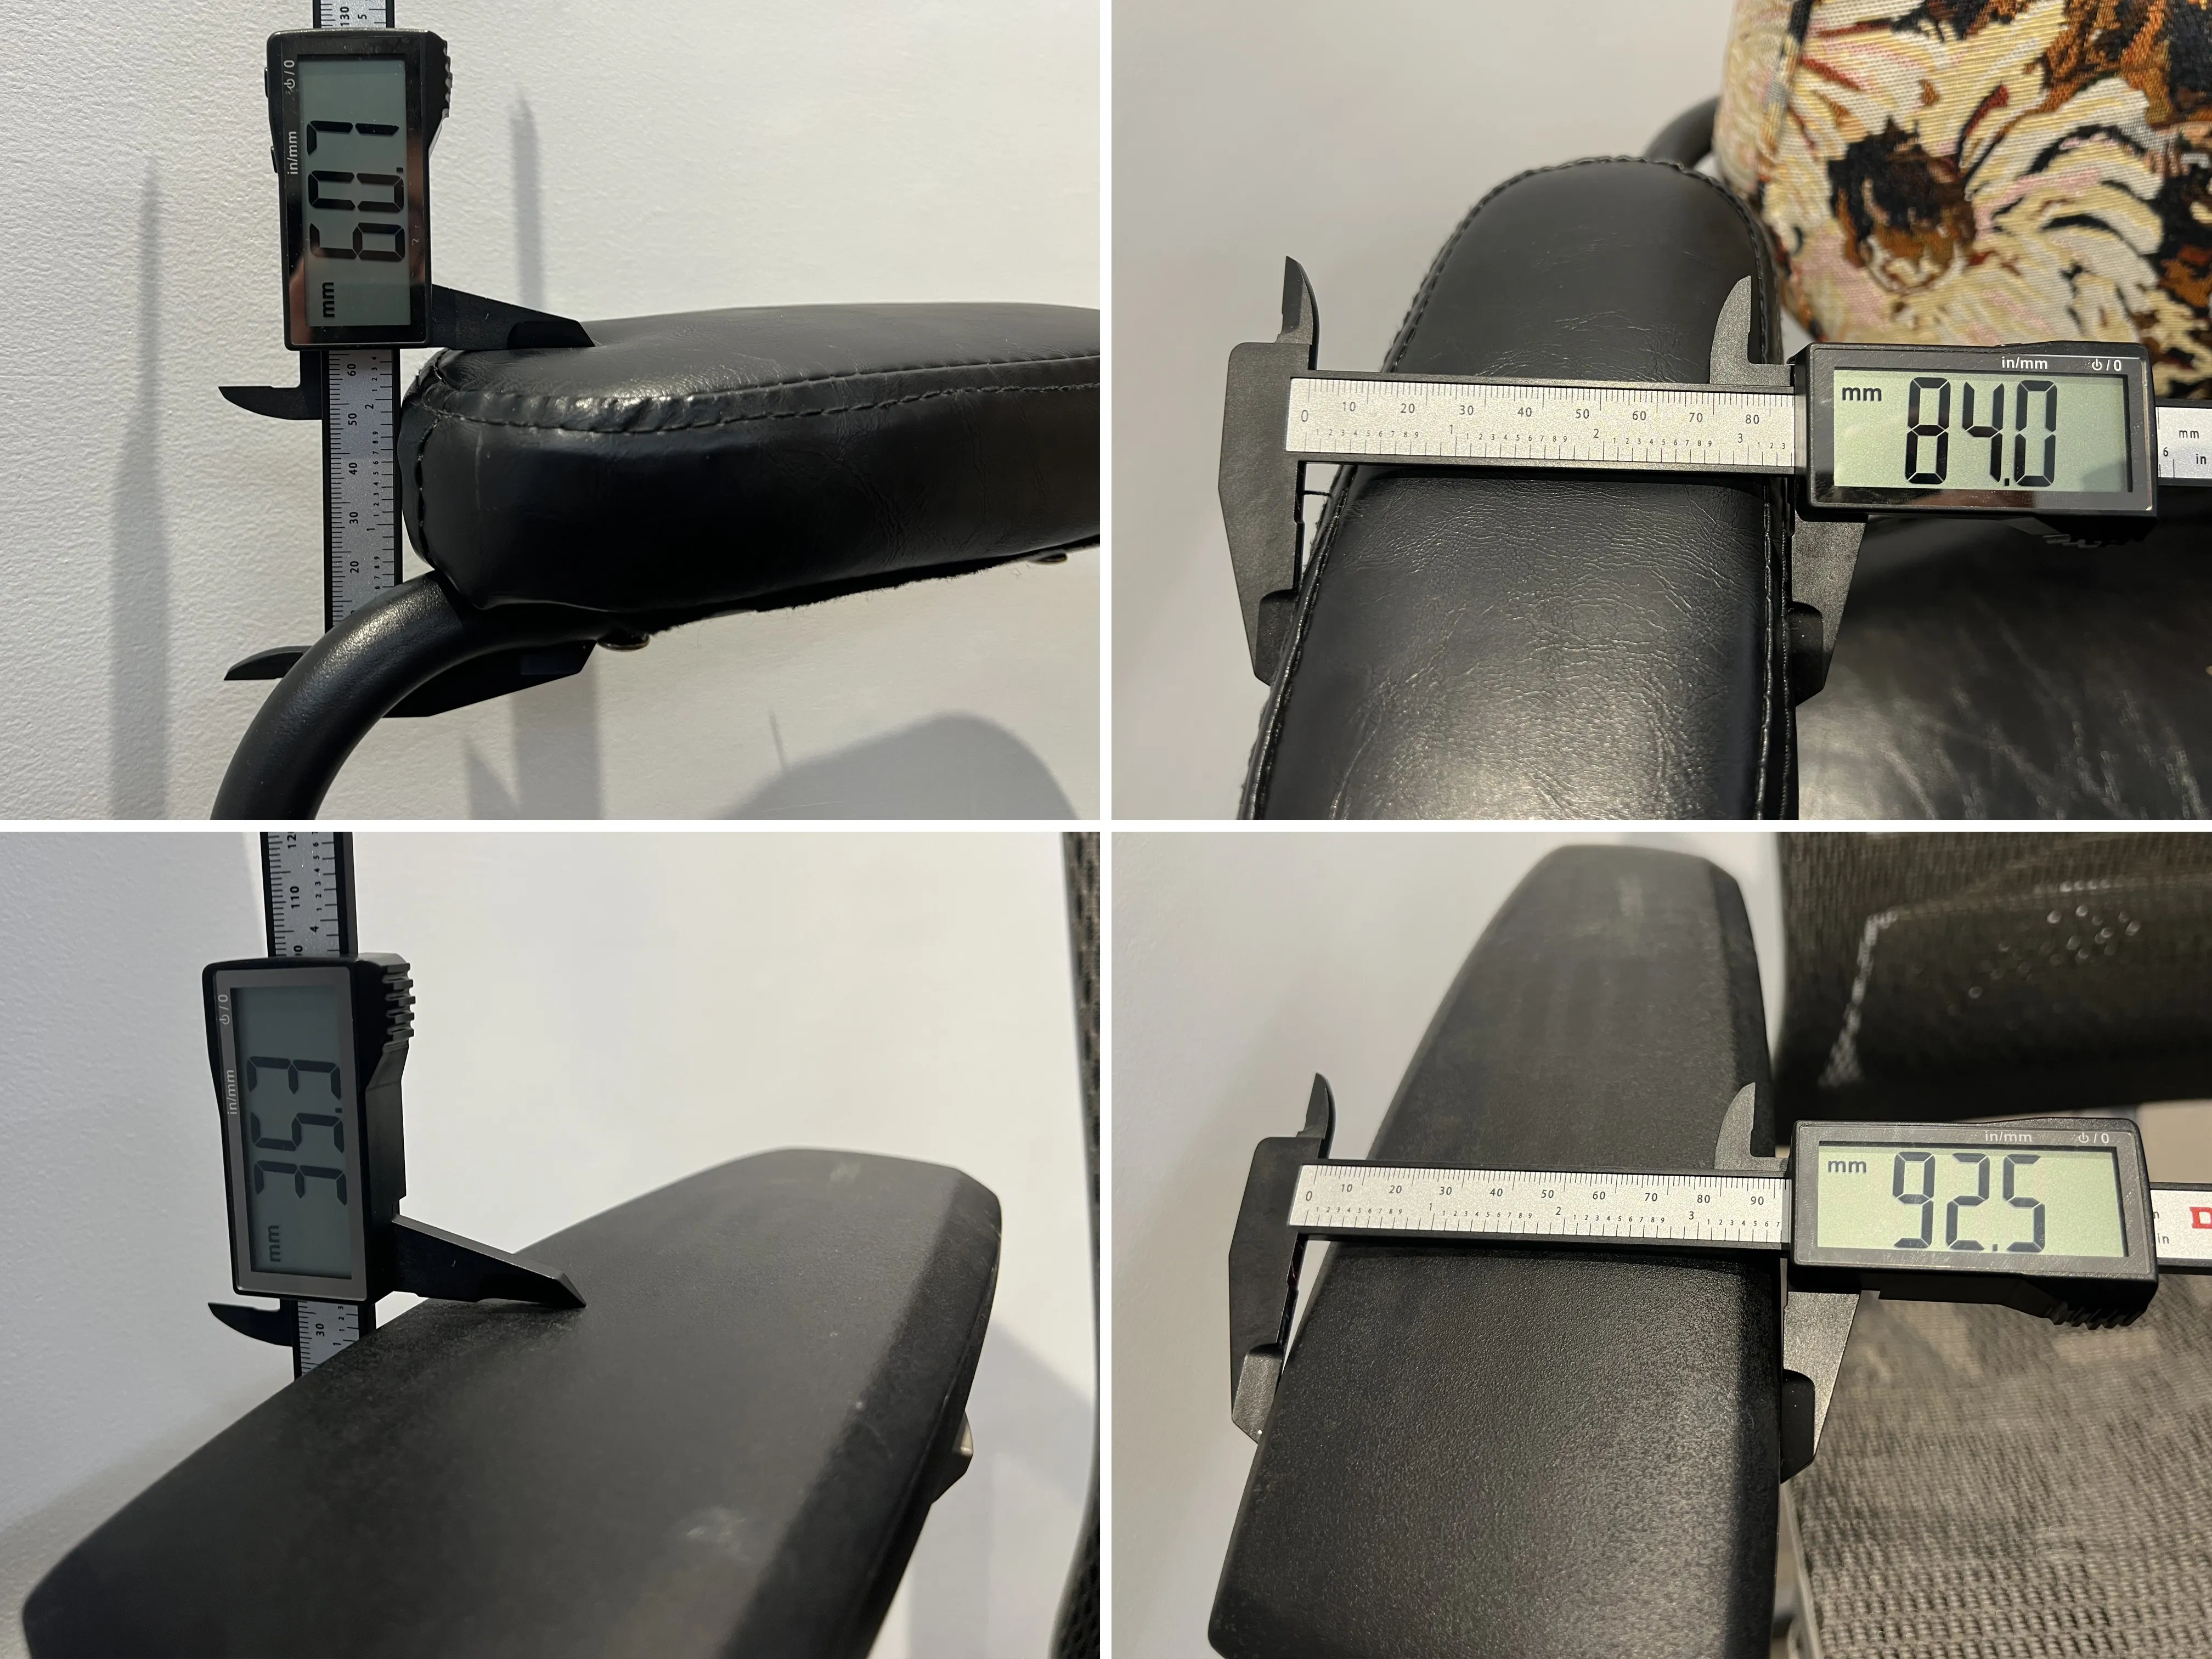
If the armrest thickness is less than 30mm, you can choose the E-type short model (F fasteners are universal);
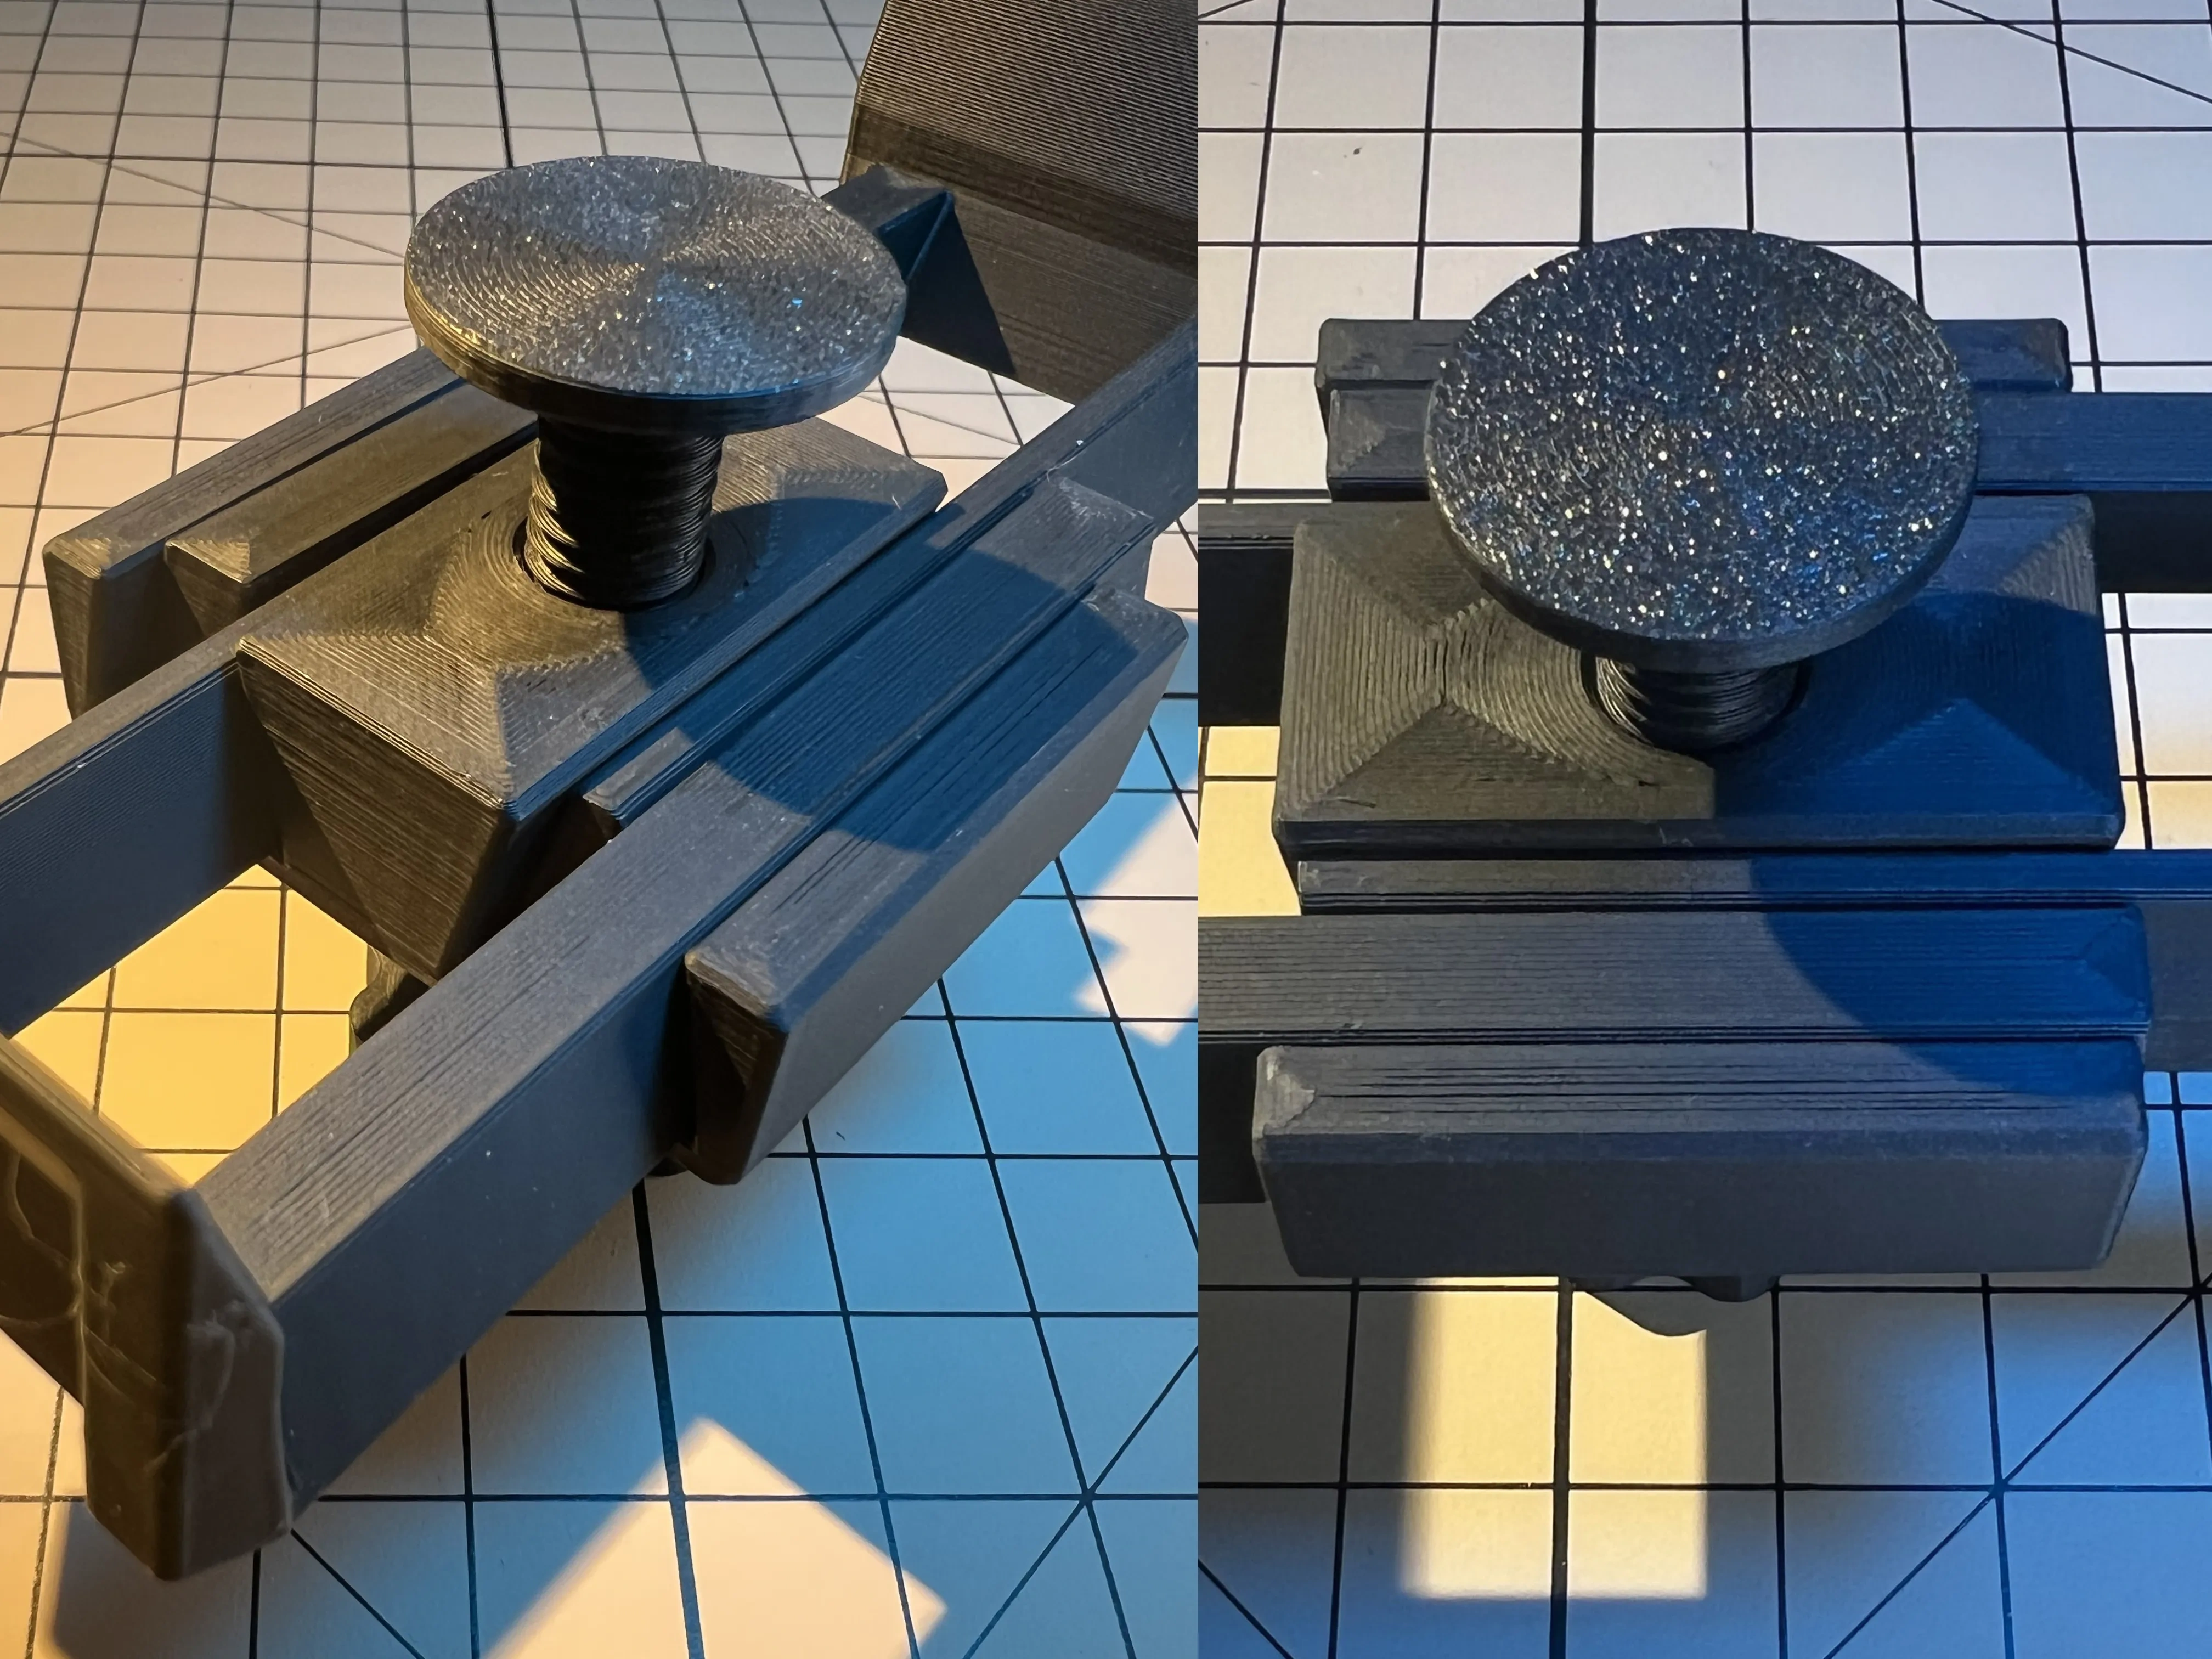
If the width of the handrail is 40-50mm, you can choose G-40 series printing in the file, and also divide it into two specifications according to the thickness of the handrail.
G1-3 accessories for general goods, directly print two copies. (The bolt base in the file has been manually added brim drawing, please check whether it is missing.)
Install to handrail:
First, combine the three parts of G (refer to the upper and lower installation directions in the picture); Insert F into the corresponding slot of D/E (after the later trial assembly is correct, it can be directly fixed with adhesive as appropriate)
Place the main body at the appropriate position of the armrest, insert the D/E + F on one side, then move G into F according to the direction of the picture and hold it temporarily by hand, then insert the D/E + F on the other side corresponding to the upper and lower slot positions, move G to the middle, and finally turn the G bolt to make it tight with the bottom of the armrest.
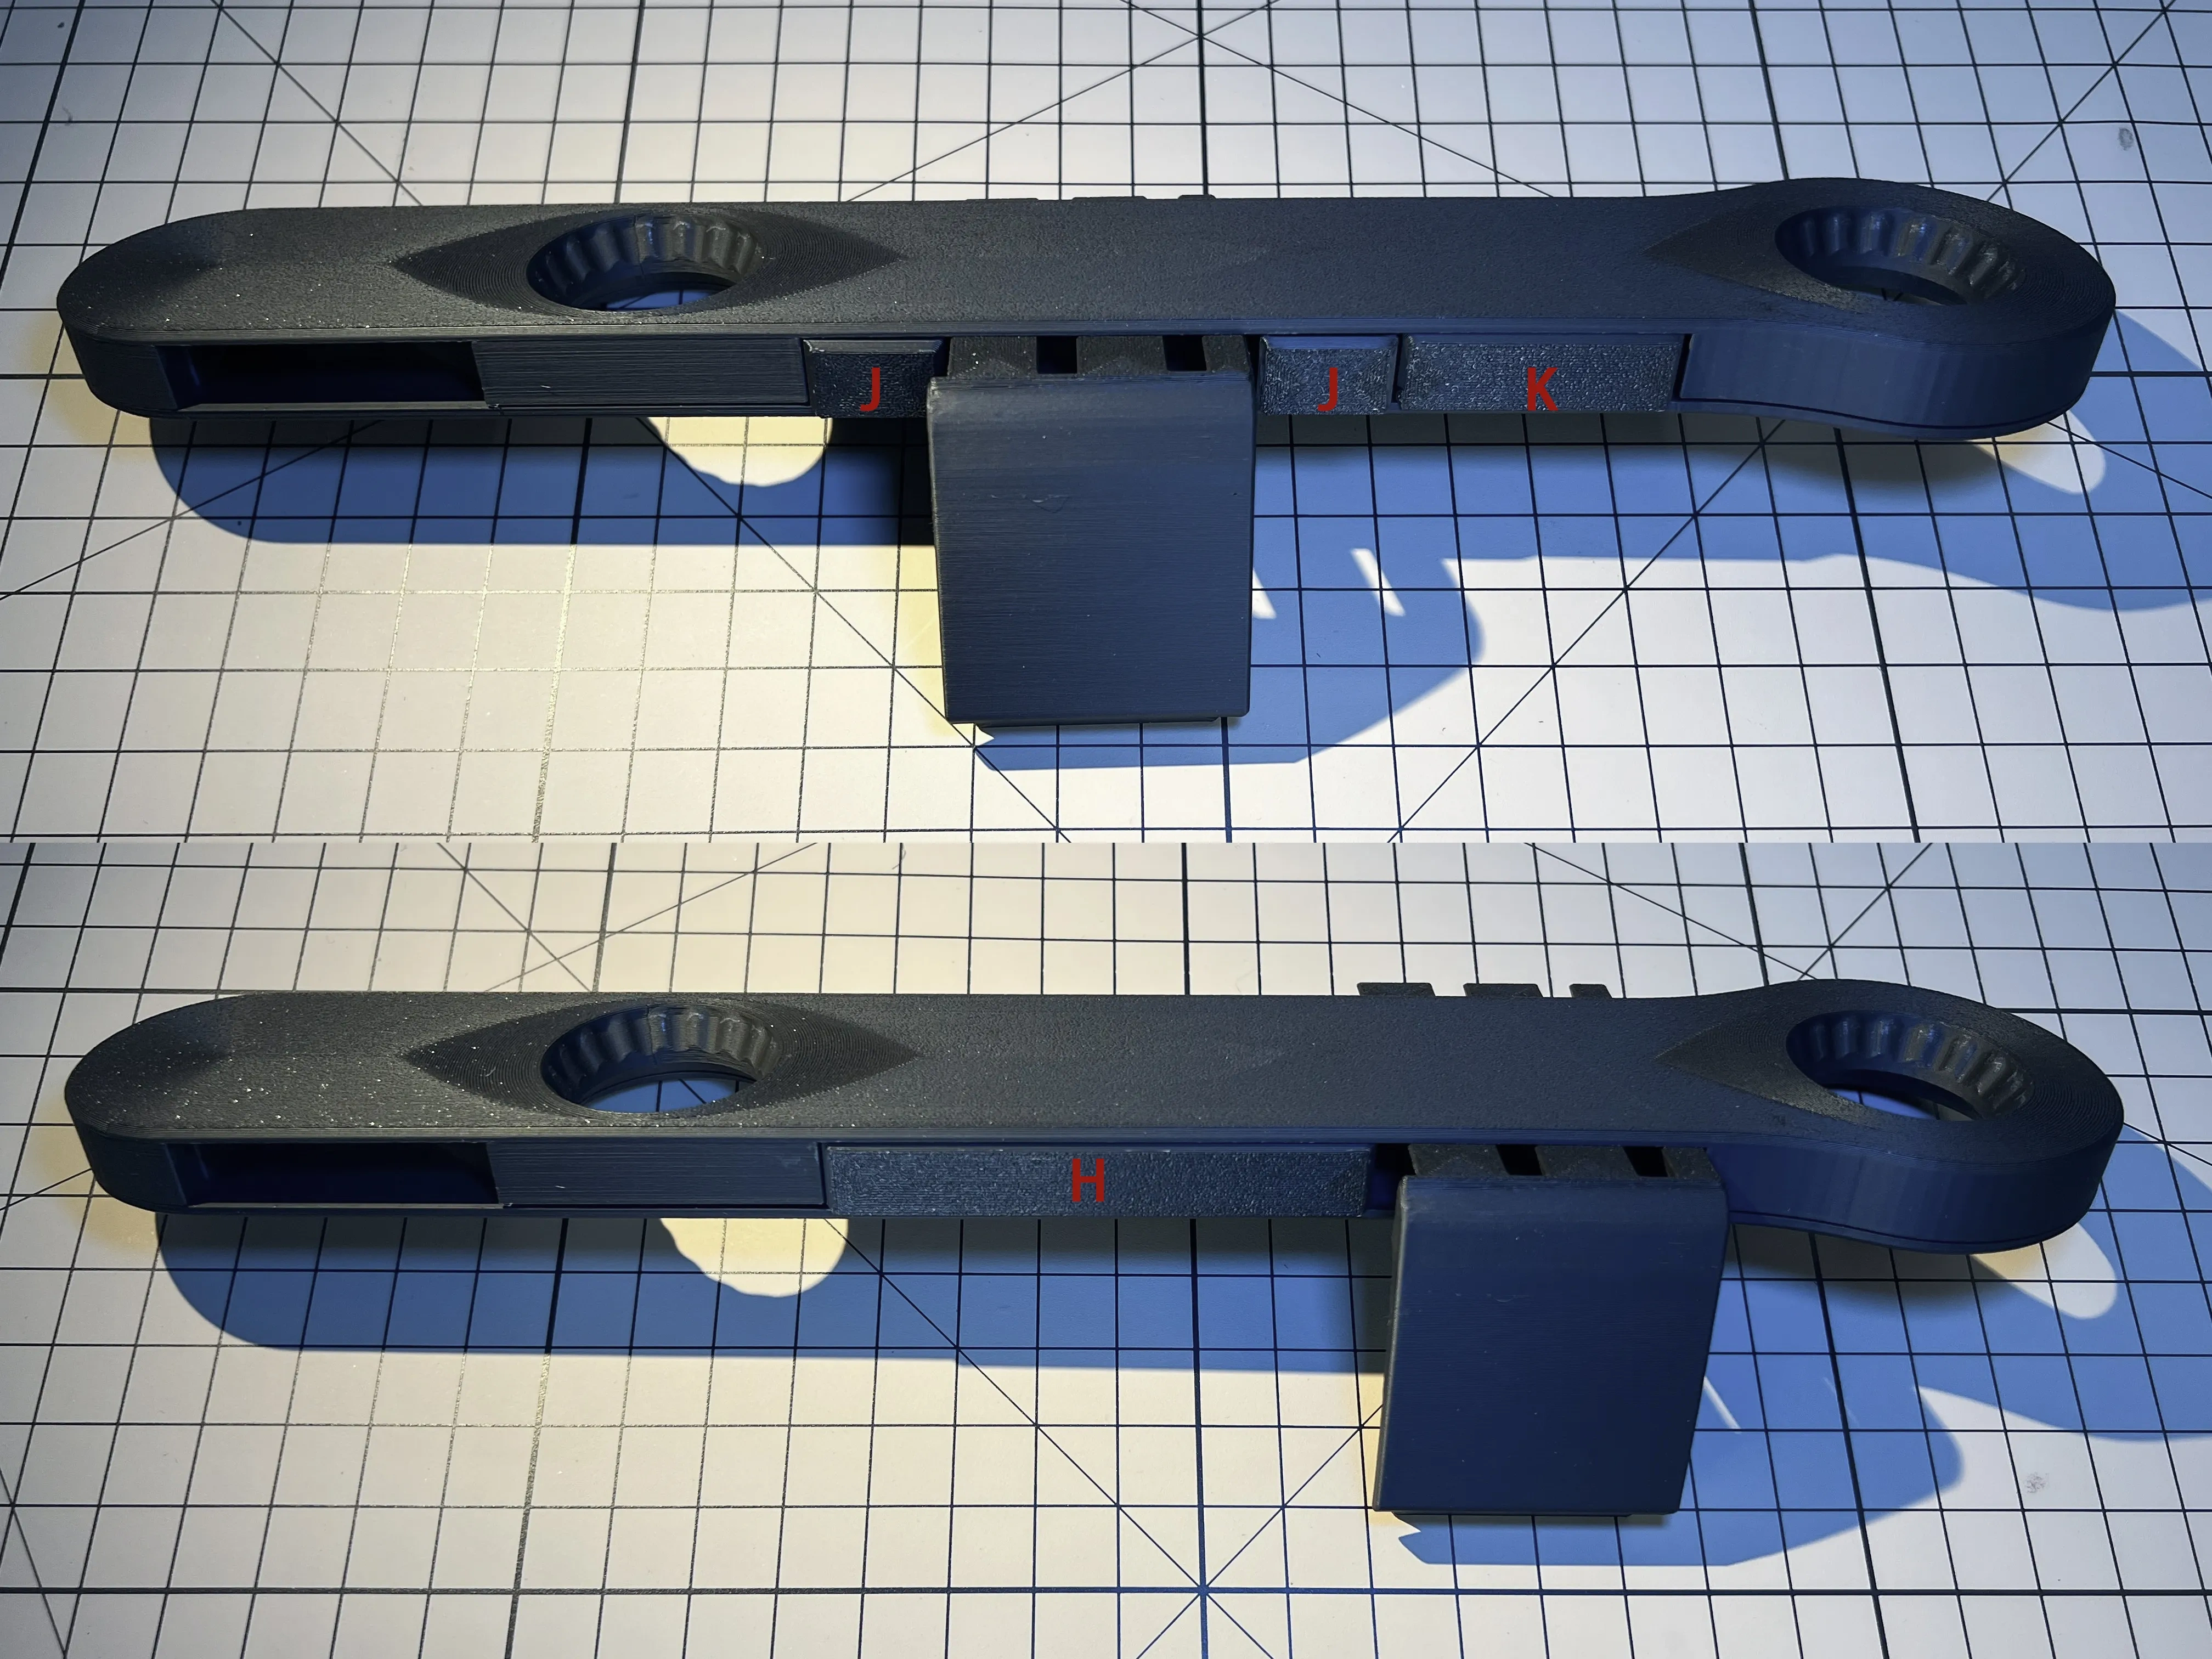
Two sets of connecting pieces are installed at the front and back of the base to make it stably fixed with the armrest. In order to adjust the installation position to the maximum range, the front end part of the base is basically hollowed out by me. After adjusting the fixed position, many positions will be vacated inside. At this time, first try whether the front and back positions of the whole tray can make the arm comfortable, and then select H/J/K accessories of appropriate specifications to print filling support keel after confirmation.

H is 80mm support, which is only applicable when the connecting piece is located at both ends of the mounting hole of the base. K is 40mm,J is 20mm, and matching printing can be selected according to the remaining positions. It is suggested that if the suspension in front of the overall base is too long, the larger the filling model can ensure the overall stability.
Base A has two sizes: a general size board and a widened version (75mm wide). The corresponding support specifications are different. Please select the appropriate configuration file to print according to the requirements.
At this point, the overall installation is completed and can provide basic use.
Auxiliary accessories selection installation:
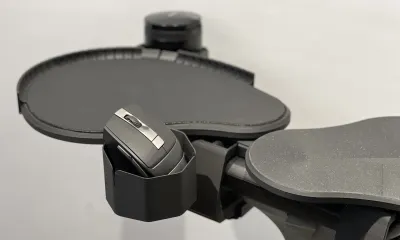
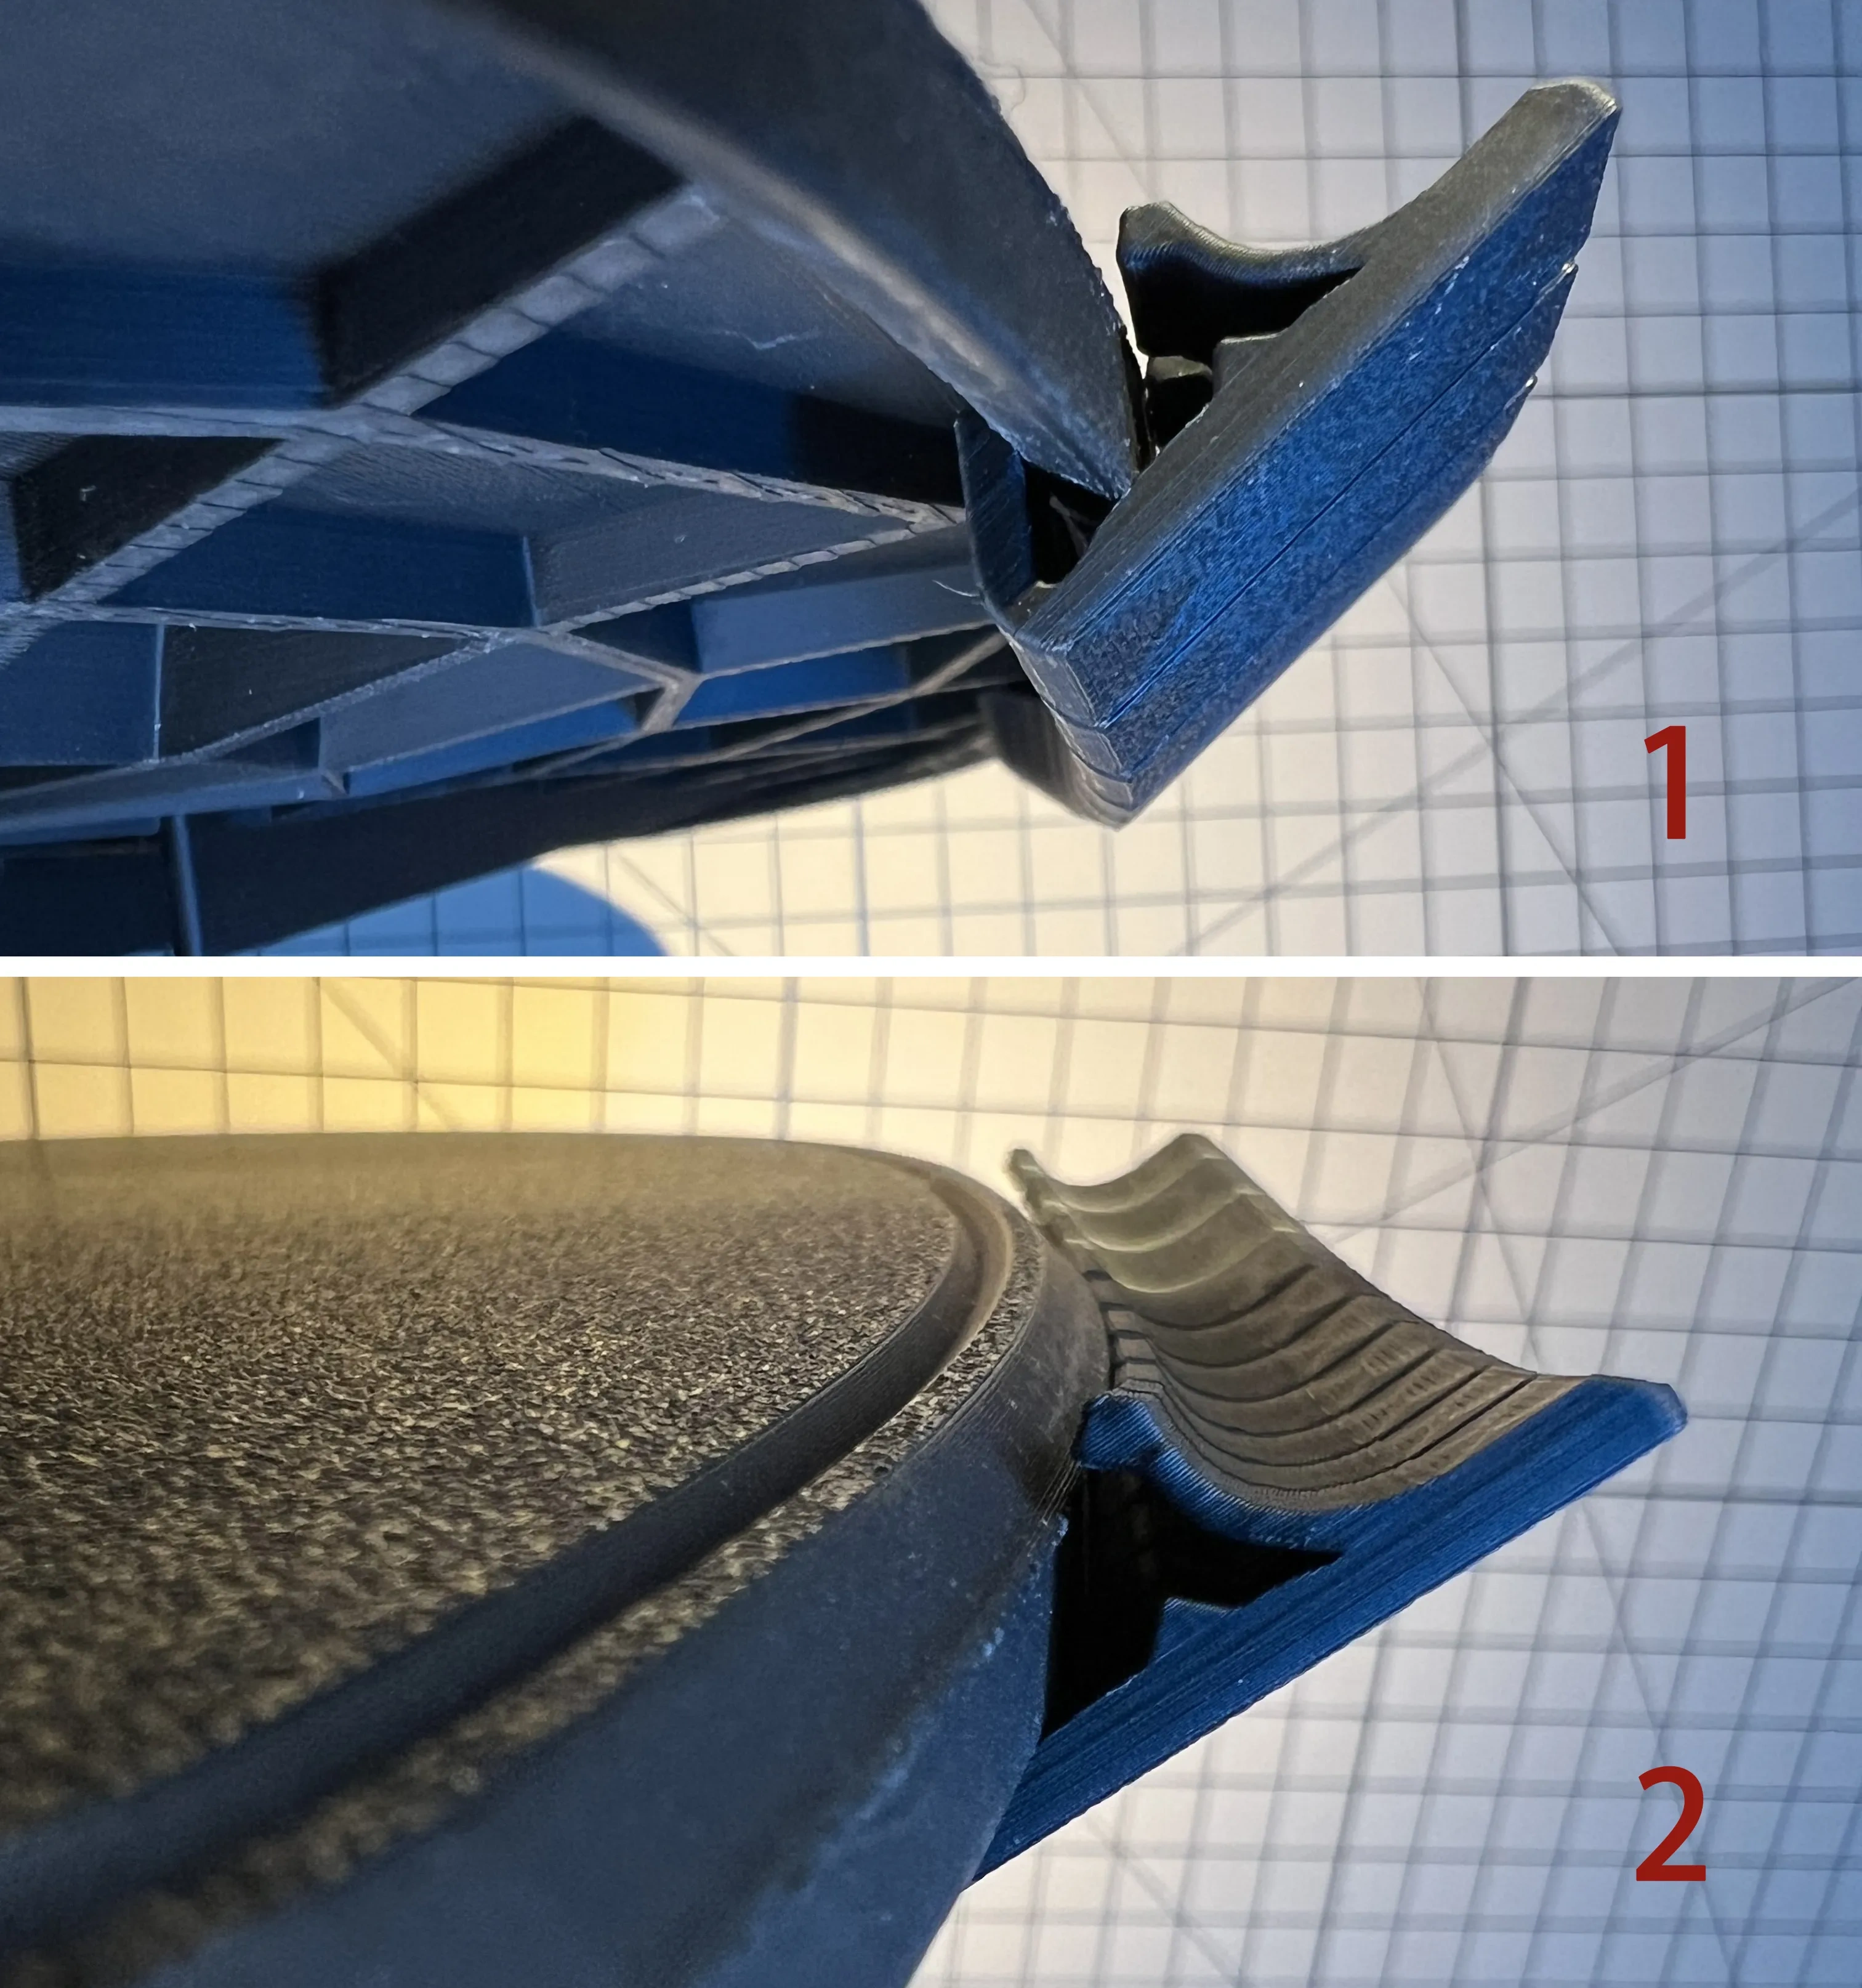
L-mouse anti-drop barrier:
- Installed on the periphery of the B pallet can help reduce the risk of the mouse slipping and choose whether it needs to be installed.
- It is strongly recommended to print with petg material. If pla is used to print the finished product, the strength and angle need to be carefully controlled when installing, which is easy to break or loosen (at the beginning, this changed more than a dozen models could not be easily installed with pla, but it was helpless.)
- In the document, I have divided every 10 sections into one (this is the length that is easier to install after many experiments, and it is not recommended to print in one piece). During installation, the bottom is tilted into the mouth first, and then the front is slowly pushed into the card slot. This part is relatively fragile and needs to be gradually increased to adapt. It is suggested to start the installation at the most gentle straight edge of the arc, and slide to the required position after the card, how long the protection range is needed, just play a few more copies.
This is the most test installation in the whole model. It takes a little patience and cannot be anxious or violent.
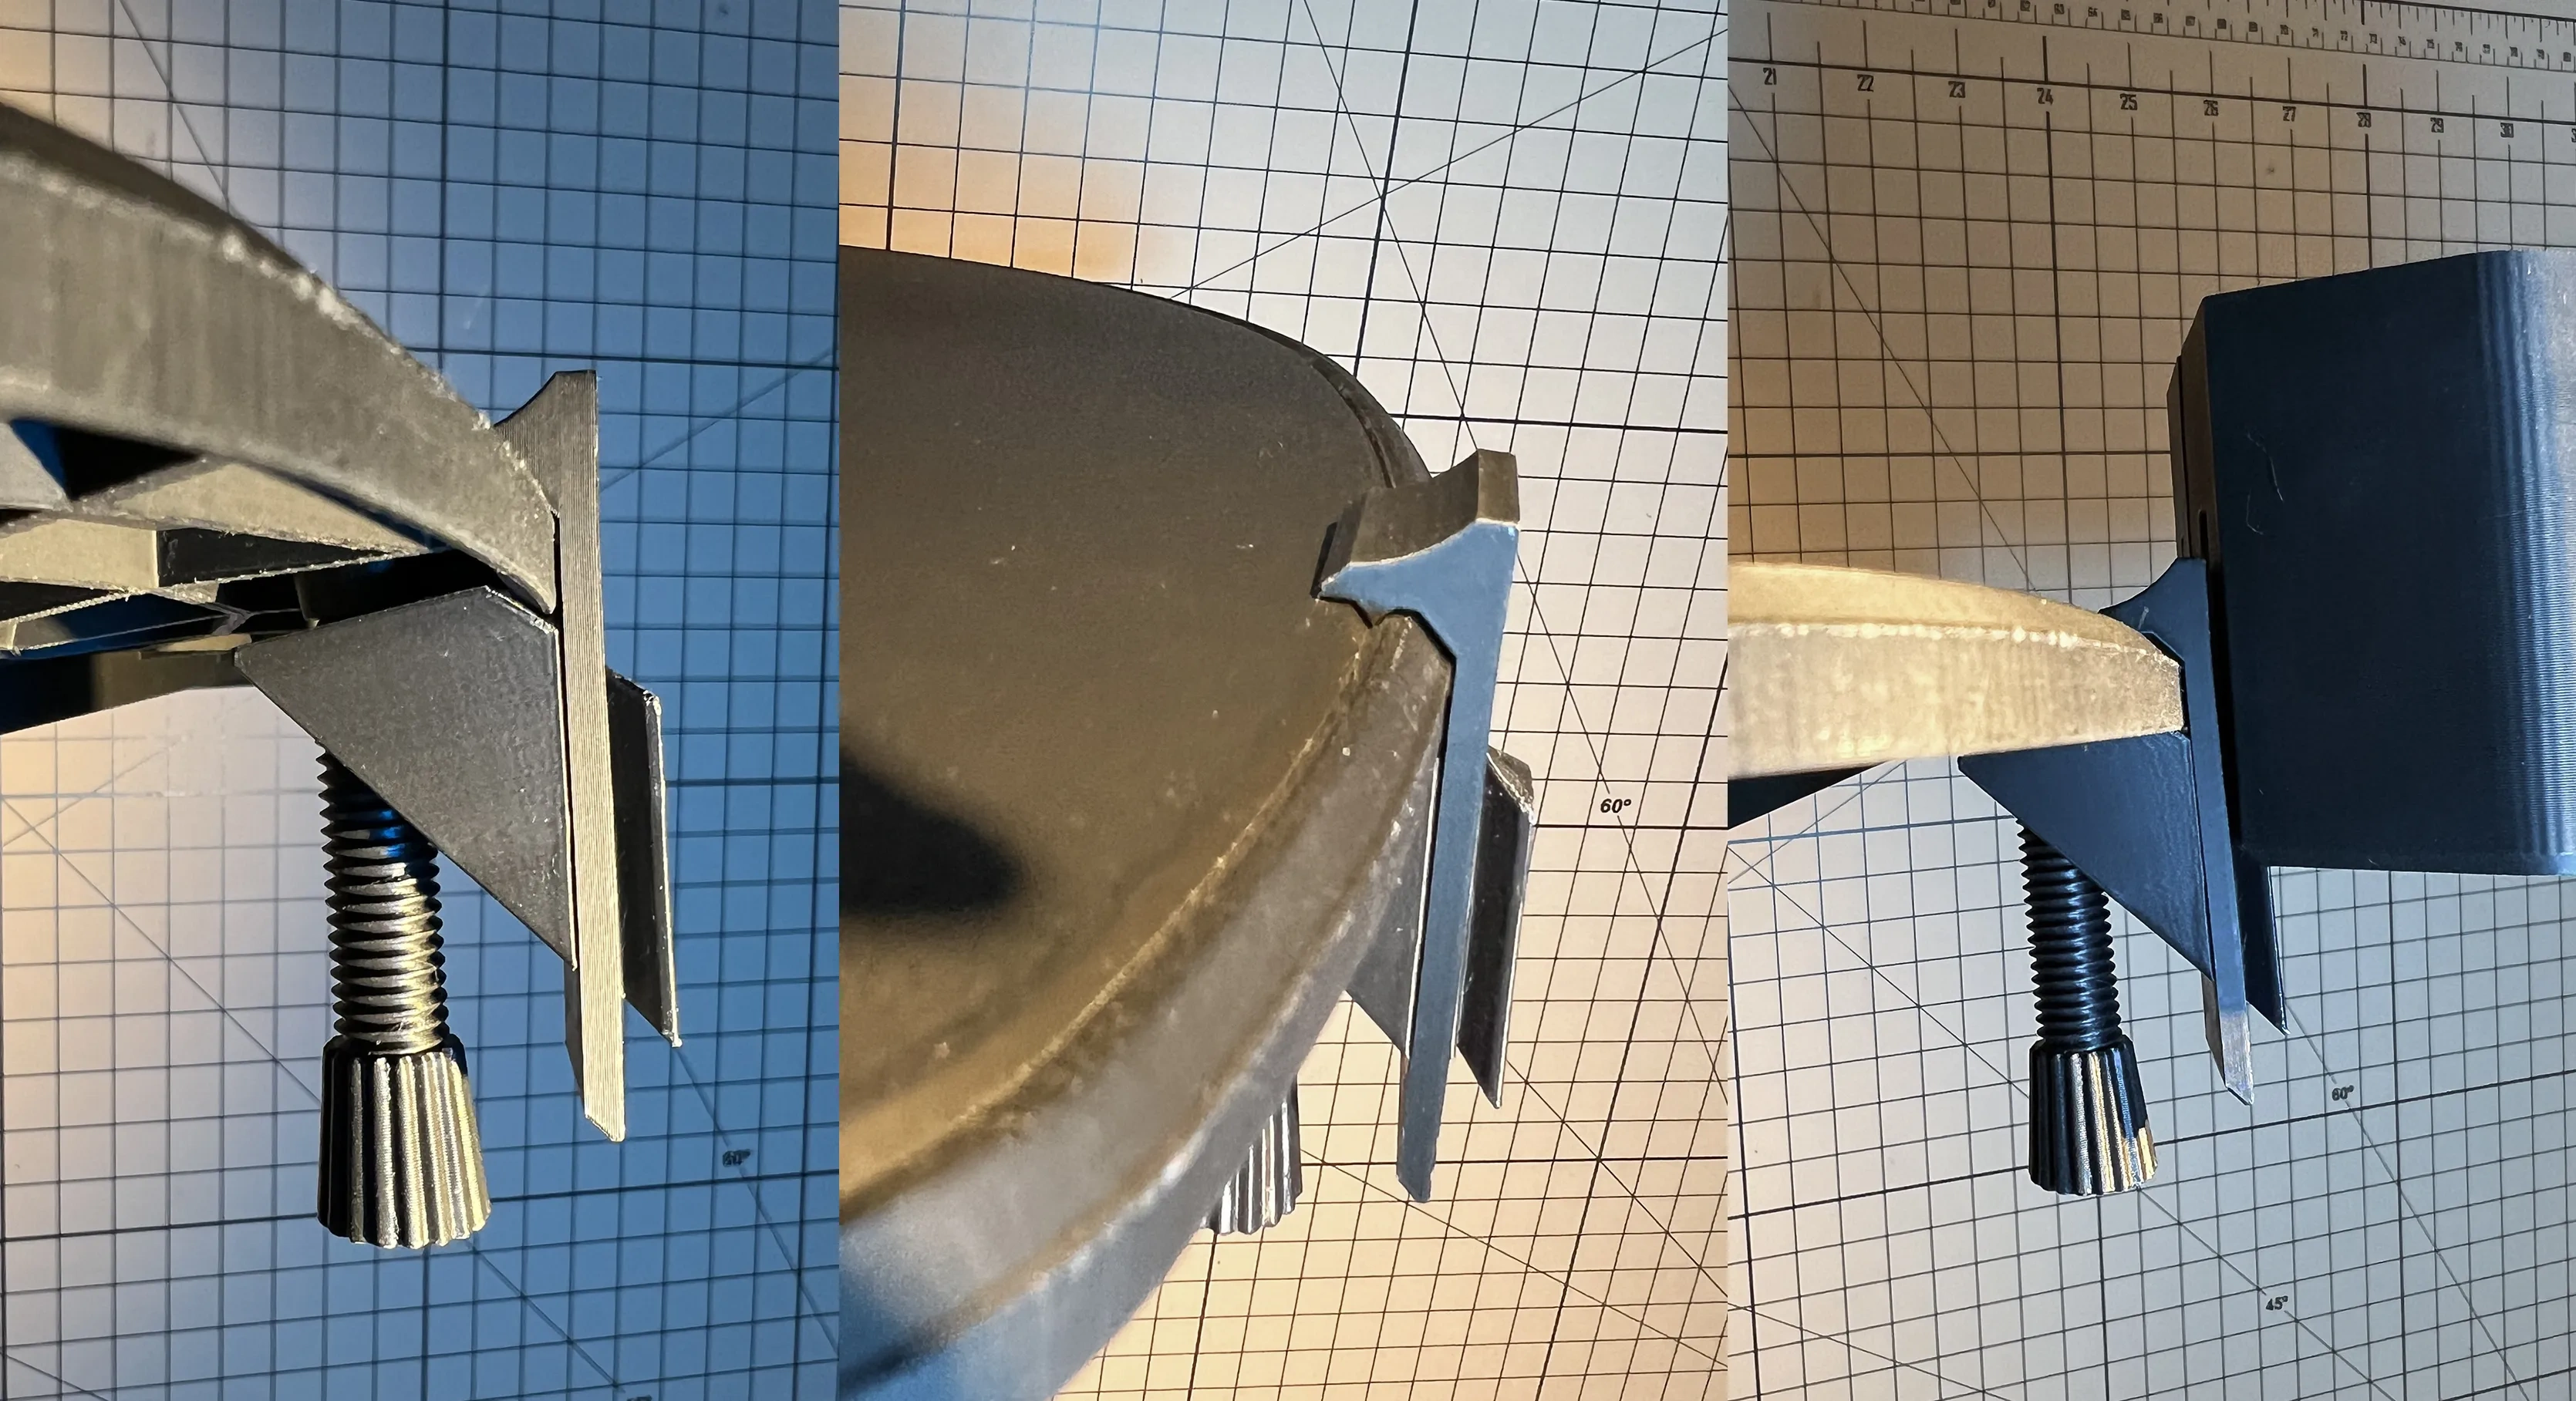
Cup holder installation:
- The original intention of designing this is to place an ashtray beside it, so two specifications (the inner empty diameter is 77mm, the depth of the n model is 60mm, and the depth of the m model is 78mm) have been made conveniently. you can put cups and pens, etc. you can choose for yourself. (It is recommended to use petg printing, pla I also typed one, so far no problem has been found)
- In order not to support and consider the problem of printing direction, this connecting piece is divided into several parts for combined insertion. If it is necessary to install the cup holder, it is recommended to try to install the cup holder once before fixing the base, which is easier to use.
- The P fasteners (in order to increase durability and toughness, petg printing is preferred, with three layers of walls and sparse filling of 30% or more) are combined into one fastener first. At this time, the bolts are not tightened first, the card slot on the back of the cup holder is held by hand and slid into a little bit, and then the other set of P combinations is also stuck into the card slot on the pallet corresponding to the other side. This is difficult to describe in words, you can find the trick by trying several times with reference to the pictures. It is also recommended to install the flat arc of the pallet before moving to the required position to tighten the bolts. M will be a little tighter than N, and you need to try several times more when installing into the card slot.
There is a small round gasket in the P series, which is the bolt plug. Depending on the installation position, it is necessary to add it. Some positions may just top the reinforcing rib at the bottom of the tray without adding gasket.
Accessories P small adjustment optimization, simplifying the installation difficulty, the new model is slightly different from the photo.
There is also a simple pen holder to choose the same installation method.


PS: An unexpected harvest. After two days of trial, I found that it was very convenient to put the mouse. I was not afraid of the risk of the mouse being hit.
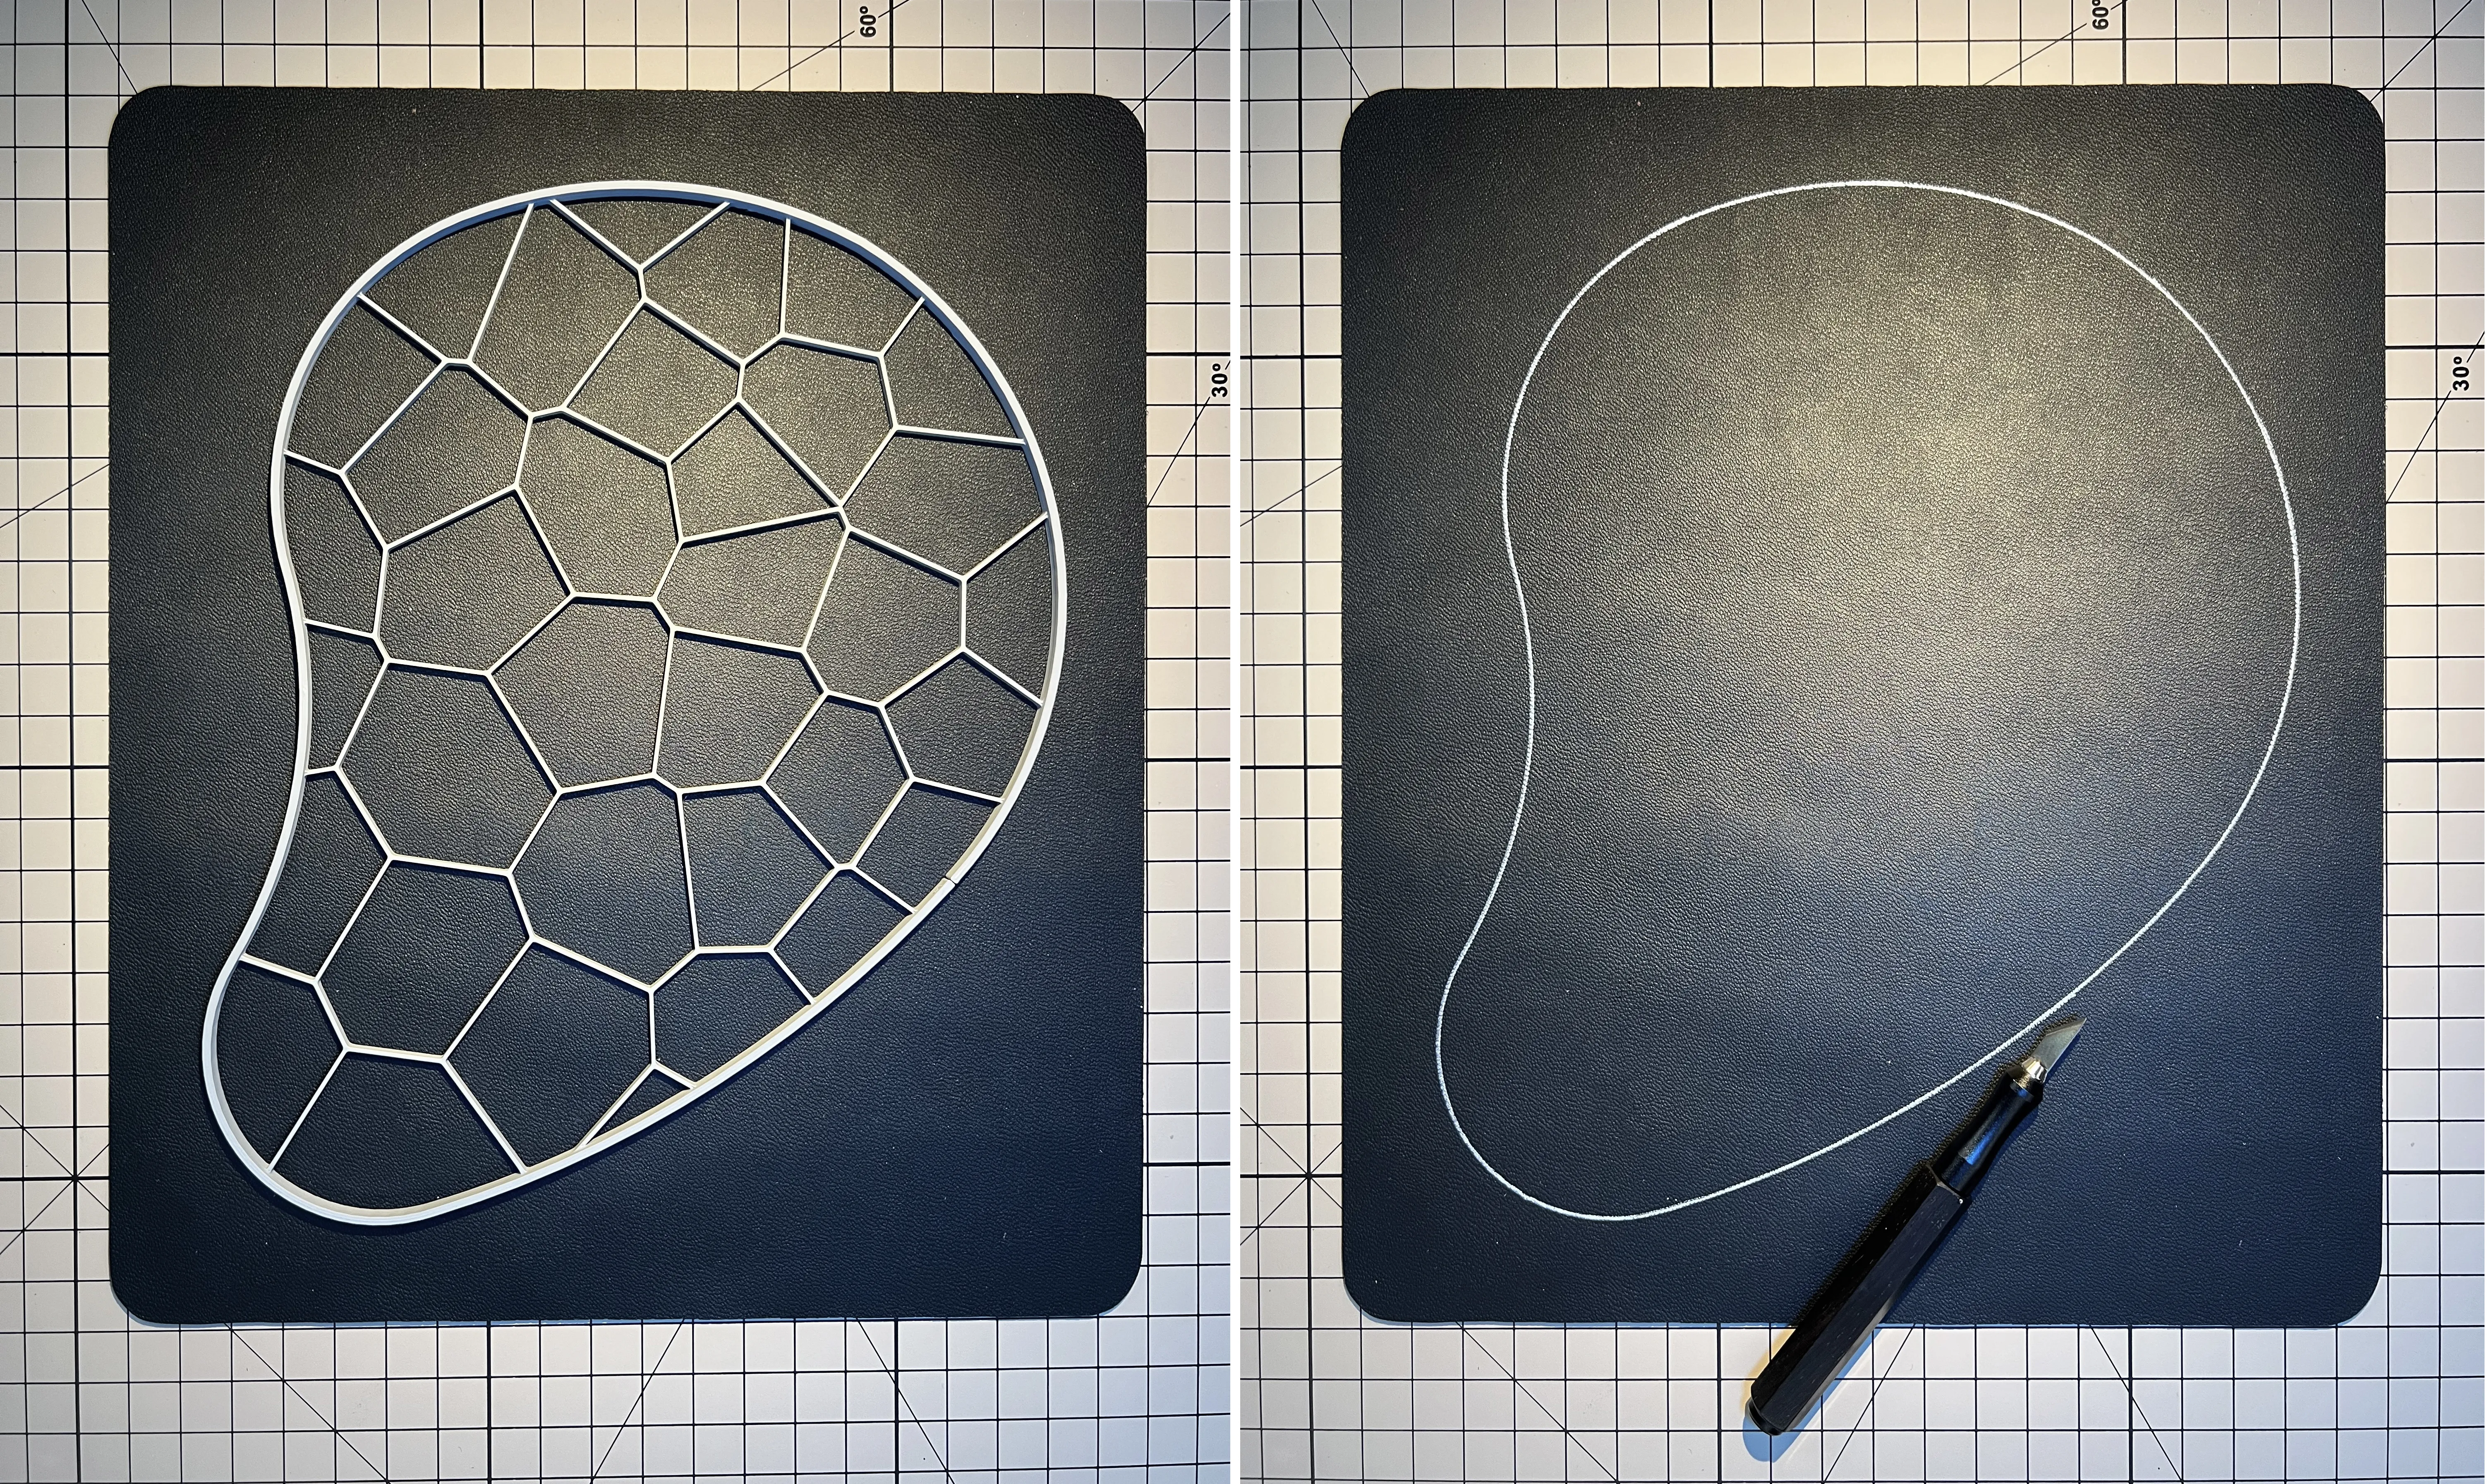
Finally, the mouse pad cutting template
, if you feel that the printing surface is too slippery and unaccustomed, or there is a phenomenon of frame skipping, you can print out the final cutting template of the document, and then buy a mouse pad made of silicone or leather without locking edges to cut by yourself. Anyway, I didn't find this phenomenon in the past two days of the test, just in case I opened a model, you can judge for yourself, but pay attention to distinguish between the positive and negative directions.
Finally, I would like to add a supplementary explanation on the shrinkage seam left between fasteners, because pla and petg have been tested during printing, and it is found that the shrinkage difference is too large. For the adaptability of general installation, most of the shrinkage is 0.08 or 0.1. After assembly, if there is no problem in trial, the model glue can also be fixed on the direct point of the structural buckle (such as the A1-2 two pieces).
At this point, I hope it is suitable for your needs. Thank you for your support and encouragement. During the use, you are welcome to put forward various suggestions for improvement. I am very grateful.
Originality of the Model
The author declares that this work is their personally original model
This model is licensed under the following terms:
This work is licensed under a Standard Digital File License. Digital files have a strict non-commercial, personal use only license.
You shall not share, sub-license, sell, rent, host, transfer, or distribute in any way the digital file or 3D printed versions of this object, nor any other derivative work of this object in its digital or physical format (including remixes of this object). You can not host these files on other digital platforms, web stores or cloud repositories. The objects may not be used in any way whatsoever in which you charge money, collect fees.
Models(3)
- 鼠标托盘 加大码基座EL260104.3mfDesigner

520.42 KB

2026-01-07
- 鼠标托盘EL260104.3mfDesigner
1.74 MB
2026-01-07
- 鼠标托盘杯架EL260104.3mfDesigner
1.01 MB
2026-01-07
View all(3)