


Ring-shaped design
Light Luxury Style
Design Sensibility
3D‑printed pendant
3D‑printed jewelry
Daily Wear
Functional Prototype
3D Jewelry
Hollow‑out design
Modern Minimalism
Minimalist Design
Vertical Printing
Dual-Material Printing
Wearable
Ring Pendant

- 0.2 mm layer height, 3‑layer walls, 15% infill density

3-disc
PETG
Designer

1

0
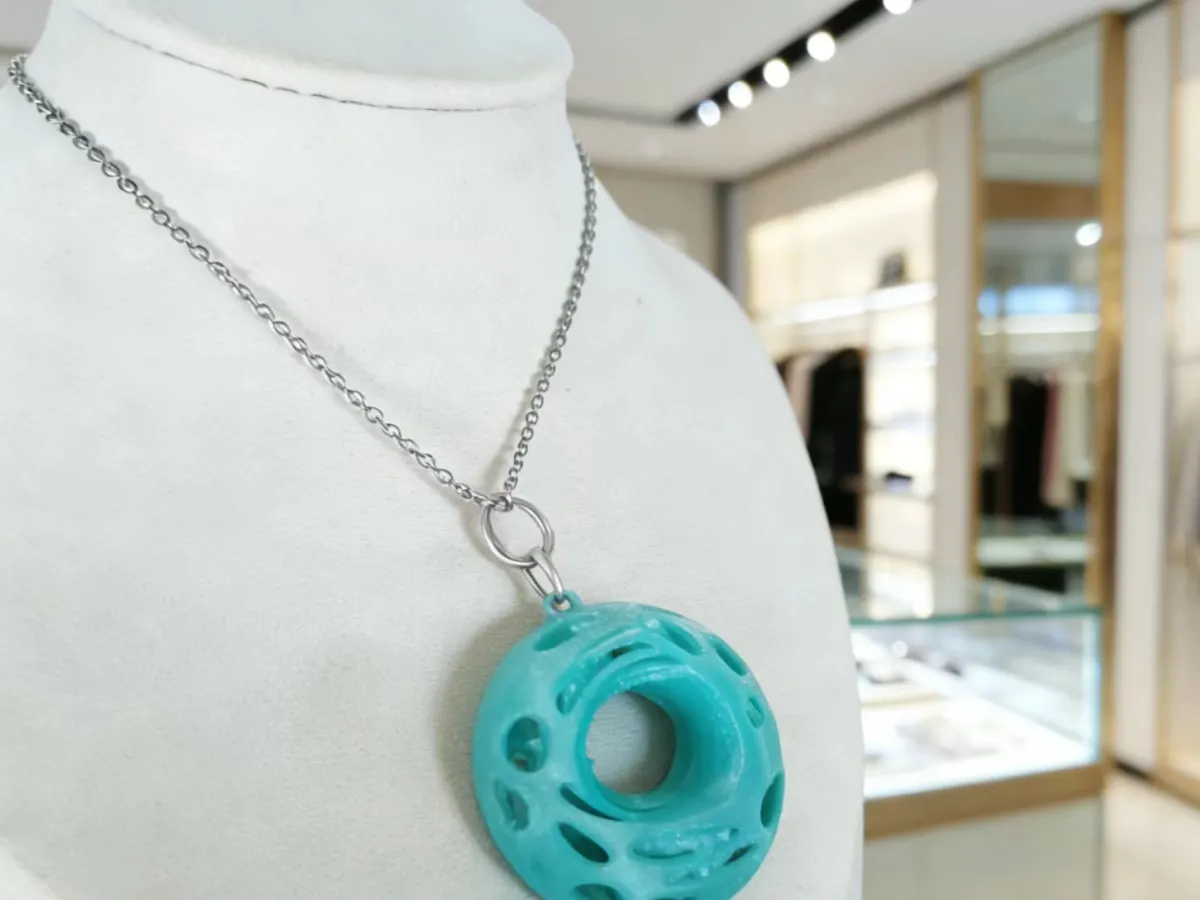
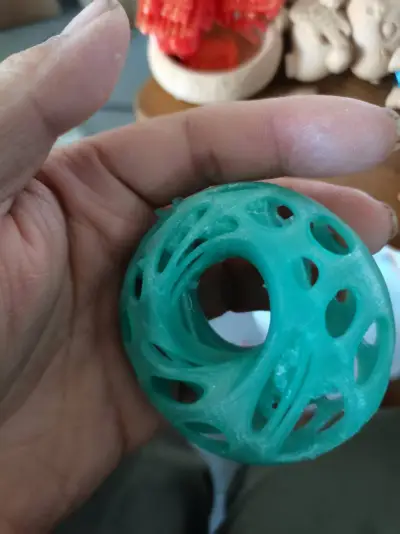
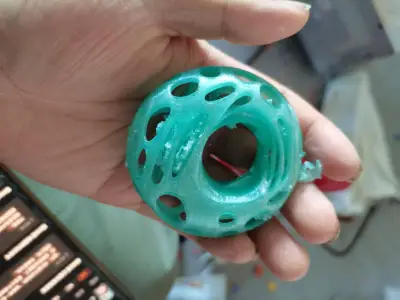
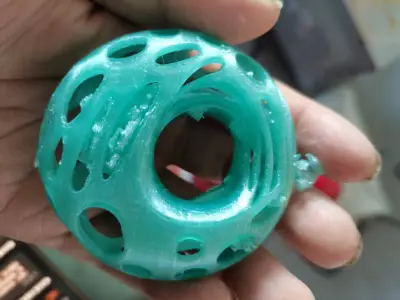
This hollow circular pendant is anchored in the core design philosophy of “the harmonious coexistence of Eastern aesthetics and modern craftsmanship,” seamlessly integrating traditional auspicious motifs with FDM 3D printing technology. The piece features a ring-shaped structure, rendered with fluid, flowing lines that create an intricate, openwork texture—preserving the ring’s timeless symbolism of wholeness and continuity while leveraging precise parametric modeling to achieve unparalleled spatial depth and visual transparency. As a wearable decorative piece, it strikes a perfect balance between collectible value and everyday practicality, serving as a shining example of how design aesthetics and manufacturing technology can converge.
II. Sources of Inspiration
(1) Tracing the Cultural Core
The design draws inspiration from the philosophical contemplation of “the circle” in Chinese traditional culture. In Chinese culture, the circle embodies unity, harmony, and infinite cycles—from ancient jade bi disks to classic ornamental patterns—the form of the circle permeates every aspect of art and daily life. This piece takes the circular ring as its foundation, using an openwork design to break free from the heaviness of solid forms. While retaining the cultural significance of “wholeness,” it also infuses the design with the lightness and dynamism prized by contemporary aesthetics, breathing new life into traditional motifs through the power of 3D printing technology.
(2) Design Insights and Practical Considerations
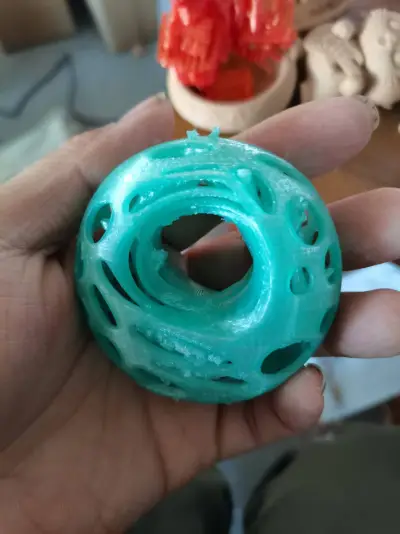
In the design process, we leveraged the unique characteristics of 3D printing to refine and optimize the concept. Early on, we experimented with various solid ring structures—but after printing, we found that solid designs were not only heavy and uncomfortable to wear, but also struggled to capture the delicate intricacies of openwork detailing. Through iterative modeling and slicing tests, we ultimately settled on a “hollow” design approach: By capitalizing on the strengths of FDM printing to precisely realize complex openwork geometries, while carefully adjusting parameters such as a 0.2–0.3 mm contact gap and controlling support density, we struck a balance between aesthetic appeal and print feasibility. At the same time, drawing on the practical design logic of household items, we ensured that the piece not only retained its decorative charm but also offered comfort and durability for everyday wear, making it both an artistic statement and a functional accessory suited to daily use.
III. Printing Requirements
(1) Equipment Requirements
1. We recommend using a dual‑nozzle FDM printer (such as the Topo A1 series), which supports multi‑material printing and water‑soluble support printing, minimizing the risk of model damage. For single‑nozzle printers, a standard 0.4 mm nozzle is essential to deliver stable, high‑resolution line work.
2. The printer should feature a closed build chamber and automatic bed leveling. A closed chamber reduces airflow interference, preventing warping at the edges; automatic bed leveling ensures first‑layer accuracy and enhances overall model flatness.
3. Bambu Studio is the recommended slicing software, offering precise control over support types, skirt settings, and other parameters tailored to the specific printing needs of this piece.
(2) Material Requirements
Core Material Recommendations
1. Dual‑Nozzle Printing Solutions (Optimal Choice)
- Option 1: Water‑Soluble Support Combination
Base Material: PLA (we recommend matte‑finish PLA for its smooth, refined texture) or PETG (for superior toughness); Support Material: PVA/PDT water‑soluble filaments that dissolve upon immersion in water—no need for manual removal, perfectly preserving the openwork structure.
- Option 2: Multi‑Material Dual‑Printing Combination
Combination A: PETG Body + PLA Support—PETG offers high strength and excellent impact resistance, ideal for everyday wear; PLA support is more brittle but easily removable, making it well suited for applications where durability is paramount.
Combination B: PLA Body + PETG Support—PLA provides a smooth, premium surface finish; PETG support boasts exceptional toughness and resists cracking during removal, perfect for projects prioritizing fine surface detail.
2. Single‑Nozzle Printing Solutions (Backup Option)
Only PLA material is permitted—PLA has moderate brittleness and low support removal difficulty, minimizing the risk of damage to openwork areas. PETG is strictly prohibited: its high toughness makes support removal extremely challenging, often leading to model deformation or even breakage.
(3) Key Parameter Settings
Parameter | Recommended Value | Notes
-------------------|---------------------|----------------------
Nozzle Diameter | 0.4 mm | Ideal for fine openwork details, ensuring crisp, clear lines
Layer Height | 0.16–0.2 mm | Balances print speed and surface precision, enhancing the smoothness of openwork edges
Fill Density | 15%–20% | 15% for the main body to maintain lightweight construction while preserving structural integrity; 20% for supports to ensure stability and ease of removal
Wall Thickness | 1.2–1.5 mm | Multiple layers of contour overlap to increase overall model strength and prevent stress fractures in openwork areas
Print Speed | 40 mm/s for outer contours, 60 mm/s for inner contours | Slow outer contour printing preserves fine details; faster inner contour printing reduces total print time
Temperature Settings | PLA: Nozzle 200–215°C, Bed 60°C; PETG: Nozzle 220–230°C, Bed 65–70°C | Tailor settings to material properties to avoid warping or poor adhesion caused by improper temperature control
Support Settings | Must be enabled; tree‑like supports are recommended—tree‑like supports have minimal contact area and are easy to remove; support density 15%–20%, with a contact distance of 0.2–0.3 mm
Skirt Settings | Must be enabled, with a width of 5 mm | Increases bottom adhesion, preventing warping and shifting, ensuring successful printing
Print Orientation | Vertical printing (ring axis perpendicular to the build platform) | Reduces support coverage and lowers the printing difficulty of openwork structures
(4) Prohibited Practices
1. Do not use single‑material PETG printing—support removal is extremely difficult and prone to damaging the openwork structure.
2. Never disable skirt settings—without a skirt, the first layer is likely to warp, resulting in complete print failure.
3. Avoid setting support density too high (above 25%) or too low (below 10%): Too high a density increases removal difficulty, while too low a density risks support detachment, compromising print quality and structural integrity.
4. Do not interrupt the printing process arbitrarily—avoid layer separation or structural fractures that can occur when the model is subjected to sudden changes in environmental conditions.
IV. Assembly Instructions
(1) Pre‑Printing Preparation
1. After printing, allow the model to cool naturally to room temperature (approximately 20–25°C) to prevent thermal deformation during removal.
2. Gather your tools: needle‑nose pliers, a utility knife, tweezers, a lint‑free cloth, and polishing cotton (optional).
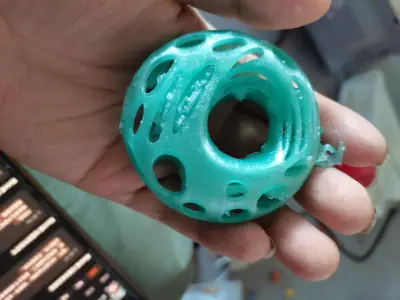
3. Inspect the printed part: Confirm there are no visible layer lines or cracks, and check whether support remnants are easily removable. If minor burrs appear, gently scrape them away with a utility knife.
(2) Support Removal Steps
1. Dual‑Nozzle Printed Parts
- Water‑Soluble Support Combination: Place the model in warm water at 40–50°C and soak for 10–20 minutes, gently agitating the model throughout the process. Once the supports have completely dissolved, remove the model, rinse thoroughly with clean water, and let it air dry.
- Multi‑Material Dual‑Printing Combination: Lightly score the connection points between supports and the main body with a utility knife, then carefully peel off the supports using tweezers or needle‑nose pliers—avoid pulling forcefully on openwork areas, starting removal from the base of the supports first.
2. Single‑Nozzle PLA Printed Parts
For tree‑like supports, begin removing from the thinner sections of the support structure. Gently grasp the support with tweezers and pull outward; if you encounter significant resistance, lightly score the contact point with a utility knife and proceed gradually. Throughout the process, avoid applying excessive force to prevent cracking in the openwork areas.
(3) Post‑Processing Optimization
1. Surface Cleaning: Dip a lint‑free cloth in a small amount of alcohol and gently wipe the model’s surface to remove residual powder and stains, restoring the material’s original texture.
2. Detail Refinement: If the openwork edges have slight burrs, lightly polish them with polishing cotton to smooth out the lines; for tiny gaps, mix a small amount of PLA powder with alcohol, apply the mixture to the affected areas, let it dry, then sand smooth.
3. Wear Preparation: Depending on personal preference, thread a necklace cord, metal chain, or leather cord through the pre‑drilled hanging hole at the top of the pendant to complete the assembly and get ready to wear.
(4) Assembly Considerations
1. When removing supports, apply even pressure—especially in densely packed openwork areas—to avoid structural fractures caused by pulling. Remove supports in multiple small steps, gradually loosening each section.
2. During post‑processing polishing, avoid excessive friction to prevent compromising the symmetry and overall aesthetic appeal of the openwork structure.
3. When wearing, avoid collisions with sharp objects to prevent deformation or damage to the openwork edges; when storing, place the pendant in a jewelry box to protect it from crushing or squeezing.
V. Application Scenarios and Value
(1) Applicable Scenarios
1. Everyday Wear: Perfect as a necklace pendant or bag charm, this piece complements casual, professional, and other everyday looks—its versatile style effortlessly elevates personal attire.
2. Home Decor: Display it on a desk or bookshelf as a small decorative accent, pairing it with greenery or creative lifestyle products to cultivate a simple yet elegant home atmosphere.
3. Collection & Gift: Blending traditional aesthetics with cutting‑edge technology, this piece carries unique design and craftsmanship value—ideal as a cultural gift or collector’s item to share with loved ones or fellow enthusiasts.
(2) Core Values
1. Cultural Value: By preserving the tradition of “wholeness” and auspicious symbolism, this piece uses 3D printing technology to bridge traditional motifs with modern life, offering a fresh, innovative expression of cultural heritage.
2. Craftsmanship Value: It showcases the technical advantages of FDM 3D printing—from modeling and parameter optimization to printing and post‑processing—demonstrating rigorous craftsmanship and hands‑on expertise at every stage.
3. Practical Value: Striking a balance between beauty and function, this pendant is comfortable to wear, highly durable, and perfectly suited to both daily use and decorative purposes.
VI. Common Printing Issues and Solutions
(1) Warping at Edges
1. Causes: Insufficient bed temperature, lack of skirt activation, or an unclean build platform.
2. Solutions: Increase bed temperature (to 60°C for PLA, 70°C for PETG); ensure skirts are enabled and set to a width of at least 5 mm; before printing, wipe the build platform with a lint‑free cloth to remove dust and oil residue.
(2) Damage to Openwork Structures
1. Causes: Improper support removal, incorrect material selection (e.g., using single‑material PETG), or insufficient fill density.
2. Solutions: Prioritize dual‑nozzle printing or single‑material PLA printing; remove supports slowly and steadily, avoiding forceful pulling; maintain a fill density of at least 15% to ensure structural integrity.
(3) Excessive Support Residue
1. Causes: Incorrect support type or unreasonable support density settings.
2. Solutions: Opt for tree‑like supports to minimize contact area; keep support density between 15%–20%, balancing stability with ease of removal; when printing with a single material, slightly increase the support interface spacing to reduce the likelihood of residual support.
(4) Prominent Layer Lines
1. Causes: Excessive layer height, overly fast print speeds, or clogged nozzles.
2. Solutions: Reduce layer height to below 0.16 mm; lower outer contour print speeds to 35–40 mm/s; inspect the nozzle, clear any residual filament, and ensure smooth filament extrusion.
VII. Conclusion
This hollow circular pendant is rooted in deep cultural heritage and powered by precise 3D printing technology. From refining design inspiration to optimizing printing parameters and standardizing assembly procedures, every step reflects a thoughtful blend of aesthetics, craftsmanship, and practicality. Beyond being a beautiful cultural product, it serves as a vibrant embodiment of the fusion between tradition and modernity. Whether you choose to collect and wear it yourself or gift it to others, it conveys a unique cultural essence and profound craftsmanship value.
In future iterations, we can explore techniques like multi‑color printing and metallic‑texture materials to further enrich the visual layers of the piece. We can also tailor pendant sizes and openwork densities to suit different application scenarios, developing a series of products that meet the diverse needs of our users. With these innovations, we believe this piece will continue to shine in the realm of 3D‑printed cultural creations, showcasing ever‑wider application potential and enduring cultural appeal.
Originality of the Model
The author declares that this work is their personally original model
This model is licensed under the following terms:
Credit must be given to the creator
Models(1)
- xk挂坠.3mfDesigner

18.19 MB

2026-02-23