


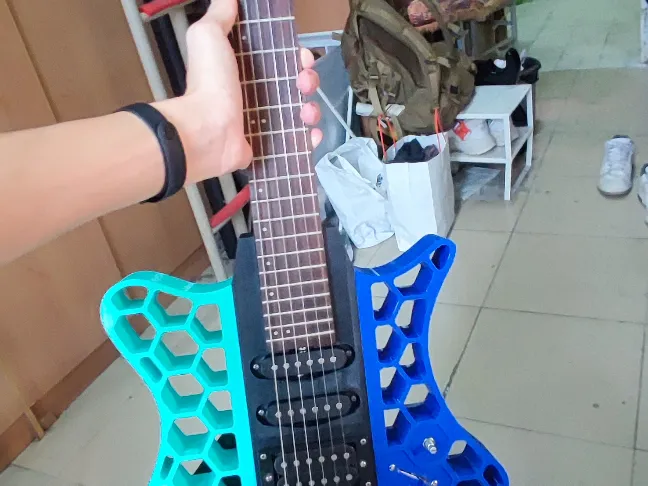
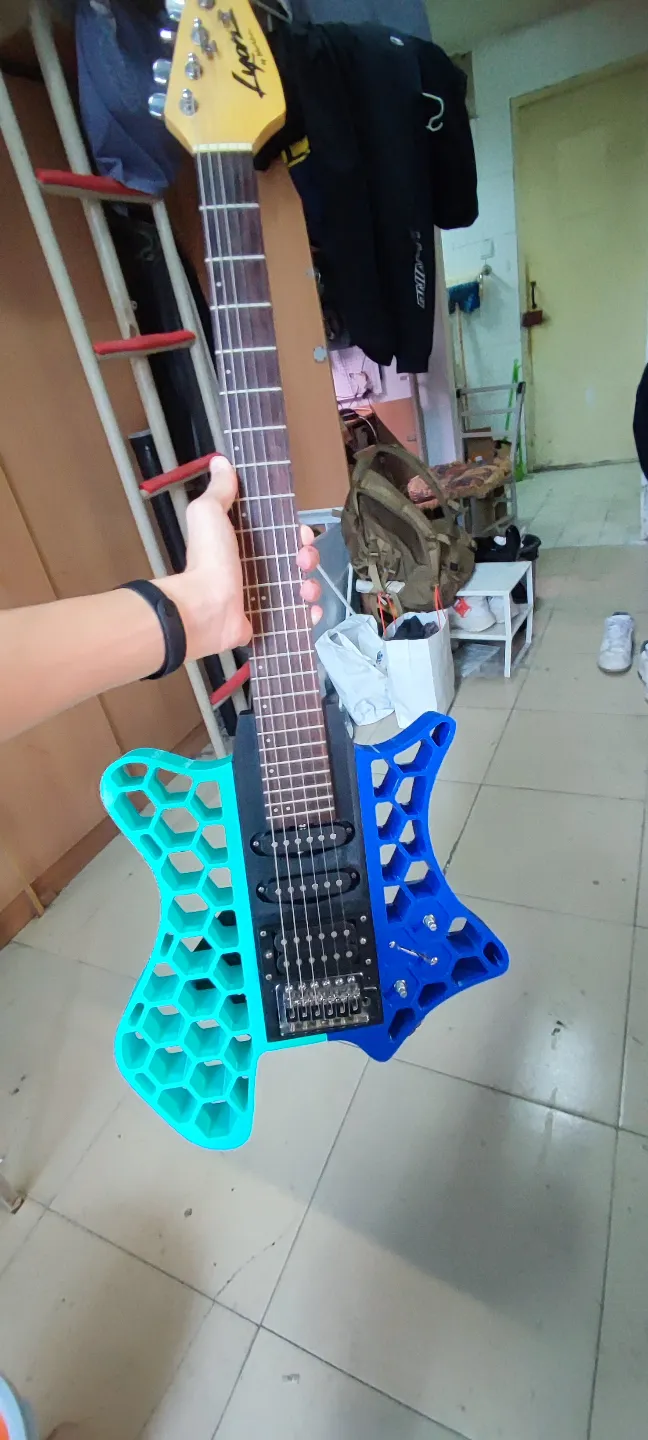


guitar

- 0.2 mm layer height, 2‑wall walls, 15% infill density

6-disc
ABS
Designer

134

13
1. Raw Materials and Tool Preparation
1. 3D Printing Filaments
- Main Material (Black ABS): Used for the core load‑bearing structure of the guitar body. ABS offers excellent machinability and heat resistance, though it’s important to address warping issues during printing.
- Decorative Material (Colored PETG): Ideal for pickguards, knobs, or non‑load‑bearing inlays. PETG boasts high toughness and strong interlayer adhesion, making it well suited for aesthetic components.
2. Hardware and Electronic Components (Disassembled Parts / Purchased Components)
- Wooden Guitar Neck: Includes a fully assembled fingerboard, frets, and headstock. The neck is critical for tuning accuracy and playing feel; while 3D‑printed necks may suffer from insufficient tensile strength and creep risks, opting for a traditional wooden neck remains the most reliable choice.
- Guitar Bridge System: Choose between a hardtail bridge or a tremolo bridge.
- Electrical System: Pickup transducers, potentiometers (volume and tone controls), toggle switches for pickup selection, and a 6.35mm output jack.
- Shielding Materials: Conductive copper foil tape or conductive paint—since plastic guitar bodies lack electromagnetic shielding capabilities.
3. Assembly Consumables
- Adhesive: A modified acrylic adhesive, such as 302AB. This adhesive cures to a high hardness and exhibits excellent aging resistance, making it ideal for bonding ABS parts together.
- Fasteners:
- M4 self‑tapping screws: Used to join the neck to the body.
- M3 self‑tapping screws or hot‑melt nuts: Employed to secure pickguards and back covers.
- Auxiliary Tools: Heavy‑duty zip ties, F‑clamps or C‑clamps, sandpaper ranging from 200–800 grit, and paper or sandpaper shims of varying thicknesses (used as spacers).
2. Core Slicing Parameter Settings
To withstand string tensions of roughly 40–80 kg, slicing parameters must be optimized for strength:
- Wall Thickness (Perimeters/Walls): This is the most critical parameter. For the guitar body shell, we recommend setting the wall thickness to 6 layers or more. Compared to infill percentage, increasing wall thickness provides a more significant boost to flexural rigidity.
- Infill:
- Total infill percentage: 40%–50%. (I actually used a higher infill rate to balance weight.)
- Infill pattern: We recommend using either a Gyroid or Honeycomb structure.
- Local Reinforcement: Around the neck pocket and the bridge mounting holes, be sure to use modifiers to set the infill to 100%, creating solid, dense areas that prevent screw holes from collapsing under sustained stress.
- Top and Bottom Layers: Use at least 5 layers to ensure surface smoothness and enhance adhesion.
3. Manufacturing and Assembly Considerations
1. Body Joining and Creep Prevention
- Surface Preparation: Both ABS and PETG have smooth surfaces, which offer poor adhesion when bonded directly with glue. Before applying 302AB adhesive, roughen both mating surfaces with coarse sandpaper (200 grit) and thoroughly remove any dust particles.
- Pressurized Curing: After applying the adhesive, securely clamp the joined parts using zip ties or F‑clamps. Key Point: While the adhesive’s instructions typically state a few hours of curing time, for guitar bodies subjected to continuous tensile loads, we recommend allowing 24–48 hours for the chemical reaction to complete fully.
- Anti‑Drip Measures: 302 adhesive has relatively high fluidity—be mindful of protecting the front face during assembly, and promptly wipe away any excess glue before it sets.
2. Neck Installation and Angle Adjustment (Shimming)
- Align the Centerline: Neck installation is the linchpin of success. Ensure the neck’s centerline aligns precisely with the bridge’s centerline; otherwise, high‑fret positions may result in strings drifting off the fingerboard.
- Shimming Adjustments:
- Phenomenon: Due to dimensional shrinkage inherent in 3D printing, after neck installation, string height may end up too high (even with the bridge fully lowered) or too low.
- Adjustment Method: As you mentioned, cut small squares of paper or sandpaper and place them inside the neck pocket—either closer to the body’s inner side or outer side—to subtly alter the neck pitch.
- Principle: Make fine adjustments to the angle. Placing shims closer to the headstock will raise the string height; placing shims closer to the bridge will lower the string height.
3. Electrical Circuitry
- You can refer to the wiring diagram below—this is the wiring method I learned from this article: https://www.bilibili.com/opus/859024073731080197?spm_id_from=333.1387.0.0
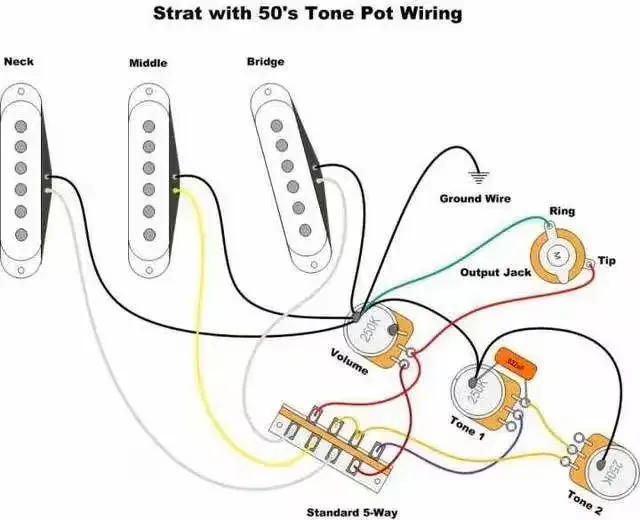
- Building a Faraday Cage: Both wood and plastic are electrically insulating. You must line the interior walls of the circuit recesses—such as the pickup slots and control cavity—with a continuous layer of conductive copper foil, ensuring all copper foil segments are electrically connected to one another.
- Bridge Grounding: This is extremely important. Since FDM materials are insulating, you’ll need to run a dedicated ground wire beneath the bridge’s metal base and connect it to the circuit system’s common ground point—typically the housing of the volume potentiometer. Otherwise, you’ll experience severe hum and noise whenever your hand approaches the strings.
4. String Installation and Stress Testing
- String Installation in Stages: Don’t tighten all strings to their standard pitch in one go.
- First install all strings and gently tension them.
- Observe the body joints for any cracks or signs of creep.
- Once everything checks out, gradually raise the pitch in stages until you reach standard tuning (E–A–D–G–B–E).
I’m not really keen on disassembling the guitar just to capture photos of each step—but if the instrument ever needs repairs or a component needs to be remade, I’ll be sure to document those steps later :(
Bill of materials
- NameQuantityNotes
- 1
Originality of the Model
The author declares that this work is their personally original model
This model is licensed under the following terms:
Credit must be given to the creator
Only noncommercial uses of the work are permitted
Remixes must be shared under the same license
Models(1)
- assem.3mfDesigner

994.80 KB

2026-02-07


