





















Autumn Nest
autumn decor
nature inspired
3d printing
led lamp
switchable magnetic base
magnetic acorn light
leaf tray
acorn lamp
fall decoration
decorative tray
seasonal lighting

 0.16mm layer, 2 walls, 15% infill

1-disc
PLA
Designer 0.16mm layer, 4 walls, 15% infill
1-disc
PLA
Designer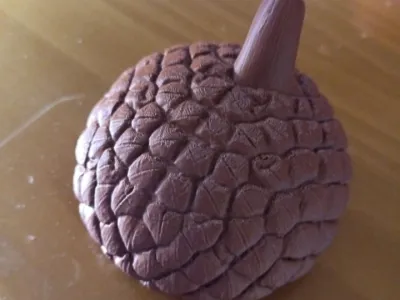 0.16mm layer, 3 walls, 0% infill
1-disc
PLA
Designer

54

0
Autumn Nest – Magnetic Acorn Light & Leaf Tray
A Little Piece of Autumn, Brought to Life
Imagine coming home on a cool autumn evening and finding a softly glowing acorn resting on a beautifully detailed fallen leaf.
Autumn Nest combines nature-inspired design, decorative lighting, and a touch of magnetic technology to create a unique seasonal home accessory.
The project consists of a large autumn leaf that doubles as a decorative tray and a removable illuminated acorn.
The leaf provides space for small everyday objects such as keys, coins, and jewelry, while the acorn creates a warm and welcoming atmosphere.
But the real magic is hidden inside!
The Magic of Magnetic Activation
Unlike traditional decorative lamps, Autumn Nest uses a hidden magnetic activation system.
Simply place the acorn in its designated holder on the leaf, and the light turns on automatically.
Lift the acorn away, and the light turns off.
There are no visible switches or external power cables required for normal operation.
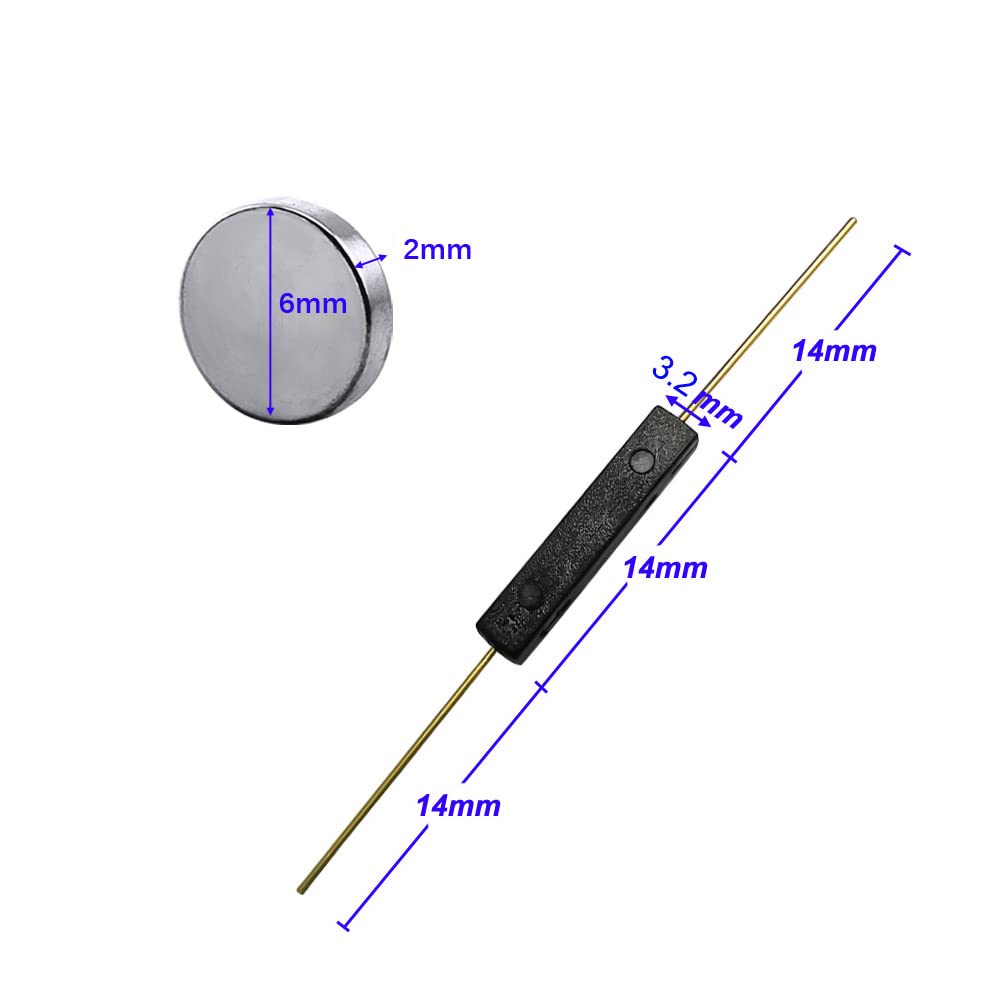
This effect is achieved using a small magnet concealed in the leaf and a magnetic reed switch positioned inside the bottom of the acorn.
The acorn is designed to rest upright in its holder for reliable operation.
Three 3D-Printed Components
1. Autumn Leaf Tray
A large, nature-inspired decorative leaf with detailed raised veins and gently curved edges.
- Brick-red PLA for the main body
- Brown PLA for the veins
- Integrated circular acorn holder
- Hidden recess for a 6 × 2 mm magnet
- Functional surface for small accessories
2. Translucent Acorn Body
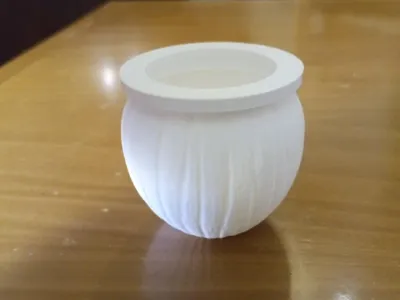
The white acorn body features delicate vertical grooves and a hollow interior that allows the LED light to diffuse through the printed walls.
- White PLA
- Hollow structure
- Designed for soft, diffused illumination
- Internal positioning for the magnetic reed switch
3. Textured Acorn Cap
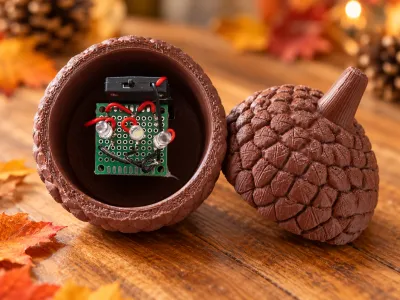
The brown cap features overlapping natural-looking scales and a curved stem.
It also conceals the electronic lighting system.
- Brown PLA
- Integrated 30 × 30 mm PCB mounting area
- Internal battery holder compartment
- Detailed organic surface texture
Electronic Components – Bill of Materials
To build the illuminated version, you will need:
| Component | Quantity |
|---|---|
| White LEDs, 3 mm | 3 |
| 330 Ω resistors | 3 |
| 30 × 30 mm prototype PCB | 1 |
| CR2032 battery holder with ON/OFF switch (2-cell, 6 V) | 1 |
| CR2032 batteries | 2 |
| Magnetic reed switch (normally open) | 1 |
| Neodymium magnet, 6 × 2 mm | 1 |
| Flexible insulated connecting wire | As needed |
| Solder and insulating material | As needed |
| Glue for securing components | As needed |
Basic soldering equipment is required.
How the Lighting Circuit Works
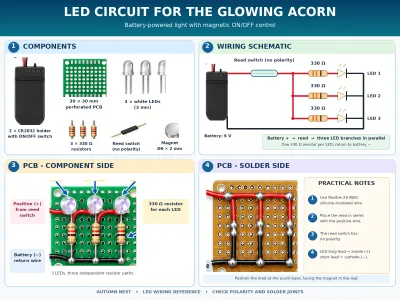
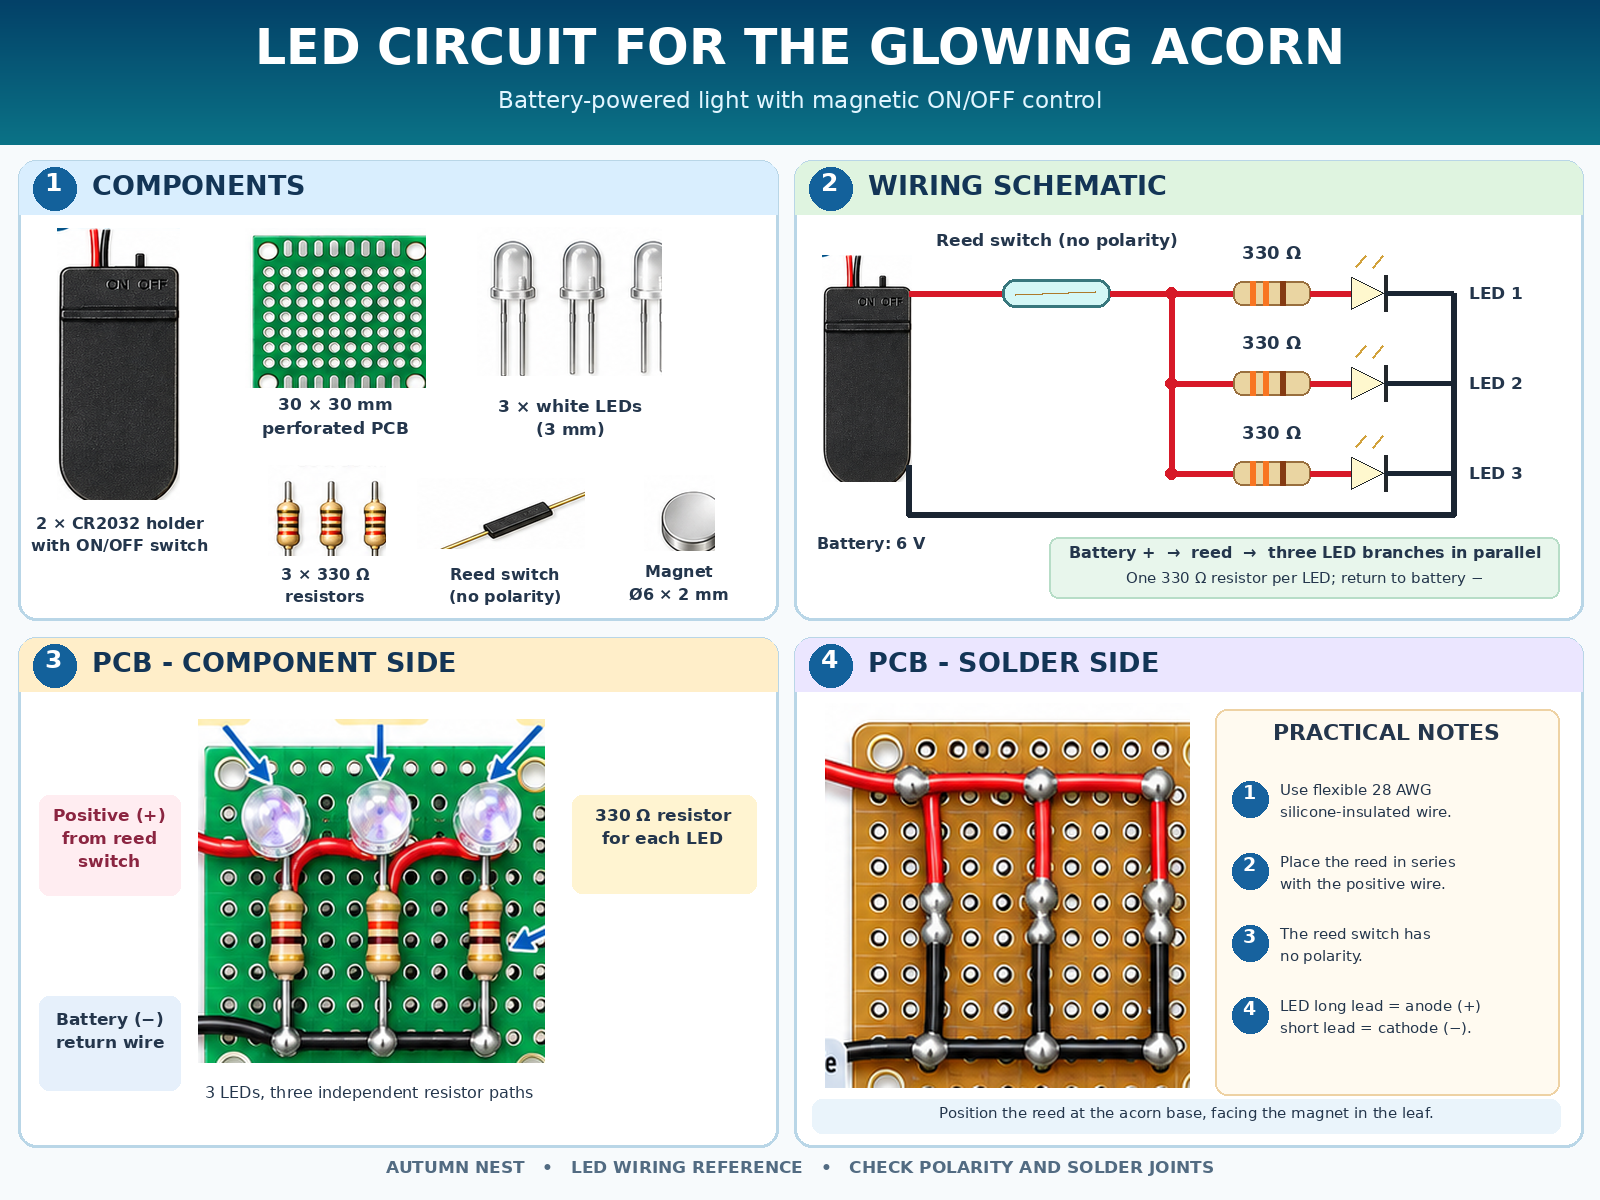
The circuit uses three white LEDs connected in parallel, each with its own 330 Ω current-limiting resistor.
The reed switch is connected in series with the positive battery supply.
Electrical connection:
Battery positive (+) → Reed switch → Three parallel resistor/LED branches → Battery negative (−)
Each LED must have its own resistor.
Observe the correct polarity of the LEDs. The reed switch itself has no electrical polarity.
The battery holder's manual switch should be set to ON for automatic magnetic activation.
Assembly Guide
Step 1 – Prepare the printed components
Print the three parts using the included 3MF profiles.
Remove any necessary supports and clean the mounting surfaces.
Step 2 – Install the magnet
Insert the 6 × 2 mm neodymium magnet into the circular recess in the center of the leaf's acorn holder.
Secure it with a small amount of glue.
Step 3 – Assemble the LED circuit
Install the three white LEDs and their individual 330 Ω resistors on the 30 × 30 mm prototype PCB.
Connect the components according to the supplied wiring diagram.
Before installation, test the circuit and confirm that all three LEDs work correctly.
Step 4 – Install the electronics
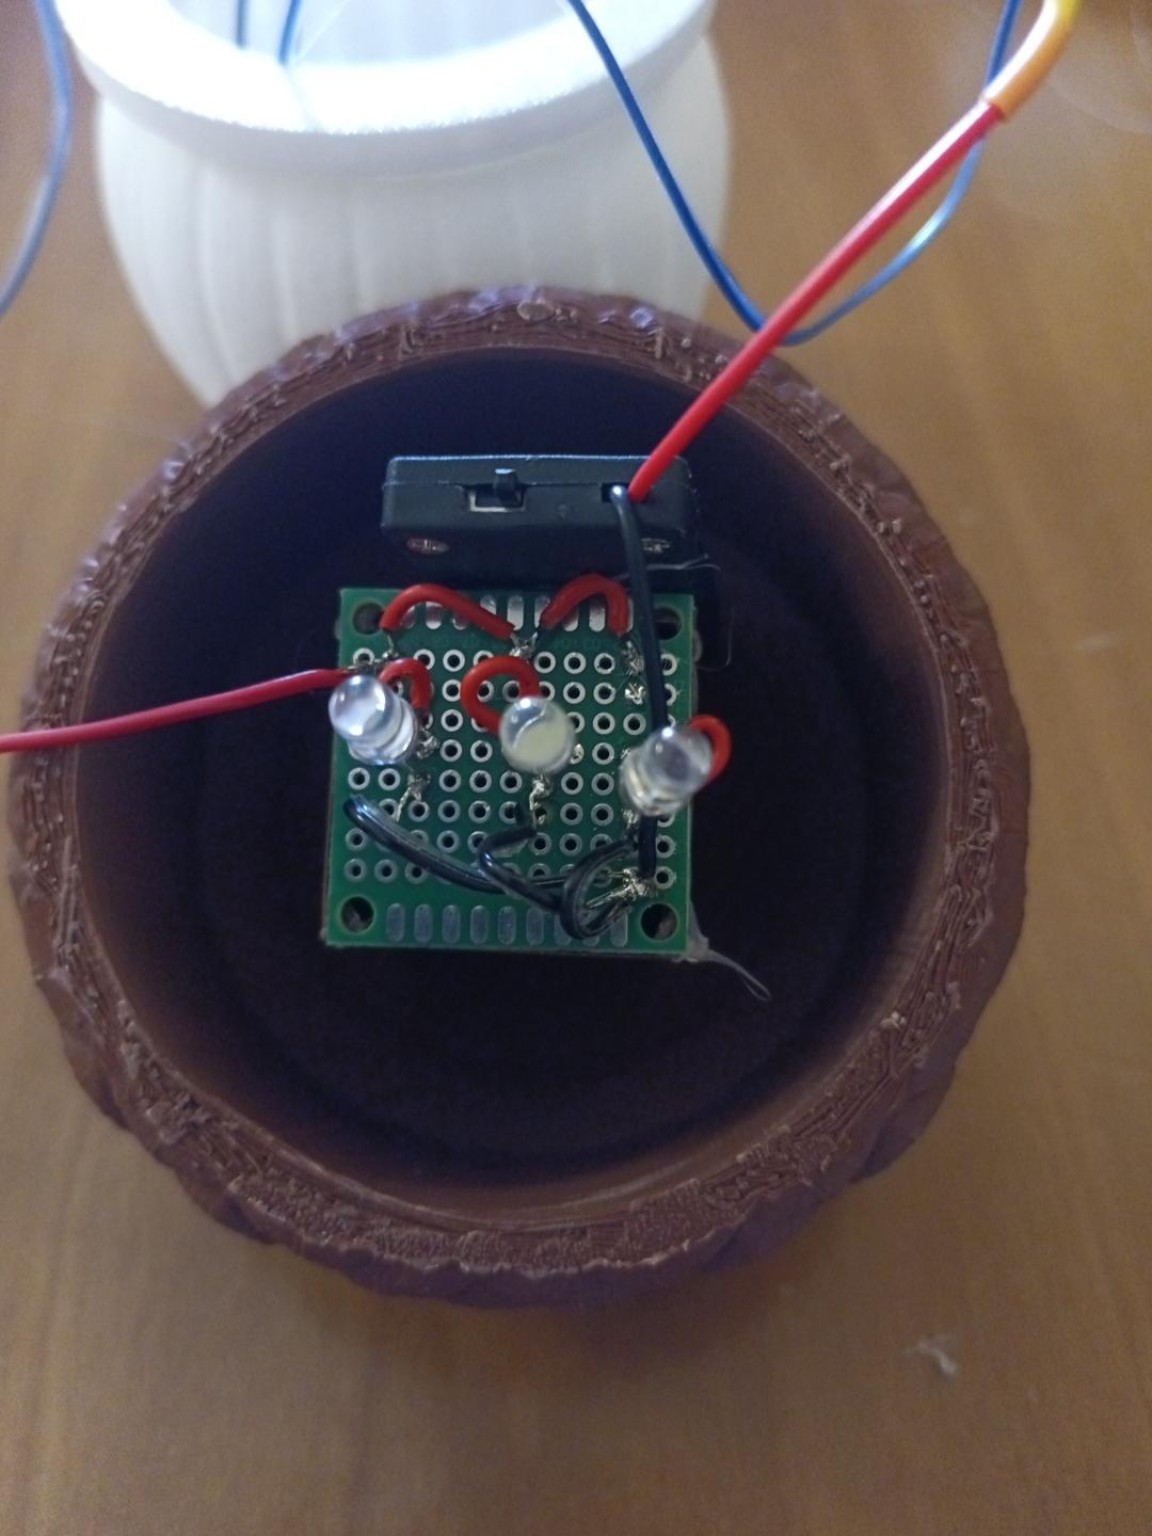
Place the assembled LED PCB inside the dedicated mounting area in the brown acorn cap, with the LEDs facing toward the white acorn body.
Position the battery holder inside its internal compartment and connect it to the LED circuit.
Ensure that the wiring is insulated and does not interfere with assembly.
Step 5 – Position the reed switch
Use sufficiently long flexible wires to position the reed switch near the inside bottom of the white acorn body.
Secure the switch with a small amount of glue.
Test its position with the magnet in the leaf before permanently closing the acorn.
Step 6 – Complete the acorn
Fit the brown cap onto the white acorn body and secure the parts once the electronics have been tested.
Ensure the LEDs illuminate the hollow body evenly.
Step 7 – Enjoy the magnetic lighting effect!
Place the finished acorn upright into the circular holder on the autumn leaf.
The magnet activates the reed switch, illuminating the acorn.
Remove the acorn to turn the light off.

3D Printing Information
The project includes three dedicated 3MF print profiles, prepared for the ELEGOO Centauri Carbon 2 Combo with a 0.4 mm nozzle.
| Component | Layer height | Walls | Infill |
|---|---|---|---|
| Acorn Cap | 0.16 mm | 3 | 0% |
| Autumn Leaf Tray | 0.16 mm | 4 | 15% |
| Acorn Body | 0.16 mm | 2 | 15% |
The leaf uses selective tree supports for critical overhangs, helping reduce unnecessary material waste.
Use the included print profiles for the configured orientation, material assignments, and support settings.
The white acorn body is designed to diffuse the internal LED light. Lighting intensity may vary depending on the PLA material used.
All three main components have been physically test-printed.
Why Autumn Nest?
Autumn Nest was created to combine three ideas:
- Nature: Organic shapes, an autumn leaf, and a realistically textured acorn.
- Functionality: A practical decorative tray with integrated lighting.
- Interaction: A hidden magnetic system that activates the lamp when the acorn is placed in its holder.
It is designed to bring a small moment of surprise and a cozy autumn atmosphere to any room.
A leaf to hold your little treasures. An acorn to light up your autumn.
Designed and assembled for the Nexprint Autumn Nest 2026 contest.
Bill of materials
- NameQuantityNotes
- 1White LED 3 mm3White LEDs for the acorn illumination
- 2330 Ohm Resistor3One resistor for each LED
- 3Prototype PCB 30 × 30 mm1Perforated circuit board
- 4CR2032 Battery Holder12 × CR2032 holder with ON/OFF switch
- 5CR2032 Battery23 V lithium coin cells
- 6Magnetic Reed Switch1Normally open (NO), magnetic activation
- 7Neodymium Magnet 6 × 2 mm1Installed in the leaf tray
- 8Flexible Electrical Wire1Insulated wire, preferably 28 AWG
- 9Solder1For electronic connections
- 10Glue1For securing the magnet, reed switch, Battery Holder and PCB
Originality of the Model
The author declares that this work is their personally original model
This model is licensed under the following terms:
This work is licensed under a Standard Digital File License. Digital files have a strict non-commercial, personal use only license.
You shall not share, sub-license, sell, rent, host, transfer, or distribute in any way the digital file or 3D printed versions of this object, nor any other derivative work of this object in its digital or physical format (including remixes of this object). You can not host these files on other digital platforms, web stores or cloud repositories. The objects may not be used in any way whatsoever in which you charge money, collect fees.
Models(3)
- Autumn_Nest_Acorn_Cap.3mfDesigner

19.04 MB

2026-10-15
- Autumn_Nest_Leaf_Tray.3mfDesigner
6.43 MB
2026-10-15
- Autumn_Nest_Acorn_Body.3mfDesigner
8.09 MB
2026-10-15
View all(3)
Attachments(1)
pdf
Autumn_Nest_Assembly_Guide_English.pdf
995.41 KB
2026-10-15


