


charging station
mean well
power delivery
diy electronics
fast charging

- 0.1mm layer, 4 walls, 45% infill

4-disc
PLA
Designer - 0.1mm layer, 4 walls, 45% infill
4-disc
PLA
Designer

33

3
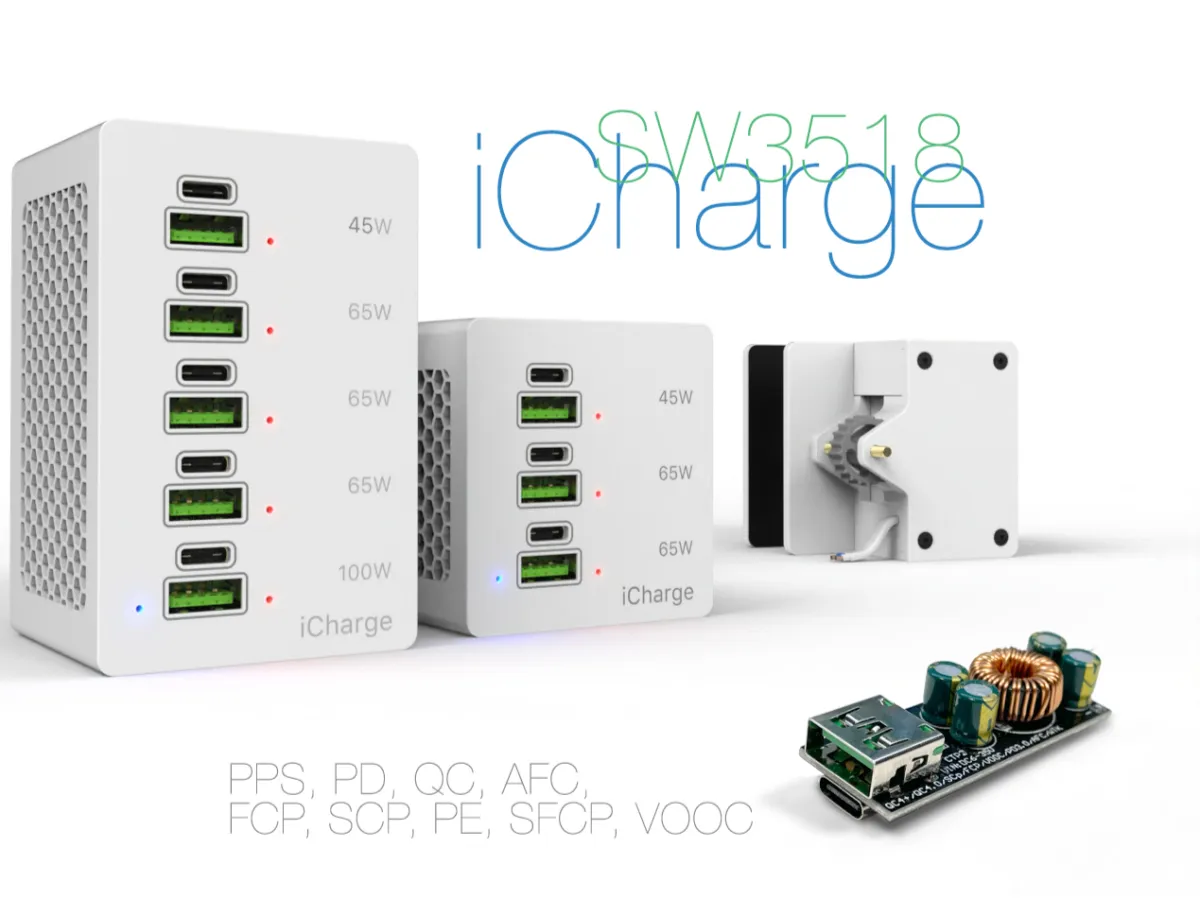
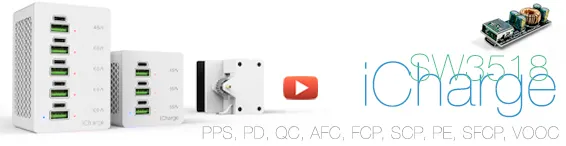
iCharge — a powerful modular charging block
Why build it?
A few years ago, I bought the SW3518 module. It caught my attention as a buck converter supporting a wide range of charging protocols. It was stable, reliable, and most importantly — affordable. Even now, it remains popular, with plenty of positive reviews. I’d recommend it myself — especially the S version rated at 65 watts. If you want more power, go for the P version, which delivers up to 100 watts. But keep in mind: any of these will get hot under full load. That’s why it makes sense to run them at no more than 70% of their rated output — a fair rule for most charging modules with high-frequency MOSFETs inside.
Concept and execution
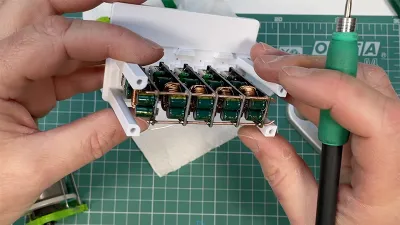
Over time, I decided not just to use the module, but to build my own charging station based on the SW3518. The idea was simple: each module is independent, all wired to a common power rail. This adds reliability — if one fails (hasn’t happened in years), just pull it and drop in a new one.
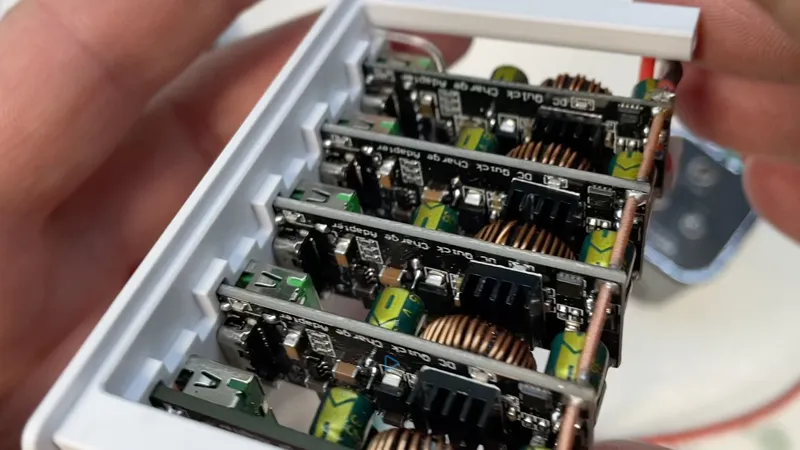


Originally, I planned to use three modules, but that quickly seemed insufficient. I ended up with five. The result? 10 ports total — half Type-A, half Type-C. Type-C handles Power Delivery and other fast-charging protocols.
Technical nuance
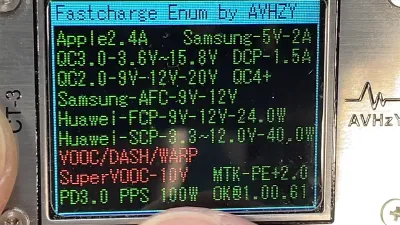
In all SW3518 modules, whether S or P, both ports are controlled by the same internal chip. That means only one port can deliver PD or other fast-charging protocols at a time. As soon as two devices are connected, the controller drops both ports to standard 5V output, disabling PD and QC. The main difference between the S and P versions is power capacity (65W vs 100W) and current rating — not protocol logic. Simultaneous PD on both ports just isn’t supported.
Power considerations
My current setup houses five modules. You could scale it up to 10 or even 20, creating a serious power hub — provided you have the right PSU. But in practice, even a 200W unit from Mean Well handles it without issue. Why? Because full simultaneous load on all ports is rare. Devices take turns, draw less current as they charge, and some ports sit idle.
Cooling and mounting
One notable drawback of the SW3518 is the lack of proper cooling. I recommend at least adding a small heatsink to the controller. The inductor also gets warm — a larger one would’ve been better, but they cut corners, as usual. Still, at 70% load, it levels out around 55 °C, which passive cooling can manage.
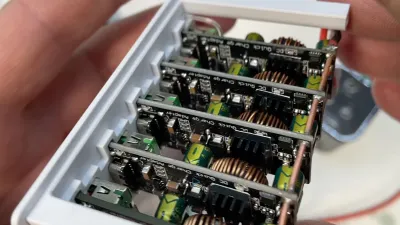
Another issue — no mounting holes. It’s just a bare board. I spent time finding a clean solution: exact dimensions are modeled in 3D. The modules slide into the front panel like plugs, and a rear clamping plate locks them in place. I connected everything with a 1.2 mm copper bus bar, which added both conductivity and rigidity.
Indicators and layout
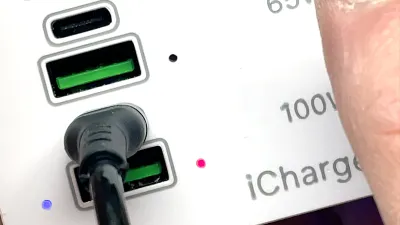
Light guides are made from standard 1.2 mm fishing line. One blue LED serves as a shared indicator — I removed the rest. Red LEDs light up when fast charging kicks in. If a device requests PD or QC, a red light shows above the active port. Clear and informative.

The housing is shaped like a clamp. It mounts to a desk or stand, doesn’t take up space, and stays put. For grip, I used 0.5 mm self-adhesive silicone, which holds great and is easy to find.
Printing and customization
The enclosure is printed in PLA+ by eSUN, in Cold White and Silver. The STL file includes unpainted labels on the front panel — split the objects manually in your slicer and assign colors. The 3MF version is already prepped for dual-color printing.
You can edit labels in modern slicers like Bambu Studio, OrcaSlicer, or PrusaSlicer. Just don’t overwrite mine — place your own over them with the values or titles you prefer. It’s a manual edit — not automatic. I called my version iCharge. The name’s overused, sure, but I like it and it works.
Assembly video
The entire build process is shown in the video. Nothing was cut — only the repetitive steps were sped up. Key steps are shown in full or slowed down. If you've seen my earlier videos, you'll recognize many of the steps. This one continues in the same spirit.
iCharge isn’t just a custom build — it’s a practical response to the flaws of commercial charging stations: powerful, repairable, and scalable.
See the video for details:
If you liked this thing - let me know by putting like!
Parts links below:
- DC-DC Step Down Module SW3518P
- DC-DC Step Down Module SW3518S
- ESUN Filament PLA
- Flexible Silicone Wire 10-26 AWG
- Self-Adhesive Magnetic Sheets Rubber
- Inserts Nut 2.5
- Insert Knurled Nuts M3
- Screws Flat Head M2.5 - M6
- Threaded Rod Brass M3
- Crystal Fishing Wire
- Neodymium Magnet Round Cup D20
- Mean Well RSP-200
- MEAN WELL RSP-100
- Mean Well LRS
Links to used tools:
My favorites:
Thank you for every tip or donation,
it means great recognition for me and helps a lot to keep going!
![]()
BTC:bc1qplpzq36ghw84hty4nn2zzu4ps4sdh4th0v93j8
ETH:0xc766ebbeAa76aaf629788c8F99C33A8d80d48977

Originality of the Model
The author declares that this work is their personally original model
This model is licensed under the following terms:
Credit must be given to the creator
Models(11)
 Grid Case 5 Modules.STLDesigner
866.49 KB

2025-06-18
 Wheel 3 Modules.STLDesigner
6.53 MB
2025-06-18
 Back Panel 5 Modules.STLDesigner
4.20 MB
2025-06-18
 Clamp 5 Modules.STLDesigner
3.19 MB
2025-06-18
 Assembly Front-Panel 5 Modules.STLDesigner
3.56 MB
2025-06-18
- iCharge 5 Modules.3mfDesigner
4.33 MB
2025-06-18
 Assembly Front-Panel 3 Modules.STLDesigner
2.36 MB
2025-06-18
 Clamp 3 Modules.STLDesigner
2.38 MB
2025-06-18
 Back Panel 3 Modules.STLDesigner
2.60 MB
2025-06-18
 Grid Case 3 Modules.STLDesigner
933.19 KB
2025-06-18
- iCharge 3 Modules.3mfDesigner
3.61 MB
2025-06-18
View all(11)